My first: Animation
Introduction
In this guide we're assuming that you're reusing an existing character and rig or an existing interactive item.
We're also assuming you've imported resources before in the editor.
We'll also mention the provided export tools throughout the guide.
We'll also refer to visual resources, animation sets and resources, the Side Bar and Root Templates.
| For more information on: |
| How to import a resource: My_first:_Item |
| How to create a character: My_first:_Character |
| How to create an interactive ttem: My_first:_Item_-_Interactable_animated_items |
| How the export tools function: Modding:_Maya_Exporter |
| An Animation Resource: Animation_resource_panel |
| An Animation Set: Animation_set_resource_panel |
| Visual Resources: Visual_resource_panel |
| Root Templates: My_first:_Root_template |
| The Sidebar: Sidebar |
In this guide we'll explain:
- How your maya files should be structured down to the folder structure.
- How to define animation data for the exporter.
- How to export the resources
- What type of editor resources you'll be importing for animations.
- How to use an animations set.
- How to use a default animation set.
- Example for a Door, Lever and Container
- Example for a Run, Attack, Hit and Skill
Included in this guide are a couple of example files:
insert Door example here
insert Container example here
insert Bear animation example here
My First animation
How do I structure my maya resources?
When creating animations we make use of maya's ability to reference scenes.
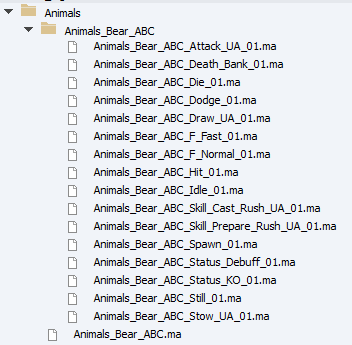
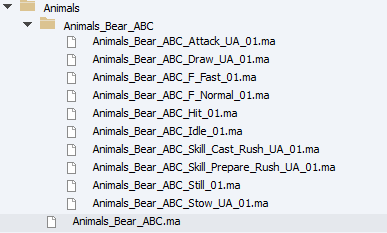
We'll have a base file with the mesh and it's rig (Animals_Bear_ABC.ma) and a sister animation folder of the same name (Animals_Bear_ABC) containing the animation files.
Each animation file has only one animation or animation sequence and has a file reference to the base file. (More on sequences later)
A file containing the rig that gets referenced we name the base file
A file referencing the base file we name the animation file
Referencing in my animation file
When starting from a new animation file we'll want to reference the base file which contains the rig. The caveat for this is the MLE doesn't support namespaces in rigs.
In your new file: Top Menu -> File -> Create Reference -> Options Square
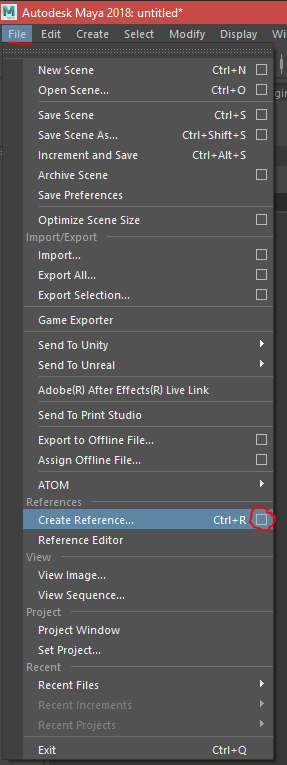
In the options window look for Namespace Options
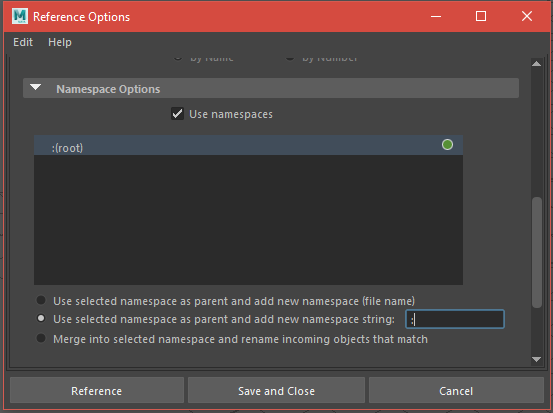
Select Use selected namespace as parent and add new namespace string and fill in a colon : in the textbox
Click reference and browse to your base file, select it and click reference. The base file contents should now appear in your scene
Save your animation file in the animation folder and name it: <item/characterName>_<AnimationSlotName>.
An animation slot name either refers to the name the animation will get in the engine when assigning it to a character it's Animation Waterfall or it's Visual Default Animations
| For more information on: |
| An Animation Set: Animation_set_resource_panel |
| Visual Default Animations: Visual_resource_panel |
Confirming the structure
To make sure that your file structure is correct open the base file.
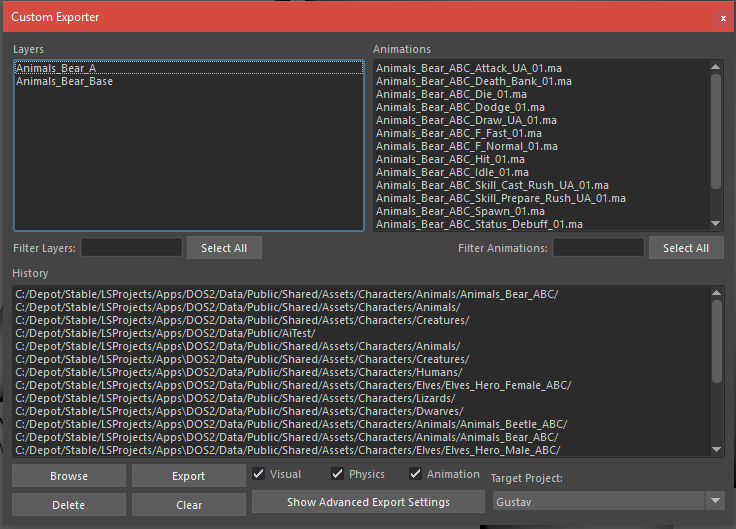
Run the MLE script and check the animations checkbox.
If you did everything correctly the Animations List should show you animations in the Animation Folder
Alternatively open an animation file.
Run the MLE script.
The Animation list should immediately be visible. A warning about missing Animation Manager Data is normal.
If neither of these cases check out make sure:
- The animation folder has the same name as your base file.
- The animation folder should be in the same folder as the base file.
Exporting the animation
With the current set up you can already export animations once they are made. Simply launch the MLE in the base file, check the animation checkbox select the relevant files and export.
From an animation file you can launch the MLE and press export right away.
By default the MLE will use the last saved timeline of an animation file to export the animation with.
However, it is possible to have multiple animations come out of a single file. It's also possible to make sure the same animation length is exported regardless of the current timeline.
For this purpose we use Animation Data.
Creating Animation Data for the exporter
To define Animation Data we use the animation manager script. This script writes data to the root of a rig as: name:AnimationName start:StartTime end:EndTime
This is also how the MLE will show the entries when in the animation file.
The animation manager supports multiple entries allowing us to define an animation sequence. A sequence is usually an animation that will concist of a start, loop and end segement.
The goal is to allow an animator to more easily set up animations that need to follow eachother up in game.
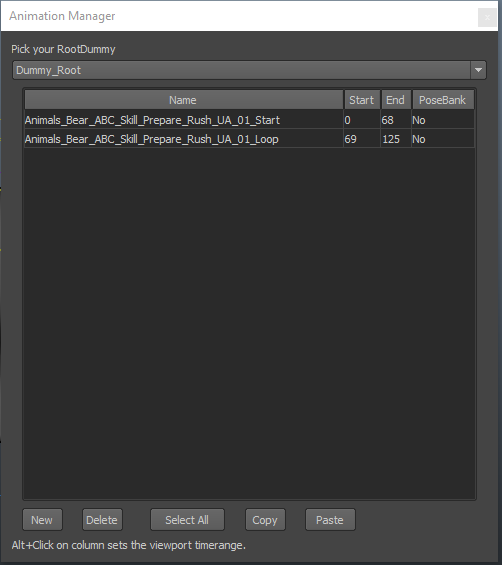
Example animation data for the knockdown animation of the bear.
When exporting from the base file the MLE will automatically export all the entries in the Animation Data as seperate animation files.
If you export a file containing the same Animation Data as the example image above you get the following files as a result:

| For more information on: |
| The Animation Manager: Modding:_Maya_Exporter |
Editor Resources
Once we've exported our resources it's time to import them into the editor.
Launch The Divinity Engine 2 and load in a mod and level. Open the content browser, select or create a correct package and add a resource.
Our animation files are in the same format as a model file (.lsm), but when importing in the editor we will be importing an Animation Resource.
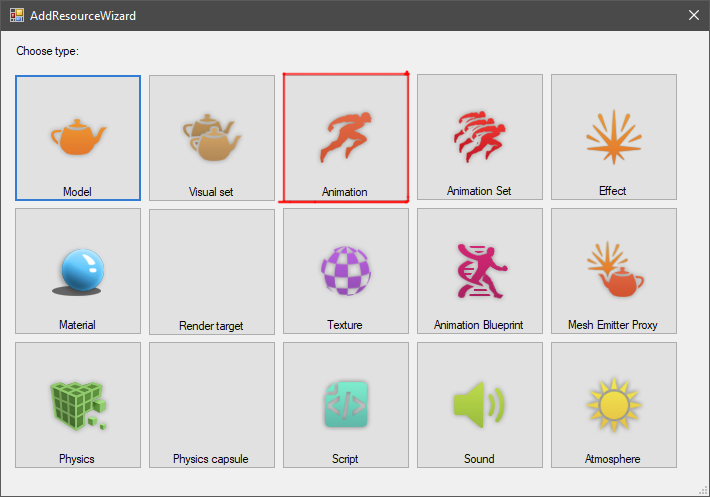
If your animations are going to be shared across multiple character models with a similar rig then it's best to also create an Animation Set resource.
Again select or create a correct package and add a resource. This time create an Animation Set.<br\>
Animation Resource
An animation resource when just made will just contain the animation data. However, to have it interact with other game systems you can also add Text Keys to the Animation Resource
When you want the creature to use the existing sounds you'll have to add multiple text keys. If you want the player to be able to use weapons you'll need to tell the engine to switch it's weapon state from sheated to unsheated.
If certain animations need certain effects to play in conjunction a text key will help you do the job.
Read up on the animation resource in the technical documentation to get a fully in depth look into how these resources can be expanded with extra functions.
In this guide we'll cover a few basic cases and their require text keys.
Animation Set
To more easily share your animations across multiple models with the same rig you can plug your animations into an Animation Set resource.
As a rule for characters it's prefered to work with animation resources. You can also plug in multiple animation sets into a single visual.
| For more information on: |
| How to import a resource: My_first:_Item |
| An Animation Resource: Animation_resource_panel |
| An Animation Set: Animation_set_resource_panel |
My First Item Animation
My First Door
A door is one of the simpler animatable objects you can make. In our example we'll have 2 different types of doors: A single and double door.
We'll have 3 files: A base file with both doors rigged and two animation files; one for each of the doors.

In the base maya file we have the two doors rigged and sorted into two separate layers.
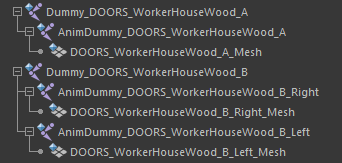
Note that in this case the mesh is part of the rig hierarchy and is parented to an animation joint.
Currently the animation manager only writes data to joints. So please use joints when creating animated items.
Each animation file references the base file and has an animation on a different door.
In each file the Animation Manager data is on the root of the door that is animated in the file
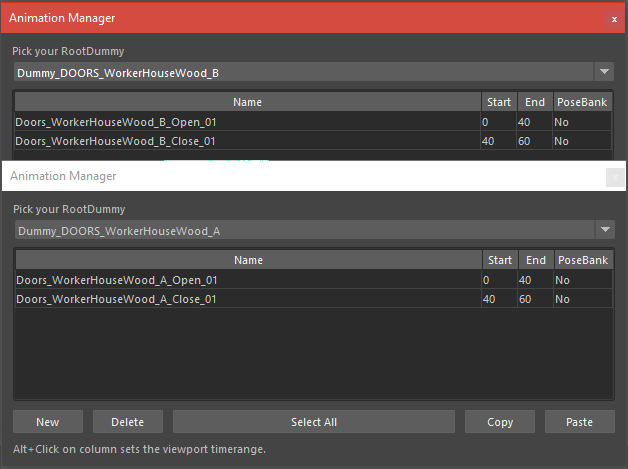
In this case we could also merge both animation files. Technically the animation of one door does not get in the way of the other door.
From the base file with this set up you can export all the relevant data with the MLE script.
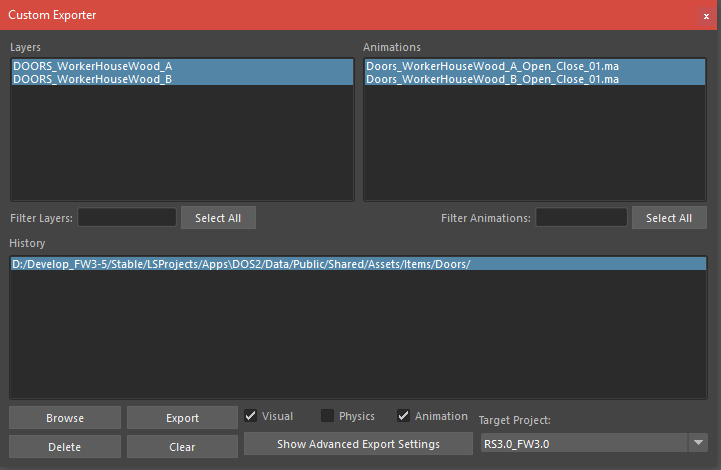
Once you're done exporting open The Divinity Engine 2, load a mod and level, open the content browser and select or make a correct package.
Add resource and import an animation for all 4 exported door animations. Import the models as models and the physics as physics.

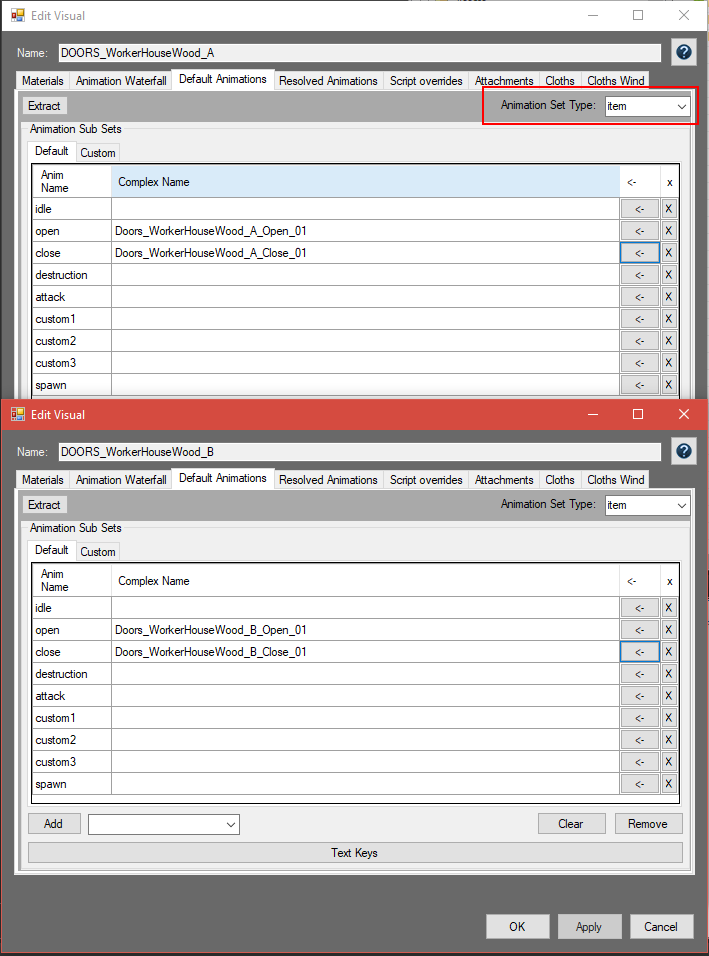
Before we make a Root Template for the object we need to assign the doors with animation. Open the visual resource and go to the default animations tab.
Change the Animation Set Type to Item. This should give you a default set of animations slots appropriate for an item.
Add the open door animation to the Open slot in the Default Animations Tab. Add the close door animation to the Close slot in the Default animations Tab.
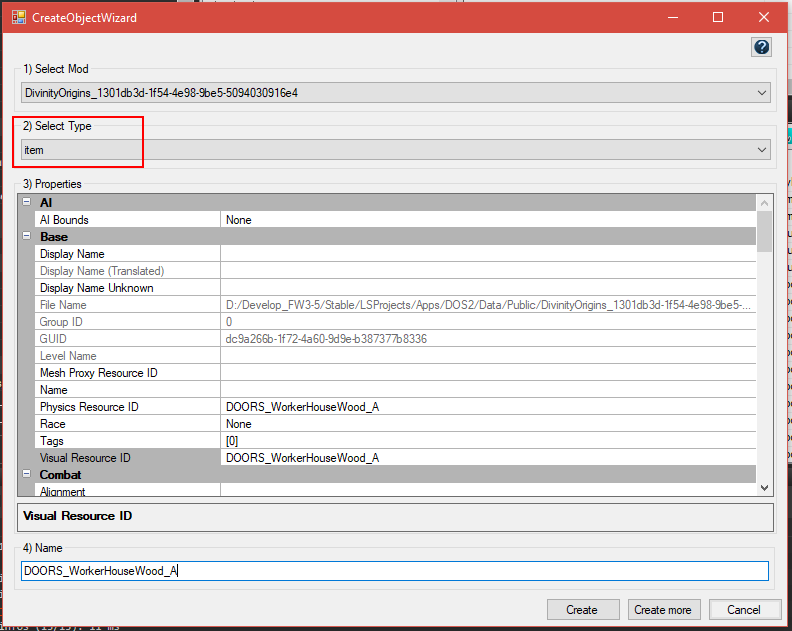
Now we can make a root template so we can preview the animation in the editor. Create a new root template and assign the model and the physics to their appropriate slots.
Create the root template and place these in an appropriate folder.
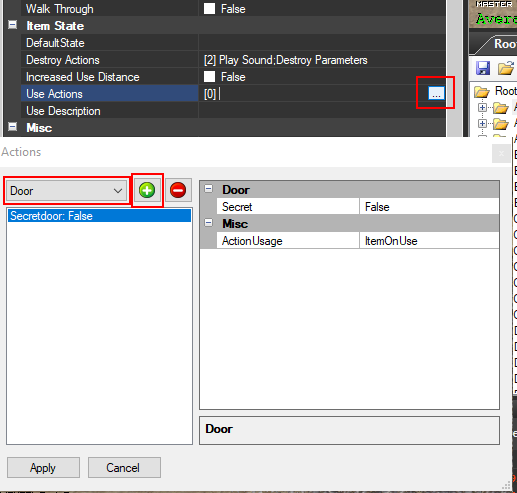
Once the root template is made open the side bar and use action Door. Place the root template in game go into game mode and try out your new animated door.
My First Container
My First Character Animation
For all the following examples we'll use one character: A Bear.
In the example is included:
- A combat set: draw, hit, hit UA (combat hit), attack, stow
- An idle set: idle, Still
- A skill set: rush prepare, rush cast
- A movement set: walk (f_normal), run (f_fast)
We'll also use an Animation Set Resource set up for a character.
I hope by now you are familiar with how to assign animation data and how to export and import the animations.
We'll start right away with data already present in the engine.

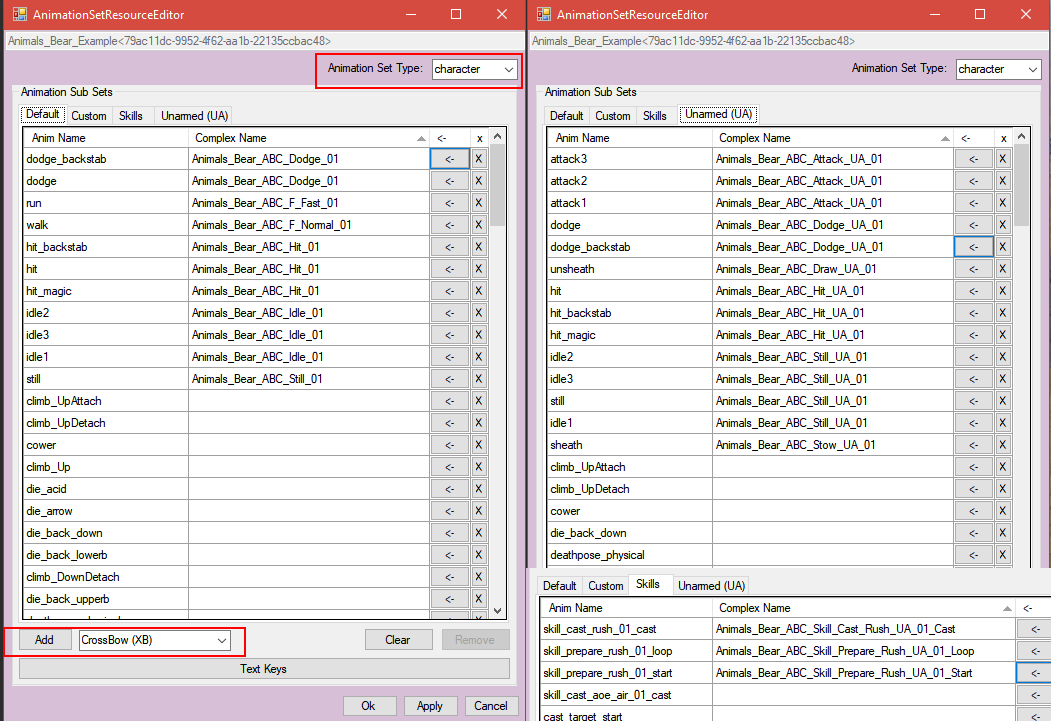
Add an animation set resource and open it. Assign the character animation set type and add an unarmed subset.
Assign the animations to the following slots:
- Default Animation Subset
- dodge slot: dodge_01
- dodge_backstab slot: dodge_01
- run slot : F_Fast_01
- walk slot : F_Normal_01
- hit slot: Hit_01
- hit_backstab slot: Hit_01
- hit_magic slot: Hit_01
- idle1,2,3 slots: Idle_01
- still slot: Still 01
- Unarmed(UA) Animation Subset:
- attack 1,2,3 slots: Attack_UA_01
- dodge slot: dodge_UA_01
- dodge_backstab slot: dodge_UA_01
- hit slot: Hit_UA_01
- hit_backstab slot: Hit_UA_01
- hit_magic slot: Hit_UA_01
- idle 1,2,3 slots: Still_UA_01
- still slot: Still_UA_01
- unsheat slot: Draw_UA_01
- sheat slot: Stow_UA_01
- Skills Animation Subset:
- skill_cast_rush_01_cast: Cast_Rush_UA_01_Cast
- skill_prepare_rush_01_start: Prepare_Rush_UA_01_Start
- skill_prepare_rush_01_loop: Prepare_Rush_UA_01_Loop
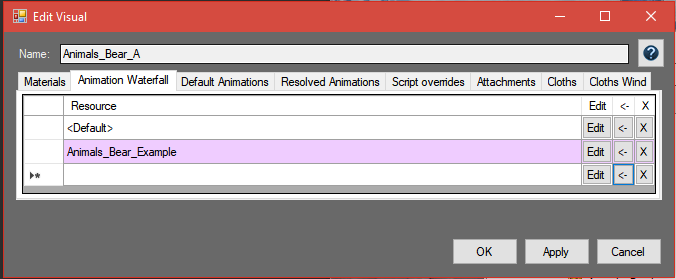
Once all the slots are filled in open the bear model resource and assign the animation set we just made to the first slot in the bear it's Animation Waterfall.
Assign the animation to the empty slot in the animation waterfall and apply the changes
My First Idle Animations
The idle animations are the easiest animations to implement. You have one still slot per state group. i.e. one for out of combat and one for each weapon type the character can use.
Per state group there are multiple idle slots. The engine automatically cycles through idle and still slots if a character is doing nothing.
The still is the default state so it needs to be looping
You won't need to add any text keys either unless your creature breathes fire while idelling, then you'll need an effect text key.
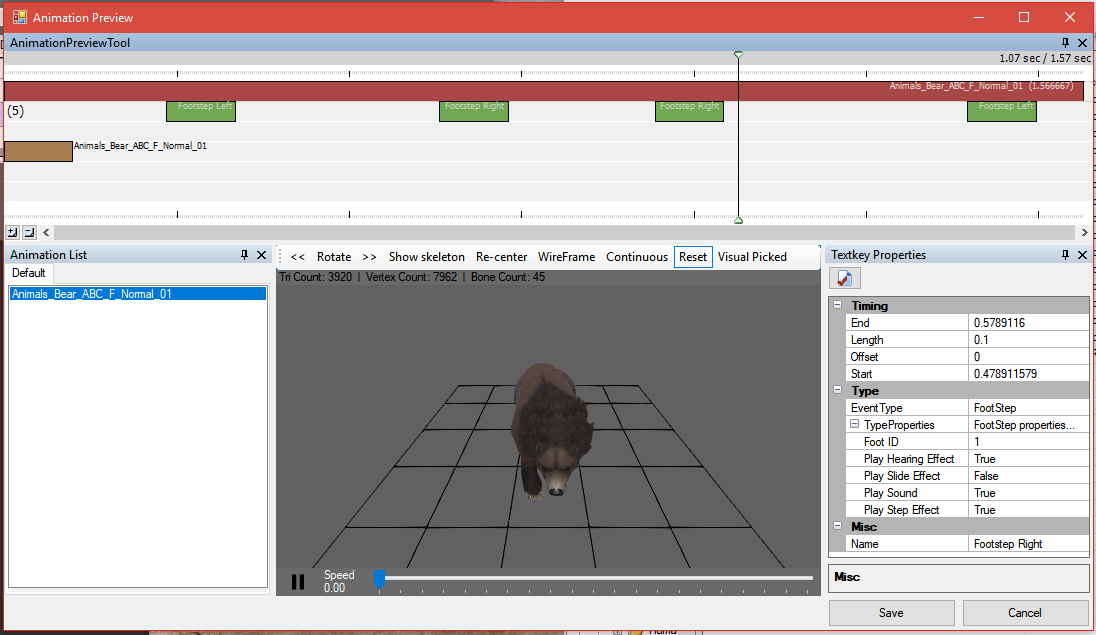
If you're character tramples in place you'll need to add a footstep text key
My First Run/Walk Animations
The run walk animations are still fairly easy to implement but require a bit more effort to have it interact with the sounds in the game. When a character runs or walks we want to hear their footsteps.
To do this open the animation resource or the animaiton set and then click the Text Keys button.
My First Combat Animations
The combat animations are a bit more complex:
- When a draw or stow animation plays we need to signal to the engine that the character is drawing it's weapon (even when it is unarmed).
- When a character gets hit we want the combat grunts to play.
- When a character attacks we want to signal to the engine when a hit would connect.


My First Skill Animation
Skill animations have a rather specific structure due to Divinity: Original Sin 2 being a turn based game.
This means that when a player is trying to decide where to use a skill the character already starts preparing the skill. Much like a still a skill prepare needs to loop.
Additionally skill animations interact with the skill data. Once a character gets certain animations assigned it can execute skills that relly on those animations being present.
Skills do relly on a few signals coming from the animations. The most common signal being cast.
When making animations for skills it's a good idea to look how the text keys are set on the an existing player character's their equivalent skill animations.

But I want to have a humanoid player character!!!
For player characters all the same principles apply. The main difference is that they need to support every weapon set type rather than just a few.
The basics remain the same. Every set will need an idle, move and attack set and skills depends on the animations the skill requires.
Animations called via scripts can have their own unique slot names. The slot name determines the name for the script to play the animation.
