My first: Item - Interactable animated items
Interactable animated items are more complicated assets. These are usually used for doors, levers, buttons and any other object that needs to be interacted with. These assets exist out of 3D mesh(es), physics mesh and animations.
This guide will explain how we export these assets from 3DS Max and import them in the editor.
This article is part of a collection of guides, with a page for every type of item.
| General |
| Scenery (Rocks, plants, trees, shelves, etc.) |
| Lootable items (Shells, plates, food, gems, etc.) |
| Interactable animated items (Levers, doors, etc.) |
| Interactable socket items (Chairs, beds, etc.) |
| Weapons (The sharp stuff) |
Setup
Bones
You can use either dummies or actual bones in 3DS Max to animate visuals.
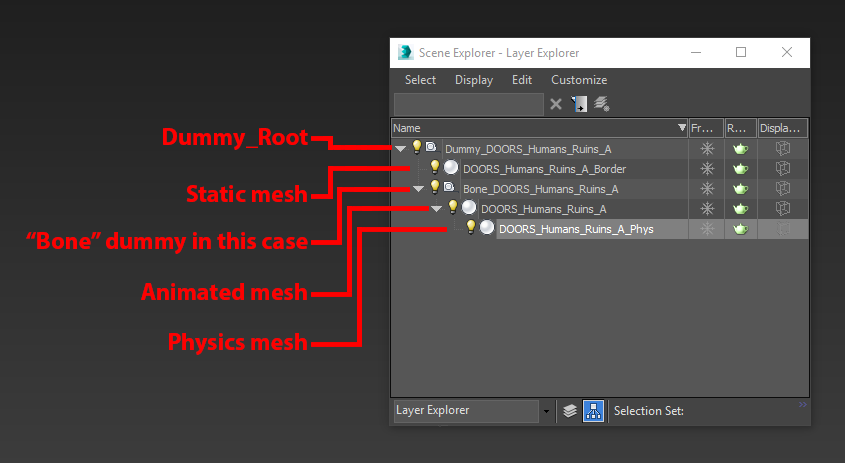
Make sure however that these bones are linked to a dummy which should be named either Dummy_Root or Dummy_<LayerName>.
If you are using a single bone for one mesh make sure to select that mesh and click the MakeAnim button.
This can also be done by hand by selecting the mesh, right clicking on it, select Object Properties, go to User Defined tab and type Rigid = true.
This does not need to be done when you are using multiple bones in the skinning.
Note:Any mesh that needs no animation (example: a door trim) does not need to be linked to a bone or be skinned. It does require it to be linked to the Dummy_Root.
Skinning
Most of these objects are simple animations and only require one bone.
In this case you could link your mesh to a Dummy_bone.
If you want to use multiple bones:
- Select the mesh you want to be animated
- Open the modifier list
- Select skin.
- Add the bone(s) you want to use.
- Apply weight paint if needed.
Layer
The name of your layer will be the name of your visual, so pick something logical. Inside this layer you could/should only have the following:
- Your mesh(es)
- Named <LayerName> or with multiple meshes <LayerName_(any addition that seems fit)>
- Your physics mesh (if needed)
- Named <LayerName>_phys
- A root dummy
- Named Dummy_<LayerName>
Try to always follow the Larian naming conventions.
Physics
Create your physics mesh and name it properly. Now you will need to link your physics mesh to your animated mesh. We do this by using a proxy so the physics mesh can be animated.
First use the 3DS Max link tool to link your physics mesh to your 3D Mesh. Once you have done this right click on your animated mesh, select Object Properties, go to User Defined tab and insert the following lines:
Rigid = true
LarianPhysics_Type = proxy
Proxy_Geometry = <LayerName>_phys
Now:
- Right click on your physics mesh
- Select Object Properties
- Go to User Defined tab
- Insert the following lines:
LarianPhysics_Type = rigid_body
LarianPhysics_RigidBody_Type = static
LarianPhysics_RigidBody_Mass = 0.0
LarianPhysics_RigidBody_Friction = 1.0
LarianPhysics_RigidBody_Restitution = 0.0
LarianPhysics_Shape_Type = convex
LarianPhysics_Shape_Flags = 0
An example of a properly setup file:

Exporting
Animation Manager
After you have created and tested your animation you’ll need add your animation to the animation manager.
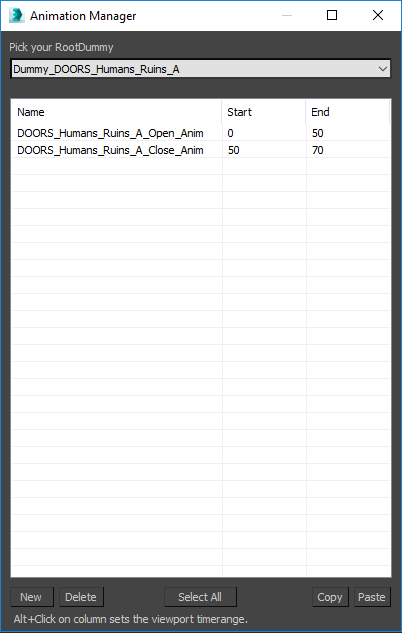
In the animation manager you can add multiple animations by first selecting the Dummy_Root at the top.
Now you can create a new layer by clicking “new” in the bottom left corner.
You will need to enter a name, the begin and end frame number of your animation. Each separate animation needs it own layer.
The name of you animation layer needs to be <LayerName>_<AnimationName>_Anim
Example:

Exporting
Exporting the visual is straight forward. Make sure your mesh and physics mesh are in the same layer. Make sure everything is linked to the Dummy_Root.
You do not have to export anything other then the visuals and physics.
After exporting the visuals you will need to export the animation. Start of by saving the 3DS max file again in a separate folder located in the same folder.
This folder needs to be named <LayerName>_<AnimationName>, in here you will save your 3DS Max file as <LayerName>_<AnimationName>_Anim.
If this is done correctly you will now be able to select the animation layers you want to export.

Importing
Importing your visuals
Importing your visual and physics is the same as any other item. Start by opening your Content Browser, now select the proper package you want to add your visual to.
Once selected add the resource by pressing the Add Resource button. Now you can choose to add your model or physics.
Once you added your files you can now find it in your content browser either by selecting the proper package and finding it or using the search bar at the top.
Importing your animation
After adding your visual it is now time to import your animation. This process is similar to importing your visual.
Start by opening your Content Browser, now select the proper package you want to add your visual to.
Once selected add the resource by pressing the Add Resource button. Now you can choose to add your animation.
Adding resources
After importing all you resources it is time to add all of them together. To start, open your Content Browser.
Find your visual, double click it and a new window will open. You will start on the Materials tab, here you will see each of your meshes inside the exported visual.
Select the mesh you want to add the texture to, now find and select your texture in the Content Browser. Now you can add your texture by clicking the <- button.
Now you can move on to the Default Animations tab, here you can add your animations. In the top right corner click on the drop down menu and select item. You should see a "list" appear with some animation slots.
For doors we will use the open and close slots. Start by selecting the animation slot you want to add your animation to, find and select your animation in the Content Browser. Now you can add your animation by clicking the <- button.
IMPORTANT
When creating levers, adding animations is a little different. Instead of using the Default tab in Default Animations you will need to use the Custom tab.
Here you will have to add the custom animations by selecting the the white square under Anim Name and typing the following (these are case sensitive and hard coded so double check):
- Full_Open
- Close_01
- Half_Open_To_Full_Open
- Half_Open
- Lever
Creating a root template
With all your resources imported and setup properly we can now add it all to a root template. The template is what you will actually use to place all of your combined visuals.
To make things easy whenever you want to create your template find something similar in the Root Template browser, right click it and select create new from selected.
This will prevent any extra work in the form of scripting, naming or checking any of the important features.
Once you create new from selected a new window will open called createObjectWizard here you can add the new Physics Resource ID and Visual Resource ID.
First select the resource in your Content Browser, now select the resource slot in the createObjectWizard. A ... button should appear on the right.
Now simply press the green arrow button and you are done. You might have noticed the naming of the template changed automatically to the name of the visual resource. You are allowed to change this if you want.
See also
| General |
| Scenery (Rocks, plants, trees, shelves, etc.) |
| Lootable items (Shells, plates, food, gems, etc.) |
| Interactable animated items (Levers, doors, etc.) |
| Interactable socket items (Chairs, beds, etc.) |
| Weapons (The sharp stuff) |