Difference between revisions of "Part 3: shaping your terrain"
From Divinity Engine Wiki
m |
m |
||
| Line 17: | Line 17: | ||
<br /> | <br /> | ||
== Description == | == Description == | ||
| + | [[File:TerrainPanelSculptingTools.png|none]] | ||
| + | <sub>The terrain sculpting interaction modes on the terrain panel</sub> | ||
| + | |||
| + | |||
The following tools allow you to sculpt your terrain: | The following tools allow you to sculpt your terrain: | ||
* [[File:InteractionMode_TerrainRaise.png|30px]] Raise | * [[File:InteractionMode_TerrainRaise.png|30px]] Raise | ||
Revision as of 16:11, 20 September 2017
This article is part of a series on how to create and edit a terrain.
| Part 1: creating a terrain object |
| Part 2: resizing a terrain object |
| Part 3: shaping your terrain |
| Part 4: painting your terrain |
This article describes how to shape your terrain.
Contents
Description
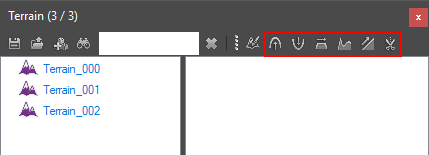
The terrain sculpting interaction modes on the terrain panel
The following tools allow you to sculpt your terrain:
-
 Raise
Raise
- Raise terrain height
-
 Lower
Lower
- Lower terrain height
-
 Flatten
- Flatten terrain height
-
 Smooth
- Smooth terrain
-
 Slope
Slope
- Create a slope on the terrain from point A to B
-
 Cut
Cut
- Cut 1x1 meter cells out of the terrain
Shaping your terrain
Step 1: raising
Step 2: flattening
Step 3: smoothing
Step 4: lowering
