Difference between revisions of "Material editor"
From Divinity Engine Wiki
(Created page with "800px|center <br /> == Description == The tag editor lets you edit the tags in your mod, which can then be added to items and characters for scripting...") |
m (Protected "Material editor" ([Edit=⧼protect-level-larianeditonly⧽] (indefinite) [Move=⧼protect-level-larianeditonly⧽] (indefinite))) |
||
| (10 intermediate revisions by the same user not shown) | |||
| Line 1: | Line 1: | ||
| − | [[File: | + | [[File:MaterialEditor.png|1000px|center]] |
<br /> | <br /> | ||
== Description == | == Description == | ||
| − | + | With the material editor, you can create your very own materials.<br /> | |
| + | Materials are used for a number of purposes, among which: | ||
| + | * Status effect overlays (f.e. wet status) | ||
| + | * Terrain layers | ||
| + | * Effects | ||
| + | * Decals | ||
<br /> | <br /> | ||
== Components == | == Components == | ||
| − | [[File: | + | [[File:MaterialEditor StepByStep.png|1400px|none]] |
| − | <sub>The | + | <sub>The material editor with each component numbered</sub> |
The tag editor consists of the following components: | The tag editor consists of the following components: | ||
| − | # | + | # Node graph toolbar |
| − | + | # List of available nodes | |
| − | + | # Properties of the selected node | |
| − | + | # Material preview | |
| − | |||
| − | # | ||
| − | # | ||
| − | # | ||
<br /> | <br /> | ||
| − | === | + | === From editor to game === |
| − | |||
| − | + | When saving a material in the editor, its game files get generated automatically.<br /> | |
| + | While the editor file of the material can be found in your mod's data folder under "Data/Editor/Mods/YourMod/Assets/Materials",<br /> | ||
| + | the game files can be found at "Data/Public/YourMod/Assets/Materials"<br /> | ||
| − | To | + | To be able to use the material in-game, you'll have to make a material resource with the generated .lsb file from the Public folder as source. |
| − | + | [[File:MaterialEditor_MaterialResource.png|800px|none]] | |
| − | |||
| − | |||
| − | |||
| − | |||
| − | |||
| − | |||
| − | |||
| − | + | {| class="wikitable" | |
| − | + | |- | |
| + | |More info on how resources work can be found here: [[Resources explanation]] | ||
| + | |- | ||
| + | |} | ||
| − | + | {| class="wikitable" | |
| − | + | |- | |
| − | + | |More info on how to create a resource can be found here: [[My first: Resource]] | |
| − | + | |- | |
| − | + | |} | |
| − | |||
| − | |||
| − | |||
| − | |||
| − | |||
| − | |||
| − | |||
| − | |||
| − | |||
| − | |||
| − | |||
| − | |||
| − | |||
| − | |||
| − | |||
| − | |||
| − | |||
| − | |||
| − | [[ | ||
| − | |||
| − | |||
| − | |||
| − | |||
| − | |||
| − | |||
| − | |||
| − | |||
| − | |||
| − | |||
| − | |||
| − | |||
| − | |||
| − | |||
| − | |||
| − | |||
| − | |||
| − | |||
| − | |||
| − | |||
| − | |||
| − | |||
| − | |||
| − | |||
Latest revision as of 13:43, 2 October 2017
Description
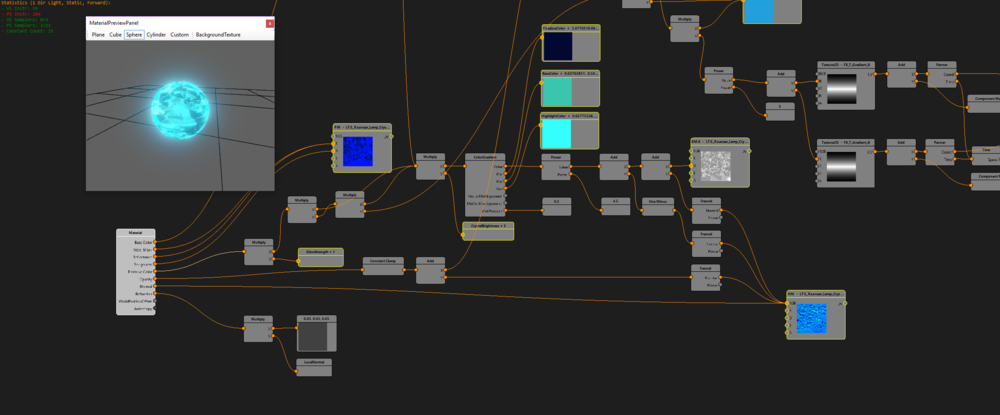
With the material editor, you can create your very own materials.
Materials are used for a number of purposes, among which:
- Status effect overlays (f.e. wet status)
- Terrain layers
- Effects
- Decals
Components
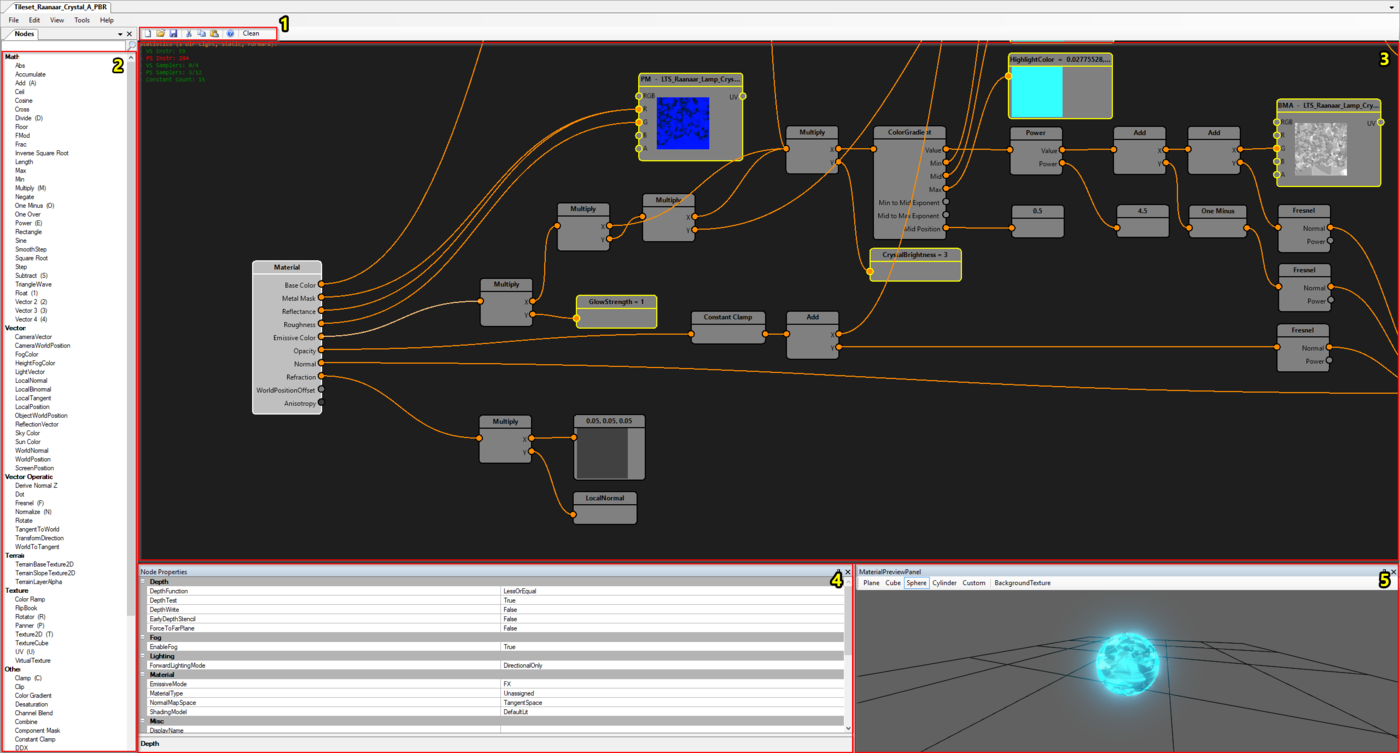
The material editor with each component numbered
The tag editor consists of the following components:
- Node graph toolbar
- List of available nodes
- Properties of the selected node
- Material preview
From editor to game
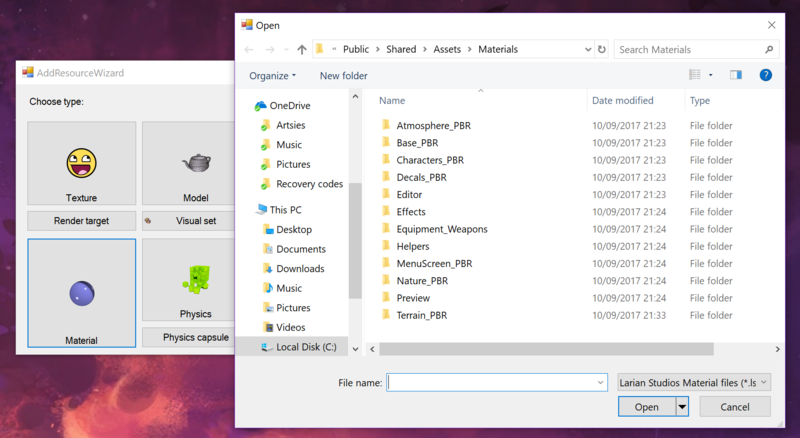
When saving a material in the editor, its game files get generated automatically.
While the editor file of the material can be found in your mod's data folder under "Data/Editor/Mods/YourMod/Assets/Materials",
the game files can be found at "Data/Public/YourMod/Assets/Materials"
To be able to use the material in-game, you'll have to make a material resource with the generated .lsb file from the Public folder as source.
| More info on how resources work can be found here: Resources explanation |
| More info on how to create a resource can be found here: My first: Resource |


