My first: Animation: Difference between revisions
JoykaDeReyst (talk | contribs) |
JoykaDeReyst (talk | contribs) |
||
| Line 104: | Line 104: | ||
<sub> Example animation data for the knockdown animation of the bear.</sub> | <sub> Example animation data for the knockdown animation of the bear.</sub> | ||
When exporting from the base file the MLE will automatically export all the entries in the Animation Data as seperate animation files. | When exporting from the base file the MLE will automatically export all the entries in the Animation Data as seperate animation files.<br \> | ||
If you export a file containing the same Animation Data as the example image above you get the following files as a result: | |||
[[File:KnockdownExportExample.png | none]] | |||
{| class="wikitable" | {| class="wikitable" | ||
Revision as of 09:50, 5 February 2018
Introduction
In this guide we're assuming that you're reusing an existing character and rig or an existing interactive item.
We'll also mention the provided export tools throughout the guide.
We'll also refer to visual resources and animation sets and resources
| For more information on: |
| How to create a character: My_first:_Character |
| How to create an interactive ttem: My_first:_Item_-_Interactable_animated_items |
| How the export tools function: Modding:_Maya_Exporter |
| An Animation Set: Animation_set_resource_panel |
| Visual Resources: Visual_resource_panel |
In this guide we'll explain:
- How your maya files should be structured down to the folder structure.
- How to define animation data for the exporter.
- How to export the resources
- What type of editor resources you'll be importing for animations.
- How to use an animations set.
- How to use a default animation set.
- Example for a Door, Lever and Container
- Example for a Run, Attack, Hit and Skill
My First animation
How do I structure my maya resources?
When creating animations we make use of maya's ability to reference scenes.
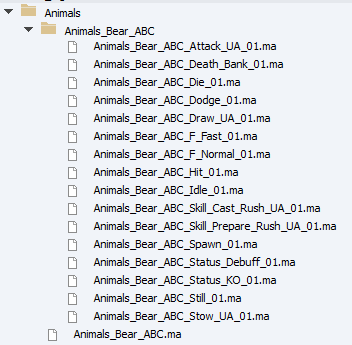
We'll have a base file with the mesh and it's rig (Animals_Bear_ABC.ma) and a sister animation folder of the same name (Animals_Bear_ABC) containing the animation files.
Each animation file has only one animation or animation sequence and has a file reference to the base file. (More on sequences later)
A file containing the rig that gets referenced we name the base file
A file referencing the base file we name the animation file
Referencing in my animation file
When starting from a new animation file we'll want to reference the base file which contains the rig. The caveat for this is the MLE doesn't support namespaces in rigs.
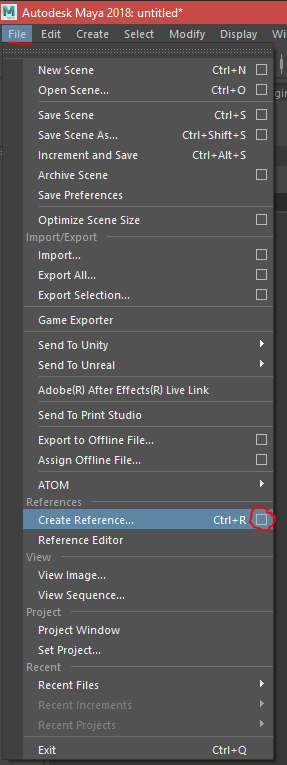
In your new file: Top Menu -> File -> Create Reference -> Options Square
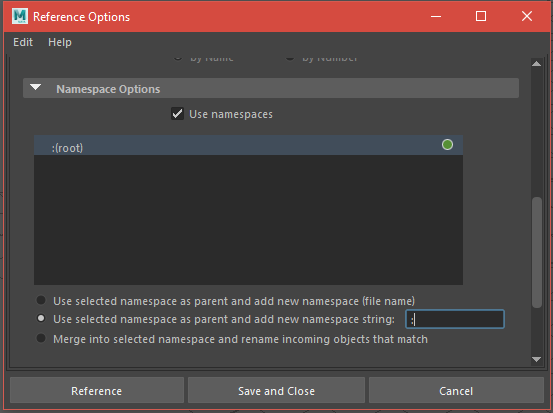
In the options window look for Namespace Options
Select Use selected namespace as parent and add new namespace string and fill in a colon : in the textbox
Click reference and browse to your base file, select it and click reference. The base file contents should now appear in your scene
Save your animation file in the animation folder and name it: <item/characterName>_<AnimationSlotName>.
An animation slot name either refers to the name the animation will get in the engine when assigning it to a character it's Animation Waterfall or it's Visual Default Animations
| For more information on: |
| An Animation Set: Animation_set_resource_panel |
| Visual Default Animations: Visual_resource_panel |
Confirming the structure
To make sure that your file structure is correct open the base file.
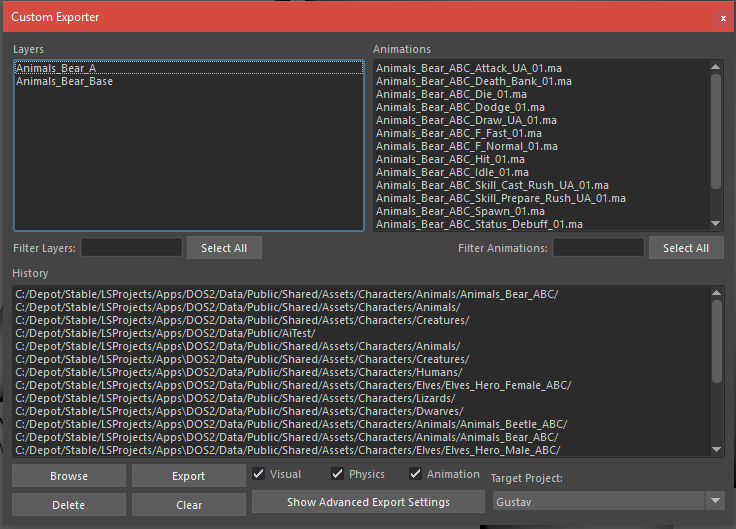
Run the MLE script and check the animations checkbox.
If you did everything correctly the Animations List should show you animations in the Animation Folder
Alternatively open an animation file.
Run the MLE script.
The Animation list should immediately be visible. A warning about missing Animation Manager Data is normal.
If neither of these cases check out make sure:
- The animation folder has the same name as your base file.
- The animation folder should be in the same folder as the base file.
Exporting the animation
With the current set up you can already export animations once they are made. Simply launch the MLE in the base file, check the animation checkbox select the relevant files and export.
From an animation file you can launch the MLE and press export right away.
By default the MLE will use the last saved timeline of an animation file to export the animation with.
However, it is possible to have multiple animations come out of a single file. It's also possible to make sure the same animation length is exported regardless of the current timeline.
For this purpose we use Animation Data.
Creating Animation Data for the exporter
To define Animation Data we use the animation manager script. This script writes data to the root of a rig as: name:AnimationName start:StartTime end:EndTime
This is also how the MLE will show the entries when in the animation file.
The animation manager supports multiple entries allowing us to define an animation sequence. A sequence is usually an animation that will concist of a start, loop and end segement.
The goal is to allow an animator to more easily set up animations that need to follow eachother up in game.
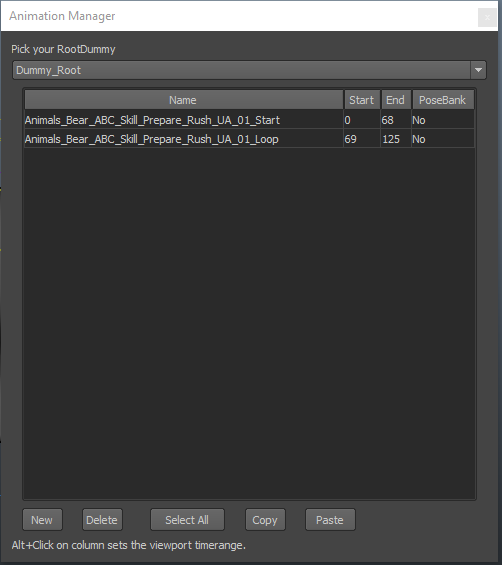
Example animation data for the knockdown animation of the bear.
When exporting from the base file the MLE will automatically export all the entries in the Animation Data as seperate animation files.
If you export a file containing the same Animation Data as the example image above you get the following files as a result:

| For more information on: |
| The Animation Manager: Modding:_Maya_Exporter |
Editor Resources
Animation Resource
Animation Set
My First Item Animation
-My First Door
-My First Container
-My First Lever
My First Character Animation
-My First Run Animation:
-My First Attack Animation:
-My First Hit Animation:
-My First Skill Animation:
