Part 1: creating a new skill: Difference between revisions
mNo edit summary |
m (Protected "Part 1: creating a new skill" ([Edit=⧼protect-level-larianeditonly⧽] (indefinite) [Move=⧼protect-level-larianeditonly⧽] (indefinite))) |
||
| (30 intermediate revisions by one other user not shown) | |||
| Line 1: | Line 1: | ||
This article is part of a 4-part series on how to create, edit and use a new skill. | |||
{| class="wikitable" | |||
|- | |||
| [[Part 1: creating a new skill]] | |||
|- | |||
| [[Part 2: creating a skill from existing]] | |||
|- | |||
| [[Part 3: creating and using a skillbook]] | |||
|- | |||
| [[Part 4: adding the skillbook to a vendor]] | |||
|- | |||
|} | |||
This article describes how to create a blank skill entry. | |||
<br /> | |||
== Introduction == | == Introduction == | ||
Creating skills in your mod is easier than ever with our newly introduced tool, the [[Stats editor]]. | Creating skills in your mod is easier than ever with our newly introduced tool, the [[Stats editor]]. | ||
<br /> | <br /> | ||
== Creating | == Creating a skill == | ||
=== Step 1: Opening the Stats Editor === | === Step 1: Opening the Stats Editor === | ||
[[File:Step1_OpenStatsEditor.png|none]] | [[File:Step1_OpenStatsEditor.png|none]] | ||
| Line 24: | Line 36: | ||
<br /> | <br /> | ||
[[File: | === Step 2: Adding a projectile skill entry === | ||
<sub>Creating | [[File:Step2_BlankProjectileSkillEntry.png|none]] | ||
<sub>Creating a blank projectile skill entry</sub> | |||
Finally, we create an entry in the Skill_Projectile document. You can add a new entry either by editing the empty row at the bottom or by clicking the [+] button at the top of the document. | |||
The only two required fields are the "Name" which serves as a (unique) identifier for the skill, and the SkillType. The SkillType can simply be set to the name of the document (Projectile in our case). | |||
<br /> | <br /> | ||
== See Also == | |||
Although adding a row to the stats document is all we need to create a new skill, our skill is far from ready to be used. | |||
To create a complete and useable skill from scratch would require a lot of work. The skill itself needs an icon, casting animations, effects, and a projectile. It is therefor recommended that you create a skill based on an existing skill. | |||
= | {| class="wikitable" | ||
|- | |||
| [[Part 1: creating a new skill]] | |||
|- | |||
[[ | | [[Part 2: creating a skill from existing]] | ||
|- | |||
| [[Part 3: creating and using a skillbook]] | |||
[[ | |- | ||
| [[Part 4: adding the skillbook to a vendor]] | |||
|- | |||
[[ | |} | ||
[[ | |||
<br /> | <br /> | ||
Latest revision as of 10:09, 2 October 2017
This article is part of a 4-part series on how to create, edit and use a new skill.
| Part 1: creating a new skill |
| Part 2: creating a skill from existing |
| Part 3: creating and using a skillbook |
| Part 4: adding the skillbook to a vendor |
This article describes how to create a blank skill entry.
Introduction
Creating skills in your mod is easier than ever with our newly introduced tool, the Stats editor.
Creating a skill
Step 1: Opening the Stats Editor

The Stats Editor button
First, we need to open up the stats editor. To do this, locate the "Stats Editor" button on the menu bar (under "Editors").

Creating the Skill_Projectile document
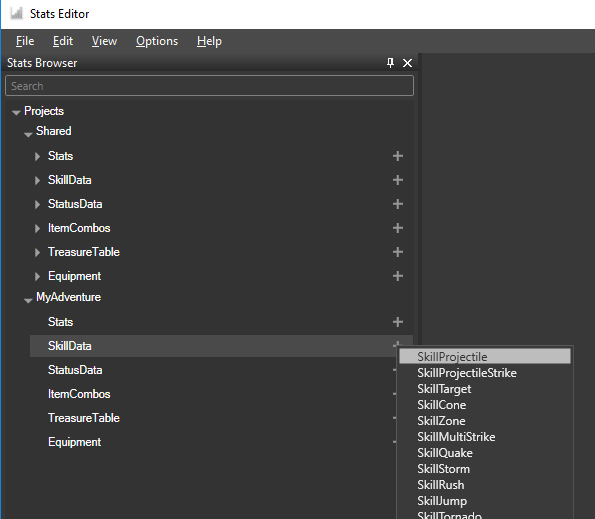
Next, we need to create the Skill_Projectile stats document in our project. If the document already exists, you can skip this step. To open the document, expand the "SkillData" item and double click the "Skill_Projectile" item.
Step 2: Adding a projectile skill entry

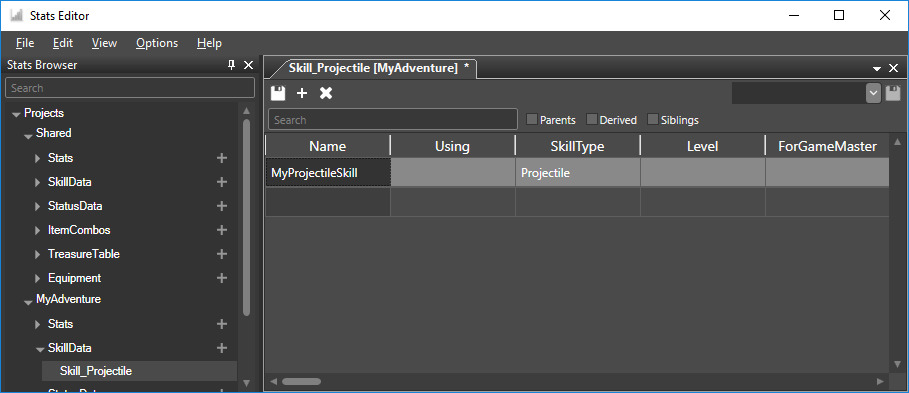
Creating a blank projectile skill entry
Finally, we create an entry in the Skill_Projectile document. You can add a new entry either by editing the empty row at the bottom or by clicking the [+] button at the top of the document.
The only two required fields are the "Name" which serves as a (unique) identifier for the skill, and the SkillType. The SkillType can simply be set to the name of the document (Projectile in our case).
See Also
Although adding a row to the stats document is all we need to create a new skill, our skill is far from ready to be used.
To create a complete and useable skill from scratch would require a lot of work. The skill itself needs an icon, casting animations, effects, and a projectile. It is therefor recommended that you create a skill based on an existing skill.
| Part 1: creating a new skill |
| Part 2: creating a skill from existing |
| Part 3: creating and using a skillbook |
| Part 4: adding the skillbook to a vendor |