Part 4: adding the skillbook to a vendor
This article is part of a 4-part series on how to create, edit and use a new skill.
| Part 1: creating a new skill |
| Part 2: creating a skill from existing |
| Part 3: creating and using a skillbook |
| Part 4: adding the skillbook to a vendor |
The data used in this article was created in parts 2 & 3 of the series.
Description
Vendors are NPC characters that buy or sell items. In order to assign our skillbook to a vendor npc, we will need to do a couple of things:
- Create a treasure table
- Create a vendor and set the trade treasure of the vendor
- Add a dialog to the vendor
Setting up a vendor
Step 1: Creating a treasure table
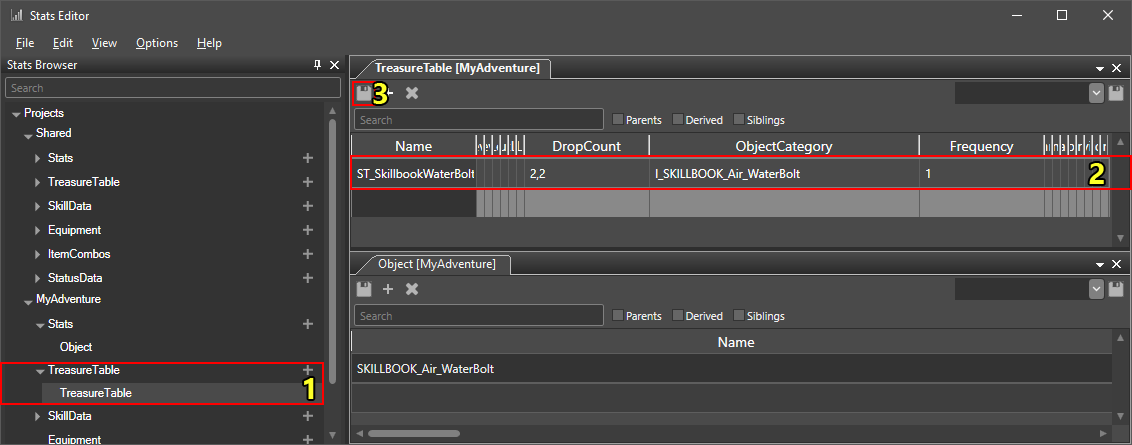
Creating the treasure table stats entry
First, we will create a new treasure table to assign to our vendor. Treasure tables are item tables used to define random loot.
To create our treasure table, we:
- Open the TreasureTable stats document in the
 Stats editor (Create the document if it does not yet exist) (1).
 - Create a new treasure table, I named mine "ST_SkillbookWaterBolt", and then set the following fields (2):
- DropCount (1,1): this defines the minumum and maximum amount of items generated from the treasure table.
- ObjectCategory (I_SKILLBOOK_Air_WaterBolt): this is the name of our skillbook's stat object with "I_" prefixed to it.
- Frequency (1): the likelyhood of SKILLBOOK_Air_WaterBolt being generated from the treasure table.
- Save (3).
Step 2: Creating a vendor and setting the trade treasure
For our vendor, we create a new template based on the GameMaster_Trader_Skill_NOTUSED root template in the ![]() Root template panel.
Root template panel.
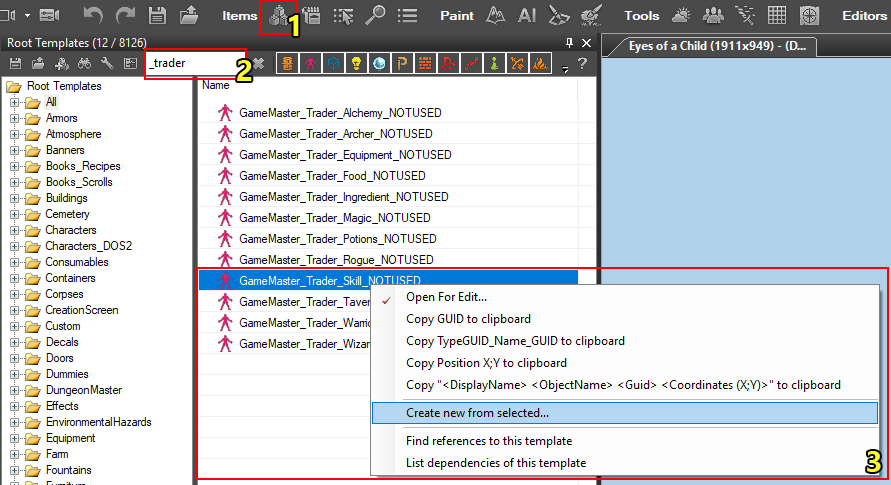
Copying the GameMaster_Trader_Skill_NOTUSED root template
First, open the root template panel (1), find the GameMaster_Trader_Skill_NOTUSED template (2) and create a new template from it (3).
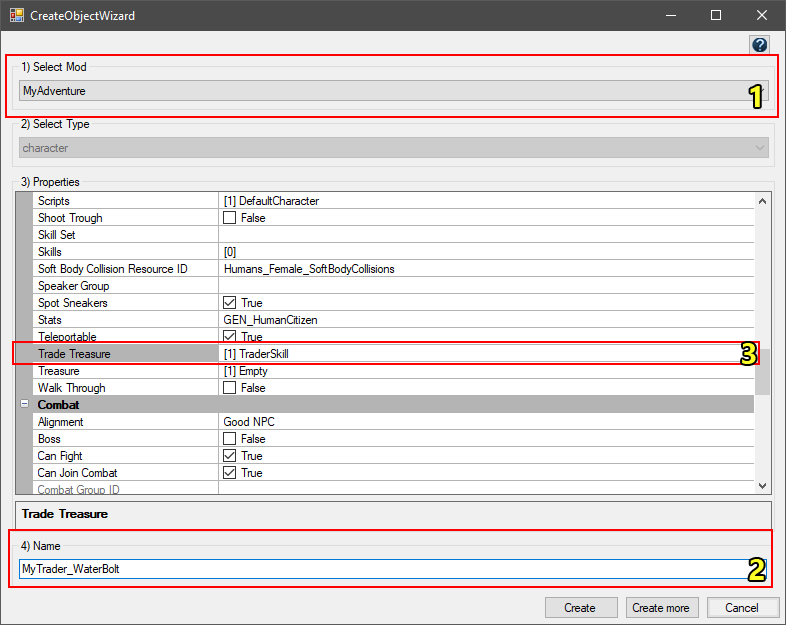
Configuring the new root template
Make sure to set the mod (project) (1) of the new root template and give it a new name (2). I named my new root template MyTrader_WaterBolt.
We also need to edit the "Trade Treasure" property of the template (3).
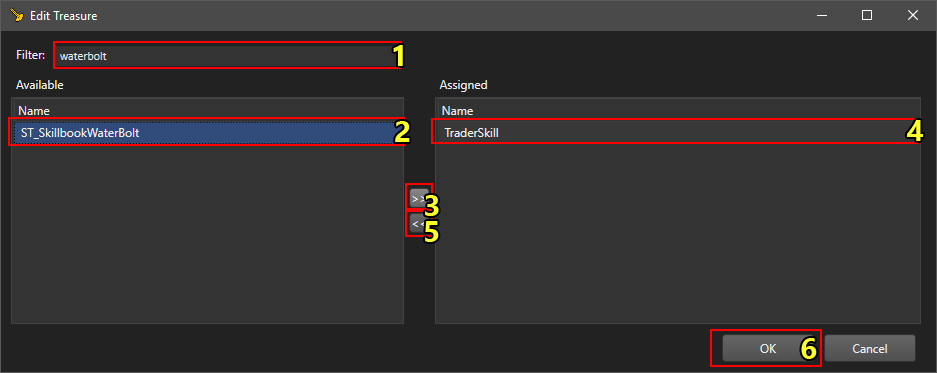
Assigning the trade treasure to our new treasure table
When the "Edit Treasure" dialog editor is open, remove the "TraderSkill" treasure table and add the treasure table we created in step 1 (ST_SkillbookWaterBolt in my case).
To assign our new treasure table:
- Search the treasure table (1)
- Select the treasure table (2)
- Assign it with the ">>" buton (3)
To remove an assigned treasure table:
- Select the treasure table (4)
- Unassign it with the "<<" button (5)
Click "OK" (6) to close the edit treasure dialog and then press "Create" to finish creating the root template. Optionally move the root template to a different folder in the root template panel, and hit save.
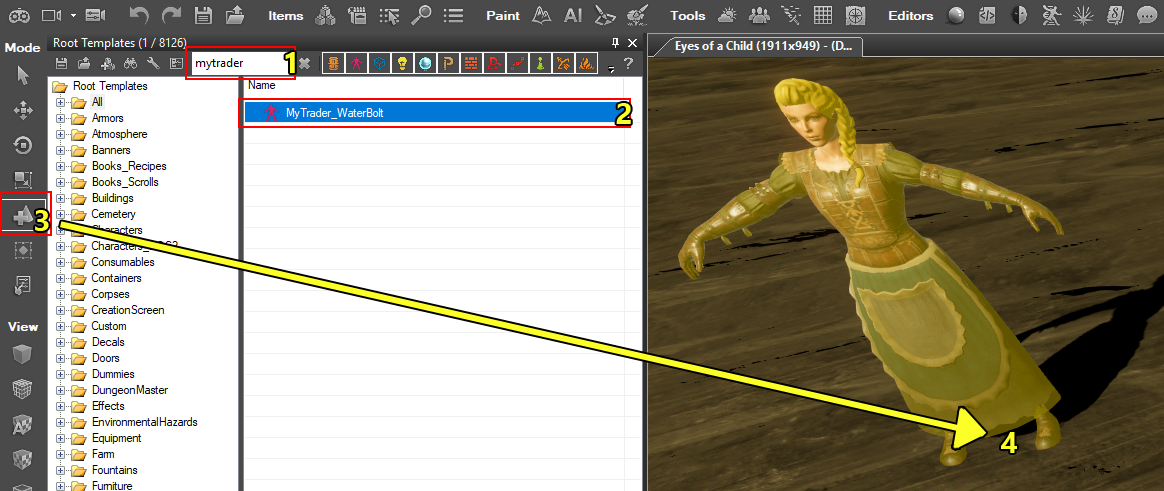
Placing an instance of the vendor in our level
Finally, we need to place our vendor in a level. To do this, find the new vendor's root template (1), select it (2), enable the creation interaction mode (3) and place an instance of the template in your level (4).
Step 3: Creating a dialog
Although our vendor is all set up to trade with, the player can not yet initiate conversation. To do this, we first need to add a dialog.
To do this, we first need to open the ![]() Dialog editor.
Dialog editor.
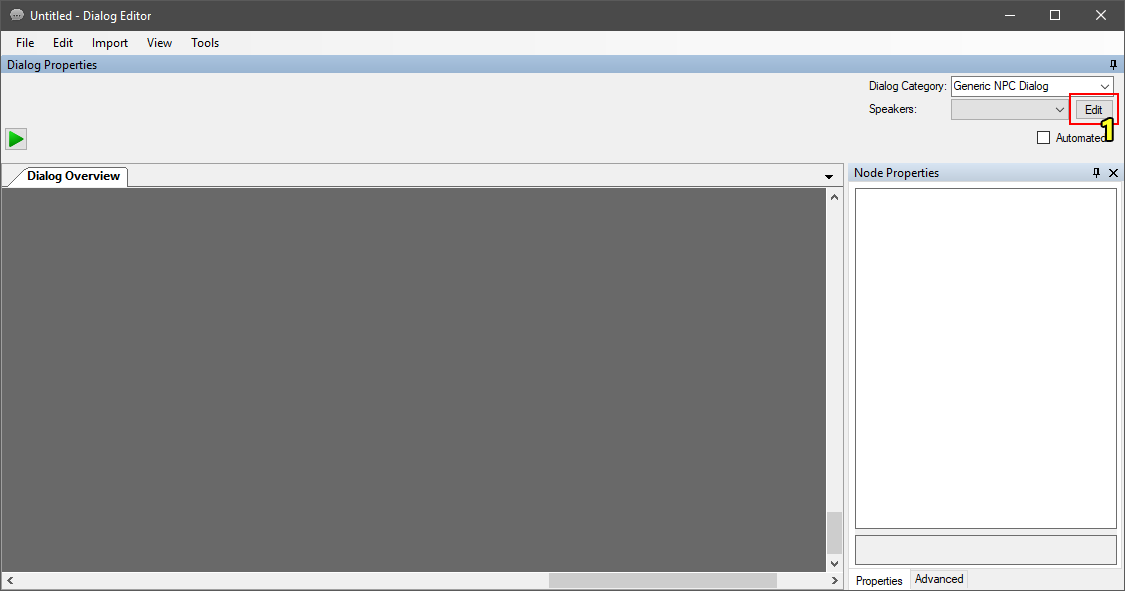
The dialog editor with a new, empty dialog
In the dialog editor, make sure you have a new, empty dialog open (Ctrl+N). We first need to assign the speakers to our dialog, for this dialog the only speaker will be our trader.
To assign speakers, first click "Edit" (1) next to Speakers in the top right of the dialog window.
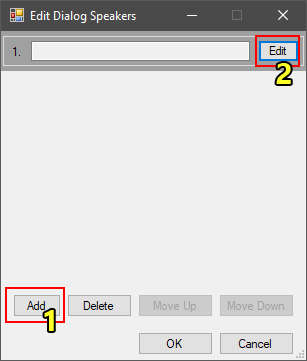
The edit dialog speakers dialog
You will see the "Edit Dialog Speakers" dialog opens. In here, we will need to add a speaker (1) and then click the "Edit" button next to the speaker to assign a character (2).
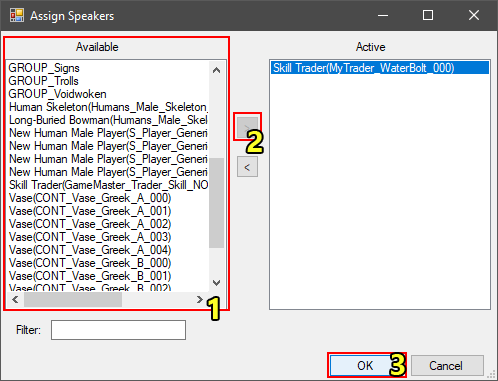
The assign speakers dialog
The assign speakers dialog allows us to assign a speaker. Our speaker will be our trader npc, which I named "MyTrader_WaterBolt".
To assign a speaker, first search for it in the "Available" speakers list (1). Then, with the speaker selected, click the ">" button (2) to assign it.
With our speaker assigned, click "OK" (3) to close the assign speakers dialog, and again to close the edit dialog speakers dialog.
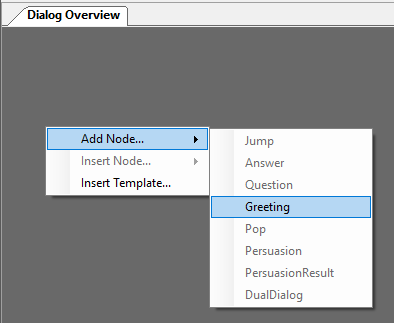
Adding a greeting node
With our speaker assigned we can add a greeting node to the dialog. To add a greeting, simply right click anywhere in the dialog overview, mouse over "Add Node" and click "Greeting".
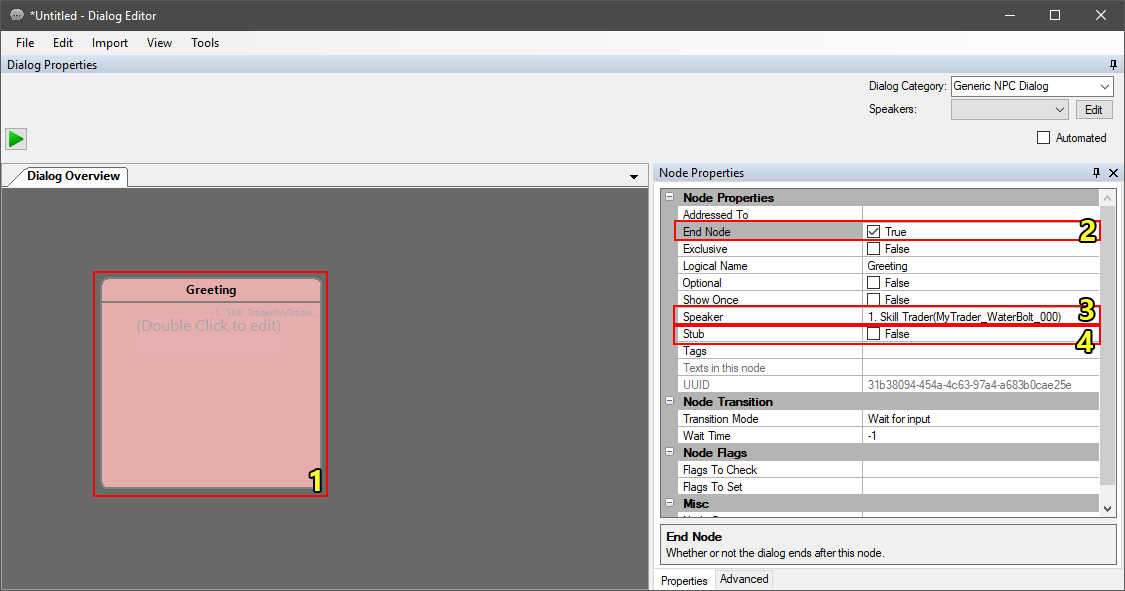
Setting the properties of the dialog node
Before we give the greeting node text we need to set up its properties. First, select the node (1).
Then, with the node selected, assure the following properties are set correctly:
- End Node (2)
- If the "End Node" property is toggled, the dialog will end after this node.
- Speaker (3)
- The "Speaker" should be assigned correctly by default, but make sure it is set to our trader npc.
- Stub (4)
- The "Stub" property is used to flag dialog nodes as work-in-progress nodes, which we do not care for.
The last thing we need to do is set the text for our dialog. To open the dialog text editor, double click the node (1).
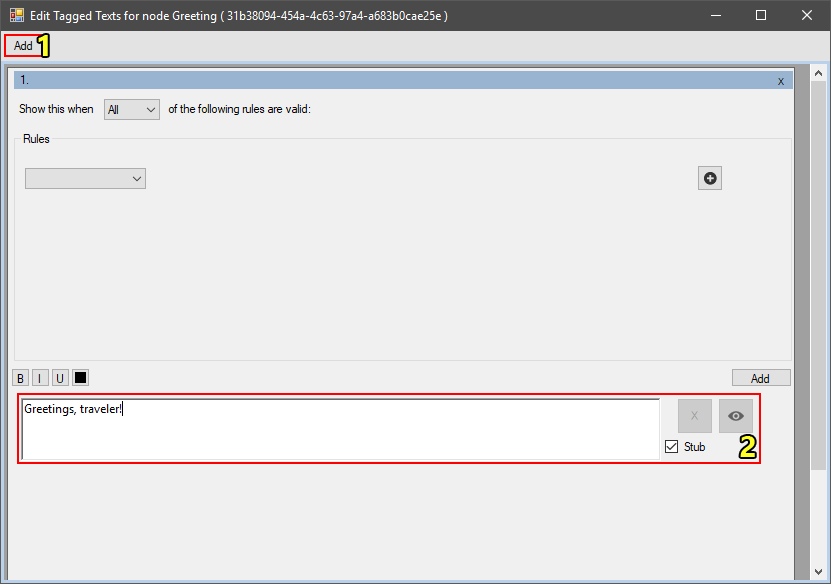
The dialog node text editor
In the dialog node text editor, click "Add" (1) to add a new text to the node and then type a greeting in the textbox (2). I set the text to "Greetings, traveler!".
Once you have a text set up you can close the dialog node text editor.
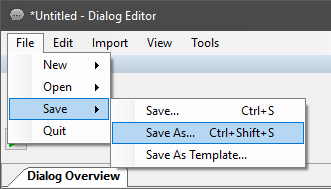
Saving the dialog
Finally, we need to save the dialog. Back in the dialog editor click "File > Save > Save As..." on the menu bar. You can save a dialog anywhere in "Data\Mods\{YourProjectFolder}\Story\Dialogs" or subdirectory.
I named my dialog "DefaultGreeting". Note that the name of the file is important, as it is also the name used to identify the dialog.
Step 4: Assigning the dialog to our vendor
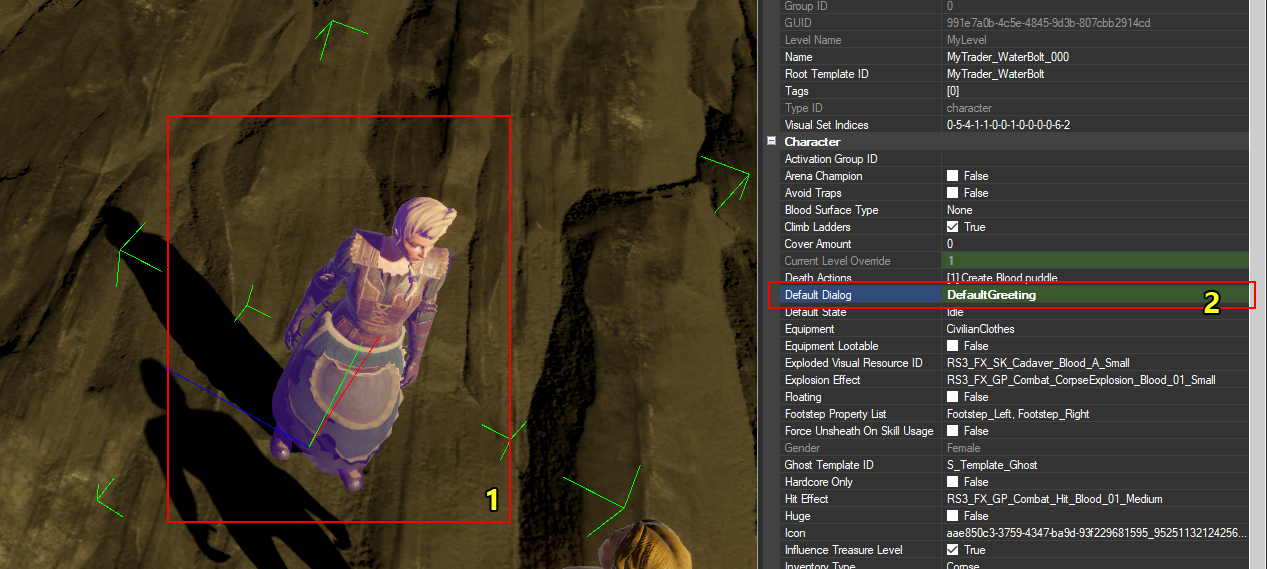
Assigning the "Default Dialog" property on a template
To assign the dialog, select the vendor in the editor (1) and type the name of the dialog in the "Default Dialog" property (2). I named the dialog "DefaultGreeting".
Our vendor is now all set up and ready to sell our skillbook!
Step 5: Trading

Trading with our vendor
To test your vendor, go in-game, initiate the conversation with the vendor and click the trade icon in the top left.
If you followed all the steps in parts 2 through 4 of this guide, you should now see the skillbook in the vendor's stock, similar to the screenshot above.
Troubleshooting
Several things can cause a skillbook to not show up on a vendor's sell list:
- The item was not generated out of that treasure table
- Items in treasure tables are randomly generated, if an item does not show up it might just be bad RNG!
- Your skillbook stats entry does not have the correct root template id
- The "Story Item" flag is checked in the skillbook properties