My first: Root template
Description
Root templates are the building blocks of Divinity: Original Sin 2. Every entity in the game, from candle holders to monsters, and even the player character itself, is an instance of a root template.
Objects in levels are most commonly local templates. Local templates are instances of root templates that have been placed in a level.
When local templates are made global, they become global templates. Global templates exist across levels in a project.
To summarize:
- Root templates define a placeable entity
- Local templates are instances of root templates placed in a level
- Global templates are local templates that exist across multiple levels (such as origin characters)
Creating a root template
There are several types of root templates. The most important types are ![]() characters,
characters, ![]() items and
items and ![]() sceneries.
sceneries.
In this tutorial, we will be creating a new scenery type root template. Sceneries are simple, static objects, such as trees and rocks.
Step 1: Opening the Root Template Panel
To create a new root template, we first need to open up the ![]() Root template panel.
Root template panel.
Step 2: Creating a new root template

The Create New button in the root template panel
Once we have the root template panel open, we can create a new root template by clicking the "Create New" button on the top left of the panel.
After clicking the "Create New" button, the Create Object Wizard should pop up. This is where we will do the initial setup of our new root template.
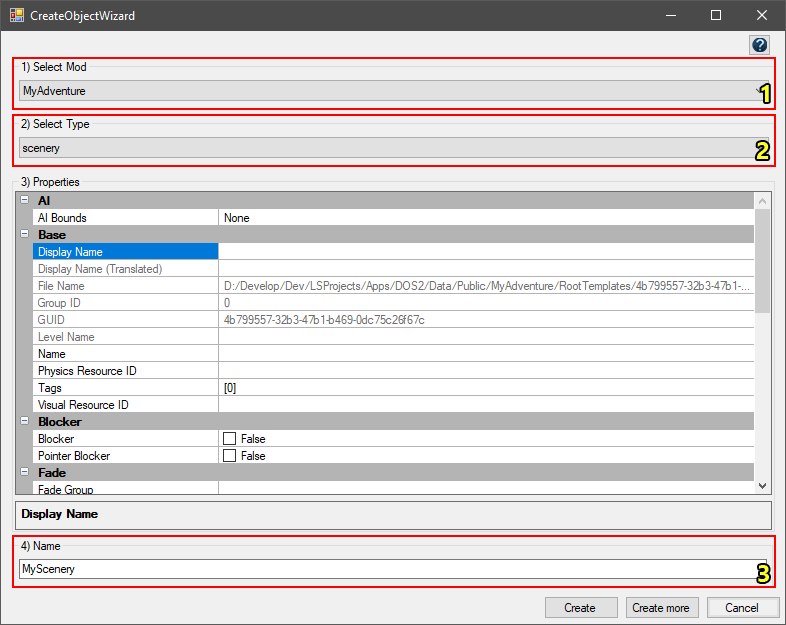
The first steps to perform in the create object wizard
The most important steps to perform when creating any new root template are:
- Selecting your mod (project) (1).
- Selecting the type of root template (select the "scenery" type root template) (2).
- Configure Properties (we skip these for now).
- Setting the name of our root template (3). Note that this is the name used to identify the root template, not the name the template will have in-game!
After performing these steps, we click "Create" to create the root template.

The newly created root template in the root template panel
Step 3: Moving our new root template to a folder (optional)
To make our root template easier to find, we can move it to a folder in the root template panel. This step is necessary if you want to assign the root template in the Stats Editor!

Creating a new folder
Our root template also has to be in a folder to be assignable in the stats editor. If you already have a folder of your own, you can skip this step.
To create a new folder:
- Right click the "Root Templates" folder (at the top) in the root template panel
- Click "Add Folder"
- Name your folder, I named mine "MyFolder"
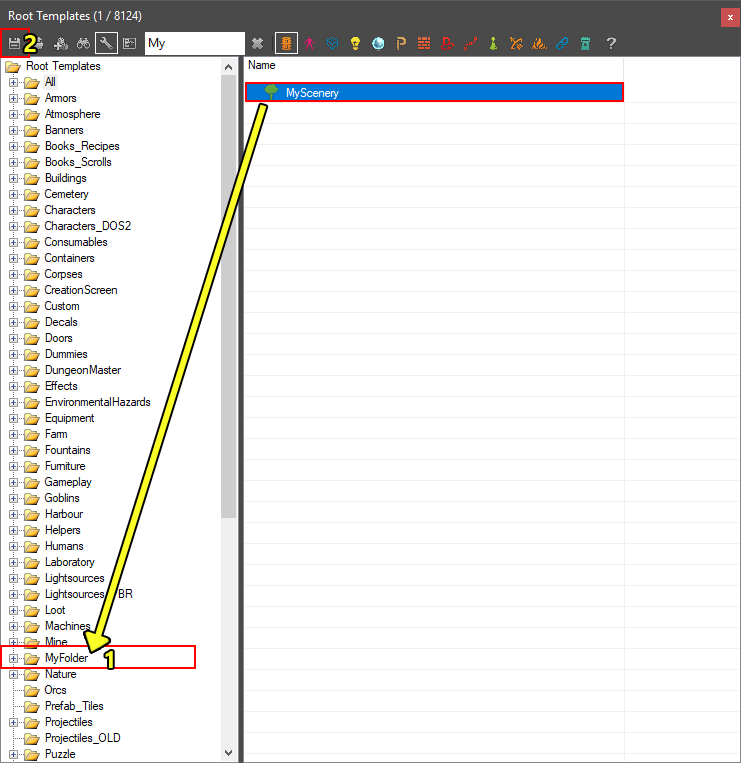
Moving our skillbook template to the new folder
Don't forget to move our new template to our newly created folder (1) and save the root templates (2)!
Step 4: Giving our root template a visual
To be able to see our root template in the game, we will need to give it a visual resource (model). I am giving my root template the NAT_Tree_Birch_A visual, which is inherited from the Shared project.
To assign a visual resource, we first need to select the "Visual Resource ID" property in the Sidebar.
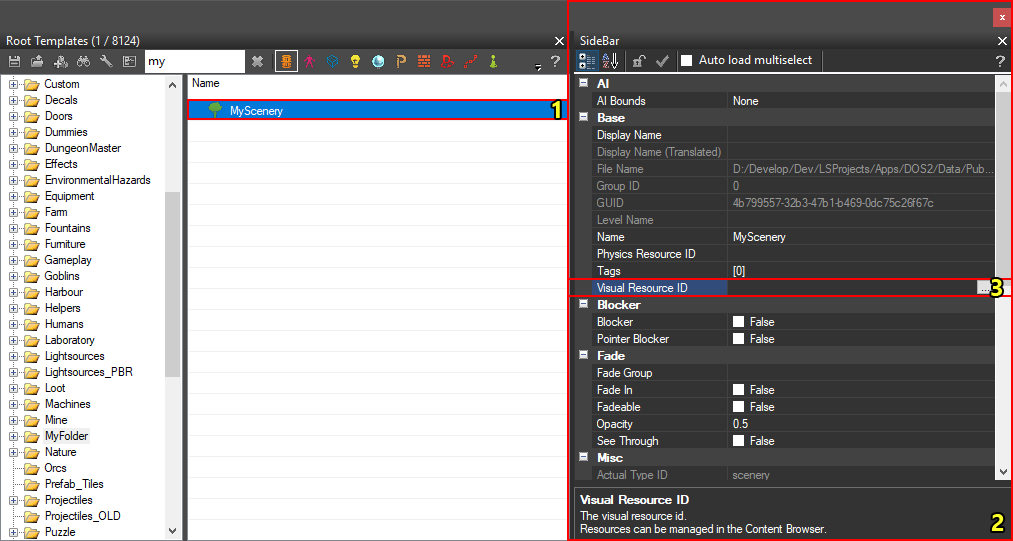
Selecting the Visual Resource ID property in the sidebar
In the image above, I docked the sidebar panel to the same window as my root template panel. You can do this as well by opening the sidebar and dragging the sidebar panel onto the root template panel.
Once we have both the root template panel and the sidebar open, we:
- Select our root template (1).
- Locate the Visual Resource ID property in the sidebar panel (2).
- Select the value field (on the right) of the property (3).
Then, when we click the [...] button on the right, the resource selector popup will open, where we open the Content browser.

The resource selector popup, where we click the middle button to open the content browser
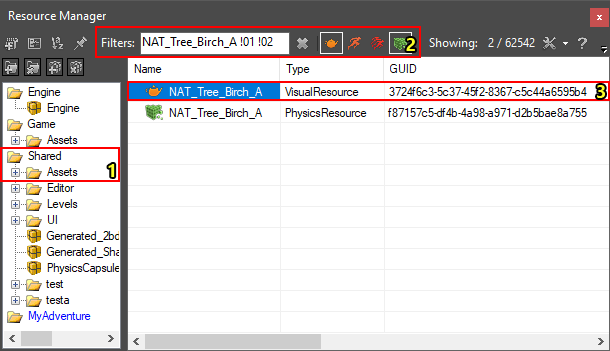
Selecting a visual resource in the content browser
When the content browser (resource manager) is open, we need to select a visual resource for our root template to use.
Here, we do the following steps:
- Select the "Shared/Assets" folder on the left (1).
- Filter by visual resources and search for "NAT_Tree_Birtch_A" (2).
- Select the
 visual resource (3).
Finally, to assign the visual resource to our root template panel, we go back to the sidebar (with our root template and visual resource selected) and click the "assign" button on the Visual Resource ID property. Don't forget to save!

Assigning the selected visual resource in the resource selector popup
Using our new root template
And that's it! Our new root template is now ready to be placed in a level.
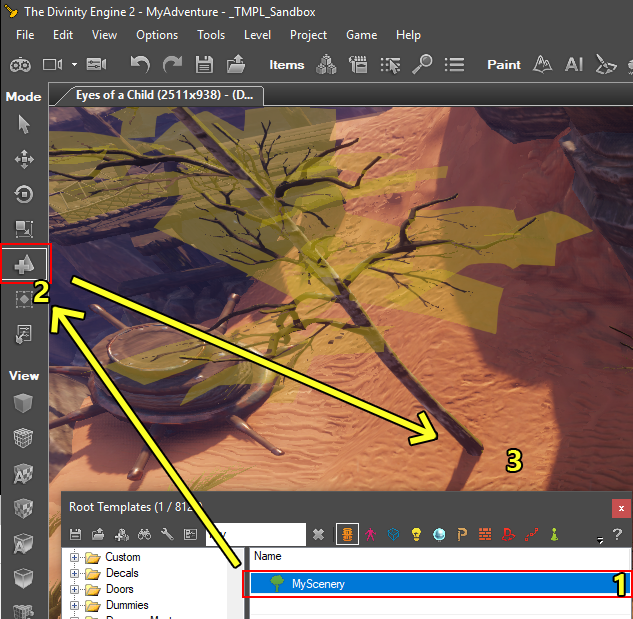
Placing a root template in a level
To create a local template (instance of a root template) in your level:
- Select the root template in the root template panel (1).
- Activate the
 creation interaction mode (2).
 - Place an instance in your level (3)!
However, our new root template is not yet fully complete. It is still missing physics, AI bounds and more.