How to create a basic adventure with quests, dialog and scripts
Contents
- 1 1. Create your new project and basic level
- 2 2. Add a character
- 3 3. Create a simple dialog and save it
- 4 4. Create our Quest Journal entries
- 5 5. Working with Prefabs
- 6 6. Shortcut tips for working with objects
- 7 7. Hidden sand piles, secrets and object items
- 8 8. Box Triggers, referencing local instances, digging with shovels and treasure rewards
- 9 9. Setting up the StoryEditor and scripts for your custom levels
- 10 10. NPC Patrols and moving NPC characters
- 11 11. Animations and gestures
INTRODUCTION
I love to write stories, and the promise of a game engine that would allow me to create interactive-and-engaging stories appealed to me. After spending a week learning everything I could about creating realistic levels and terrain, I moved on to working with quests and scripting.... which shortly hit a road-block when I began to get frustrated when my scripts wouldn't work no matter what I tried.
Four days later, I worked it out and decided to put together a basic-adventure guide that would help other modders to more quickly understand the engine so more of us can move on to putting together custom adventures faster :-). Overall I would like to touch on every system in the game, for a complete reference guide to everything. Please feel free to also request custom tutorials for different scripts or areas of the engine and I'll integrate them into our evolving story / adventure.
1. Create your new project and basic level
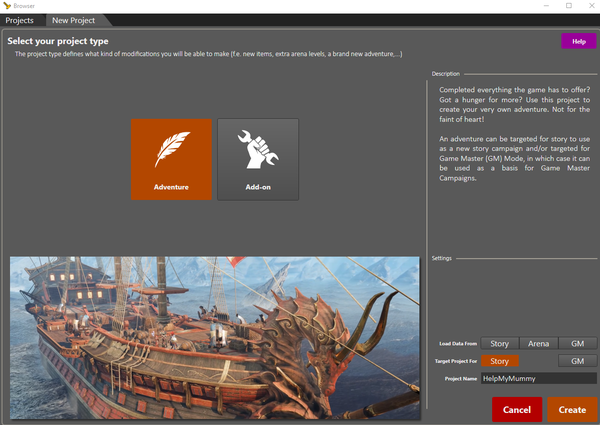
We will be creating a Story mode Adventure, with the main focus being assisting a little girl to find her mummy's medicine. To that end, please create a new Adventure, targeted for story mode with the name HelpMyMummy.
1.1. Create a new adventure type project, targeted at Story mode
Create a new project by pressing the green create project button on the top left. Select the Adventure project type, and target the project for Story mode. Use whatever name you like for the project name – for our tutorial adventure I have called the project HelpMyMummy.
1.2. Create a new basic level template, called 'TheVillage'
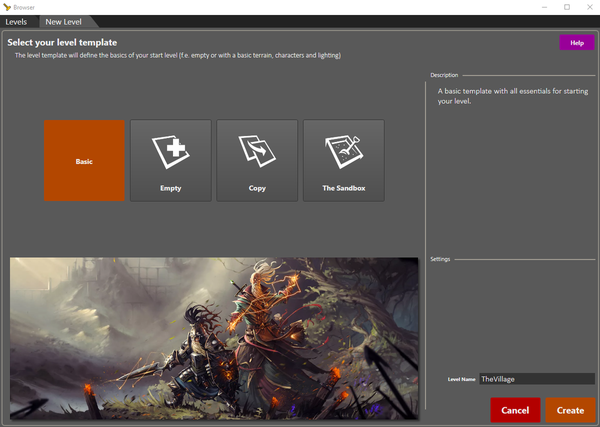
Select the Basic level template, and call your level TheVillage – or whatever other name you prefer.
2. Add a character
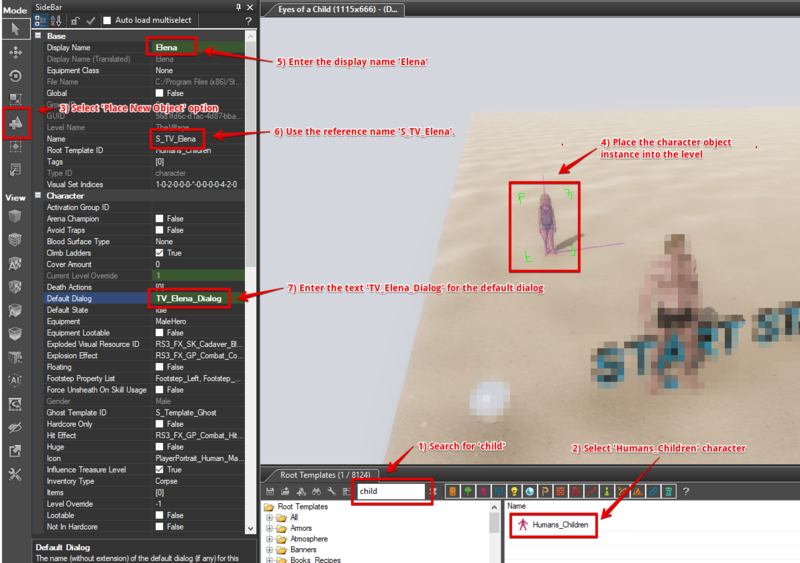
We'll keep this bare-boned and simple, placing a character into the level and updating the bits and pieces we will require for the next steps. We named her Elena (5) and used Larian coding standards to give her a reference name of S_TV_Elena (6). For this stage, feel free to use any character and name.
| Highly recommended we follow Larians coding standards for consistency and because they make our job easier long term, both in understanding each-other's scripting and in reducing future 'lookup' time finding more info about items we wish to refer to. |
2.1. Create a new NPC character model and place it into the level
Find the Humans_Children (1,2) model and place it into the level (3,4), naming her Elena (5). To keep in line with standards, for her reference, use the name S_TV_Elena (6). The S is to let the engine know that we want to reference this local object in the story and the TV is the prefix for our TheVillage level.
We're adding this early so we don't have to come back, but for now please enter the text TV_Elena_Dialog (7) for the default dialog that will start when speaking with her.
3. Create a simple dialog and save it
In this section we are going to create a simple quest dialog so we can talk with our NPC character and begin a quest.
3.1. Create the start of a simple dialog
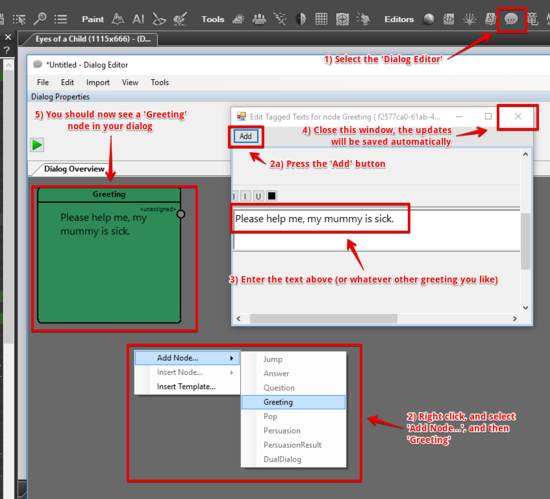
Open up the Dialog Editor (1) and create a simple dialog between players and your NPC character. Create a new Greeting dialog (1) and enter the initial greeting (3). Once done press the 'x' button (4) to save your changes and close the Edit Tagged Texts window.
3.2.Save the dialog as 'TV_Elena_Dialog'
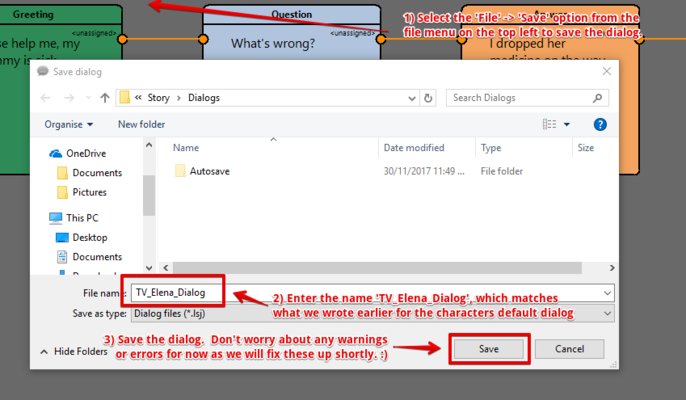
Take this moment to save the dialog. We know the prefix for this level is TV, that our character is called Elena and we are referencing a Dialog - thus: TV_Elena_Dialog (2), which we entered earlier.
3.3. Create the rest of the dialog
Follow the steps below to create the rest of the dialog nodes (1-4), along with the final node (5).
3.4. Setup and assign speakers for your dialog
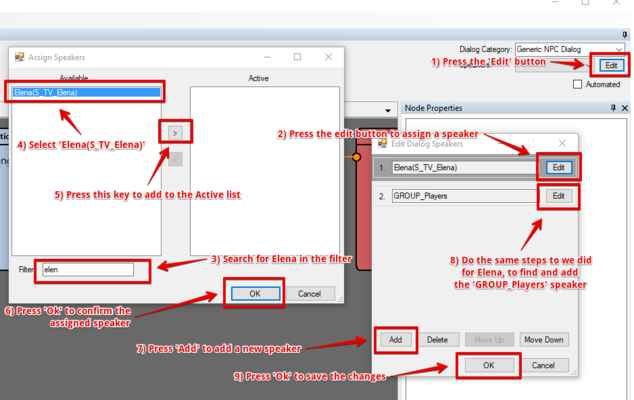
Final step for our dialog is to setup and assign our speakers. Press the edit (1) button to add new speakers, searching for our S_TV_Elena (3,4) speaker. Select Elena(S_TV_Elena) (4) and add it to the active list of speakers (5), pressing Ok once done (6).
Add a new speaker and then follow the same setup steps (3-6) for the GROUP_Players speaker (8), which covers any player talking to our NPC character. Press the Ok button to save your changes (9) once both speakers have been assigned.
| Don't add both speakers under one node. For example, having Elena(S_TV_Elena) and GROUP_Players both grouped together as speaker one (2). Doing so is only used when we have more than one speaker saying something, such as from a group of 2 or more NPC characters speaking together. |
3.5. Assign the correct speaker to each node
The correct speakers should automatically be assigned to their nodes now. However, if anything isn't correct, you can manually select a node (1) and update the speaker as need be.
4. Create our Quest Journal entries
Ah :-), some more of the fun parts. I'll show you what standards the DOS:2 team use and how we can best setup our quests for our adventure.
4.1. Create our quest categories
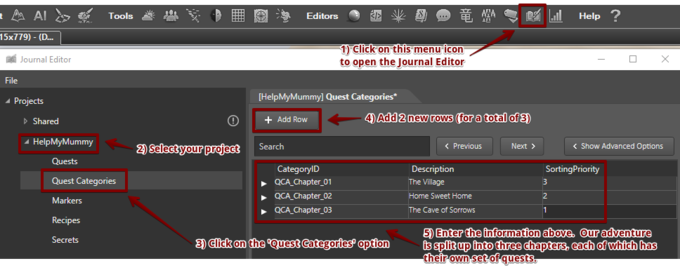
Open up the Journal Editor (1), select your project (2), click on the Quest Categories option (3) and add two new rows (4), for a total of three quest categories. Once done, update our quest categories to match our screenshot (5).
a) CategoryID: QCA_Chapter_01 | Description: The Village | SortingPriority: 3
b) CategoryID: QCA_Chapter_02 | Description: Home Sweet Home | SortingPriority: 2
c) CategoryID: QCA_Chapter_03 | Description: The Cave of Sorrows | SortingPriority: 1
Feel free to update descriptions and category IDs in any way you see fit. If possible, work with including the QCA_ prefix with your category ids, for better code / script legibility.
| Please note that our little adventure has been broken up into categories -- which would normally only occur in a larger adventure -- to demonstrate how the DOS:2 team structure their adventures and to give you a template to build out your own larger scale adventure. |
Save and reload all
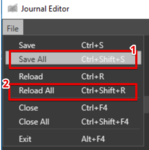
Take a quick second to click on the file menu and Save All (1). Then Reload All (2) to update everything.
4.3. Add a new quest under our 'QCA_Chapter_01' category
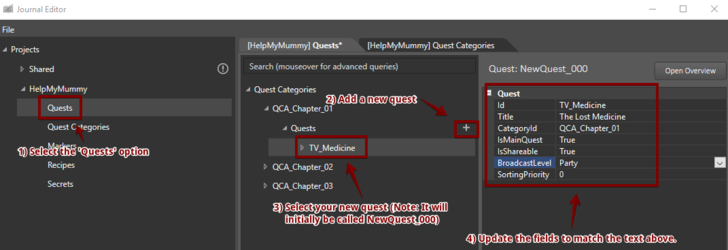
Select the Quests (1) option, add a new quest (2), select it (3) and then update its details (4). Please note the prefixes used, with TV representing TheVillage and QCA indicating that this is a quest category. We will go into more detail about the IsMainQuest, IsShareable and BroadcastLevel settings in future.
5. Working with Prefabs
Prefabs are cool :-) -- especially for laying out rocks, vegetation and trees. In this instance, we want to create some sort of simple structures to indicate a nomad style camp and luckily we have some prefabs that can do just that for us.
| What are prefabs? -- In the words of Larian, a prefab is a collection of entities, and is used to speed up decoration. For us this means we can put together a mini-scene, such as an oasis setting and then be able to save that as a collection for use in future levels. |
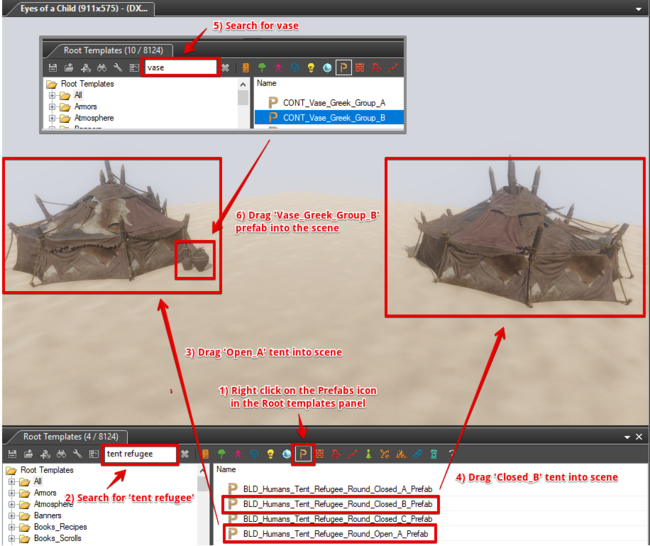
Open up the Root Templates panel -- which should already be open at bottom of your screen --, right click on the prefabs icon (1) and search for 'tent refugee' (2), which will provide us with some prefabricated groups of objects that look like a tent we'd find in a desert community.
Once you have dragged in two suitable tent prefabs, aligning them however you wish (double click to select and move prefabs in scenes) –- please also grab a set of vases to add a little bit of flavour (5, 6).
| Prefab usage tip -- I struggled with prefabs initially, until I found out you have to double-click on them to select all objects within a prefab. If you don't do this then you will just be grabbing one of the objects within the collection (prefab), which can be useful when re-arranging a collection of trees you have recently added. |
6. Shortcut tips for working with objects
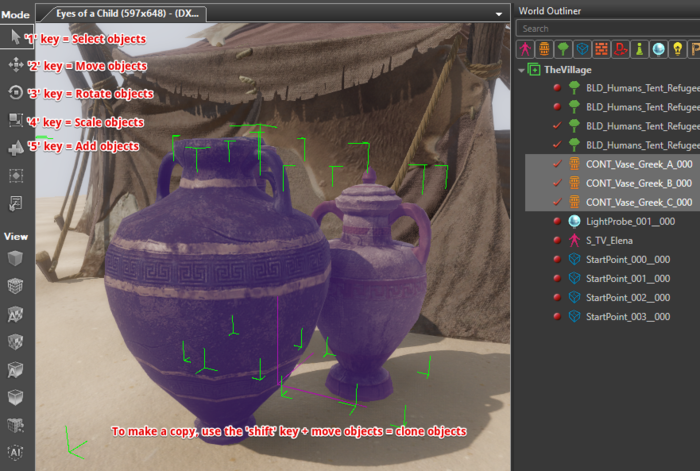
For a while I was clicking on each of these 'Mode' icons on the left hand side to manipulate objects, until I learned about these nifty shortcut keys. When selecting any objects, use keys 1 - 5 to make changes and hold down the shift key when moving (translating) a selection to create a copy of all selected objects.
| Options | Key (requires object to be selected first) |
|---|---|
| Select objects | '1', used to directly select objects |
| Move objects | '2', used to move / translate selected objects (x, y, z) |
| Rotate objects | '3', used to rotate selected objects |
| Scale objects | '4', used to scale selected objects |
| Add objects | '5', used to add objects selected in the Root Templates Panel |
| Copy objects | Select '2' to move selected objects, then hold down 'shift' when moving objects to copy them |
| Select prefabs | Select '1' to select objects, then 'double-click' to select all objects in a prefab |
7. Hidden sand piles, secrets and object items
For our next steps we need to go searching for the medicine that Elena lost while playing. To set this up we are going to create some hidden dirt piles which the player needs to discover, a handy shovel for digging and some items for our player characters to find.
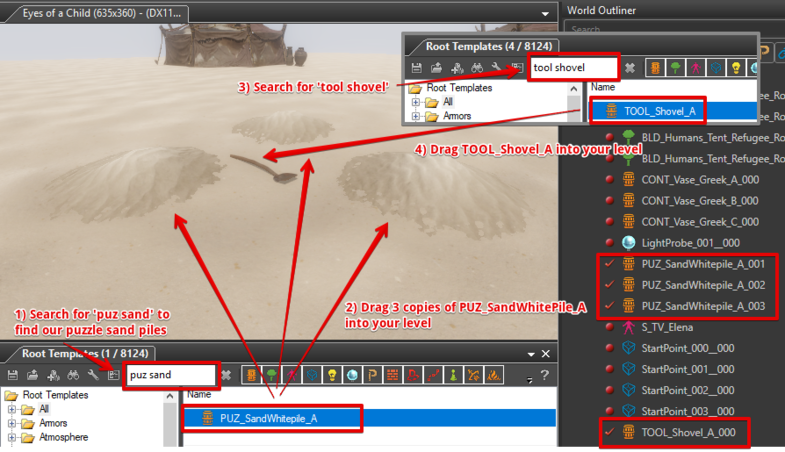
7.1. Add a shovel and three instances of a white sand pile Search for our hidden sand pile objects (1), add three instances (3 x objects) of PUZ_SandWhitepile_A (2) to our level and search for a shovel (3) to add nearby (4).
7.2. Add some objects into the level to dig up out of our sand piles
Search through our root templates and add the following objects into our level.
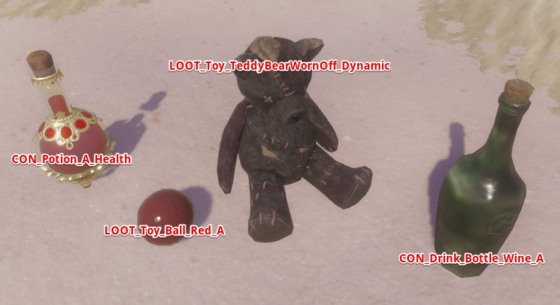
1) LOOT_Toy_TeddyBearWornOff_Dynamic
2) CON_Potion_A_Health
3) LOOT_Toy_Ball_Red_A
4) CON_Drink_Bottle_Wine_A
We will shortly be moving them into our sand piles.
7.3. Add our objects to our sand-piles item property
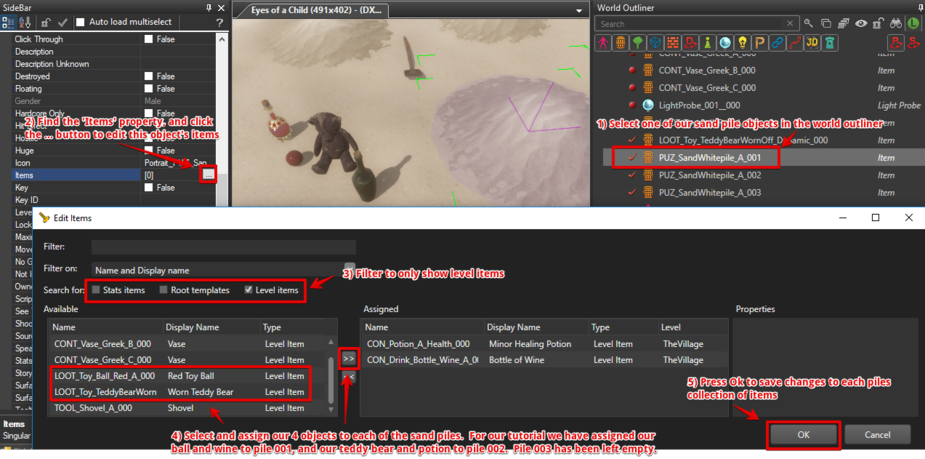
Individually select each of our three sand piles from the world outliner (1), and click on the Items (2) property to edit each objects items. Filter our Edit Items window to only show level items (3) and then select and assign the four objects in any way you like (4, 5).
| For our tutorial we have assigned our ball and bottle-of-wine to PUZ_SandWhitePile_A_001, and our teddy bear and potion to PUZ_SandWhitePile_A_002. Pile 003 has been left empty. |
7.4. Only show our sand piles if the user passes a perception test
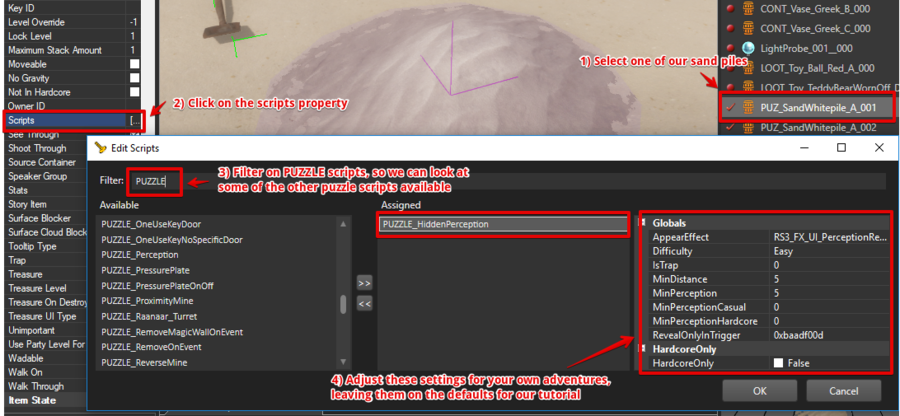
We want to hide our sand piles so that they are not immediately obvious to our players. Luckily these objects already have the PUZZLE_HiddenPerception script assigned, which will trigger a default perception check for players to see the object. Please feel free to use this script on any other world objects you wish to hide until perceived by the player.
8. Box Triggers, referencing local instances, digging with shovels and treasure rewards
We're going to be jumping over to some slightly more complex topics in this section. Our aim here is to let our story (script) know about how our sand piles behave, specifically how they react and we will also be reviewing our naming conventions for local objects – to ensure we are consistent with Larian's standards.
8.1 Naming and referencing of local instances
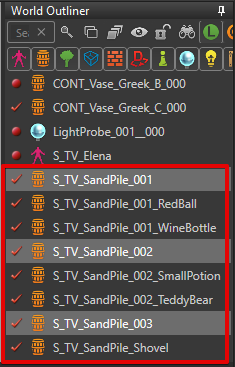
This is going to be cool :-). Please run through all our sand pile objects (including diggable items) and rename them to:
1) S_TV_SandPile_001
2) S_TV_SandPile_001_RedBall
3) S_TV_SandPile_001_WineBottle
4) S_TV_SandPile_002
5) S_TV_SandPile_002_SmallPotion
6) S_TV_SandPile_002_TeddyBear
7) S_TV_SandPile_003
8) S_TV_SandPile_Shovel
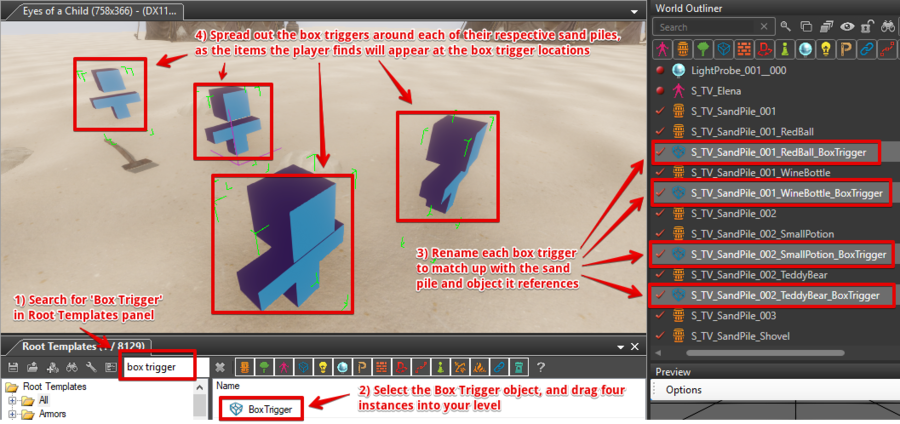
Once completed, our world outliner should look like the following.
| Why make these naming changes? -- A couple of reasons :-). First of all, we add the 'S' as a naming convention for any local objects we want to reference in scripts. This has the benefit of keeping them ordered together, lets the engine know to have references setup for us and improves our code readability (easier to find / understand) – which has ongoing long-term benefits for us and others.
You'll also note that we renamed the items to match up with the sand piles, which has helped to order them in our World Outliner and also makes it easy to see where our items Red Ball, Wine etc. belong. |
8.2 Doing a better job hiding our sand piles
I was curious as to how Larian achieved this, as it seemed pretty obvious where the sand piles were. Lo and behold, we have a simple solution here – which is to select all of our sand piles (1), select the translate option (2) and push them further into the ground (3) so that only the top part of the sand piles are visible. This way it isn't so obvious where the sand piles are, whilst at the same time our shovel should help point our players in the right direction.
8.3 Setting up box triggers to implement digging treasure rewards
We will need to create some box triggers to let our story know where diggable areas exist and where to spawn any found objects. Please search for Box Trigger (1) in the root templates panel and drag out four instances (2) into your level (one box trigger for each object). Once done, run through and rename each box trigger (3) to match up with our sand piles and related items.
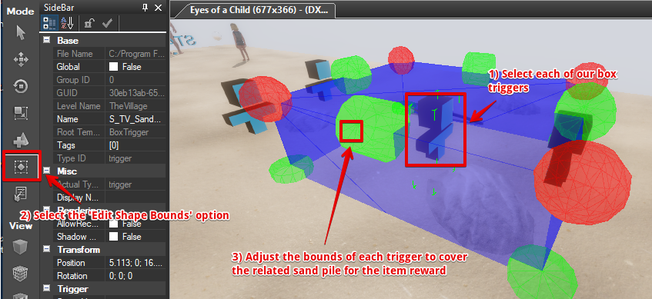
Finally, we just need to make sure our Box Trigger bounds covers our sand piles. Run through and select each box trigger (1), then select the Edit Shape Bounds (2) option to specify the bounds (3) for each trigger.
9. Setting up the StoryEditor and scripts for your custom levels
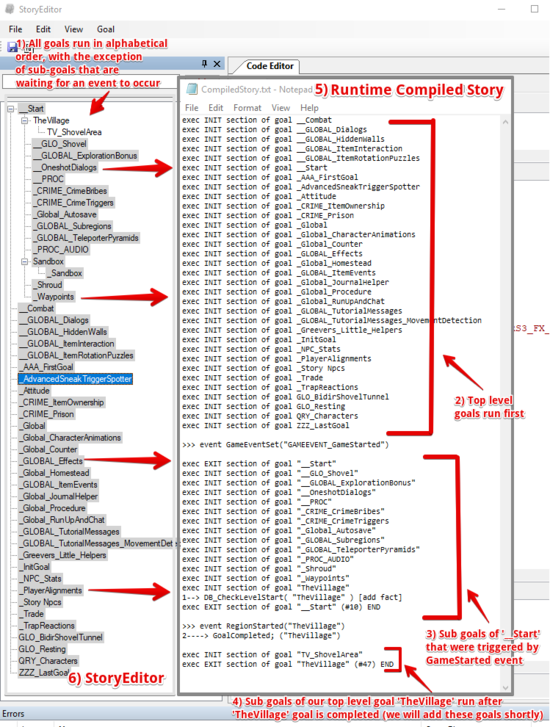
Before we begin, there are a few things we need to understand first about stories and how they work. Notably that all our goals are placed in alphabetical order and compiled into a single story at run-time – with the only exception being that sub-goals will only run when their parent goal completes.
9.1. There is only ever one story, with goals running in alphabetical order
At compilation time, our collection of goals is compiled into one story and sorted alphabetically (5). Regardless of where the goal sits within our Story Editor, whether this be a top level goal or a goal that sits two levels deep under its parent goals.
9.2. Sub-goals will only run when their parent goal is 'complete'
This is a big caveat, and led me to days of frustration as the scripts I wrote just weren't executing. What was happening was that my sub goals that I had neatly placed under a parent goal related to my level weren't being triggered because I hadn't set my parent goal to 'complete' (4). Something we will setup and address shortly.
| For clarity sake, I removed the exec INIT section of goal "Sandbox" which had successfully completed an INIT and EXIT prior to the exec INIT section of goal "TheVillage" occurring. |
9.3. Create a parent goal for your level under the __Start goal
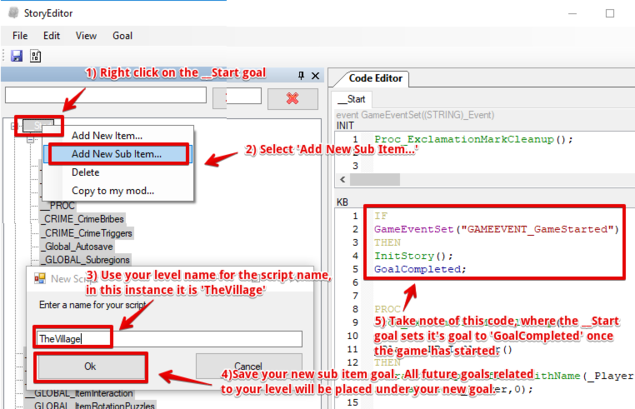
Right click on the __Start goal (1) and select the 'Add New Sub Item...' option (2) to create a goal with the same name as your level (3), in our instance this would be TheVillage. Press the Ok button (4) to save the new parent goal for your level and check out the GoalCompleted code in the __Start goal (5), as we will be setting up something similar for our newly created parent level goal – TheVillage.
9.4. Add in the code that will complete our parent level goal
I re-used this code from the Sandbox parent level goal that Larian had setup. Like our other goals, it has an INIT, KB and EXIT section.
- INIT is where all the initialisation code for a goal is placed, think of it like your setup area – all the actions in here occur as soon as the goal initialises.
- KB is where the bulk of the code goes, and contains all the rules that become active as soon as your goal starts initialising.  Which means that the rules in the KB section can react to changes      made in the INIT section of that same goal.
- EXIT is all the actions that are executed once the goal completes, which is generally used to remove existing databases – resulting in smaller save-game sizes and a faster game experience.
Grab a copy of the code blocks below and paste them in your TheVillage parent goal.
// ------- Place in the "INIT" section --------

DB_CheckLevelStart("TheVillage");

// ------- END "INIT" section --------
// -------- Place in the "KB" section --------

IF
RegionStarted("TheVillage")
THEN
GoalCompleted;

IF
DB_CheckLevelStart("TheVillage")
AND
DB_CurrentLevel("TheVillage")
THEN
GoalCompleted;

// ------- END "KB" section --------
// -------- Place in the "EXIT" section --------

NOT DB_CheckLevelStart("TheVillage");

// ------- END "EXIT" section --------
9.5. Create a new sub item goal under the parent goal for our level – 'TheVillage'
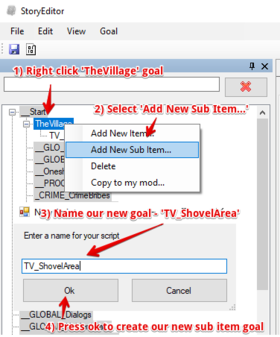
Right click TheVillage (1) goal and select Add New Sub Item... (2) to add a new sub item goal that will execute after TheVillage goal completes. Name the new goal TV_ShovelArea (3) and click Ok (4) once done.
We will be using this goal to store the code for letting our story know how to handle character interactions with our secret sand piles.
9.6. Generate definitions, build and reload
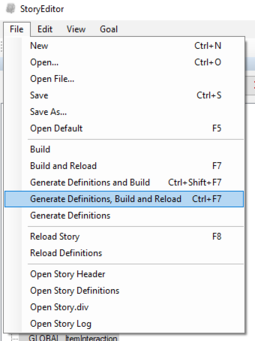
Click on the file menu and choose Generate Definitions, Build and Reload to generate all the code we need to reference the local objects in our levels – required before we can move on to the next step.
9.7. Add the shared helper code to your new sub item goal – 'TV_ShovelArea'
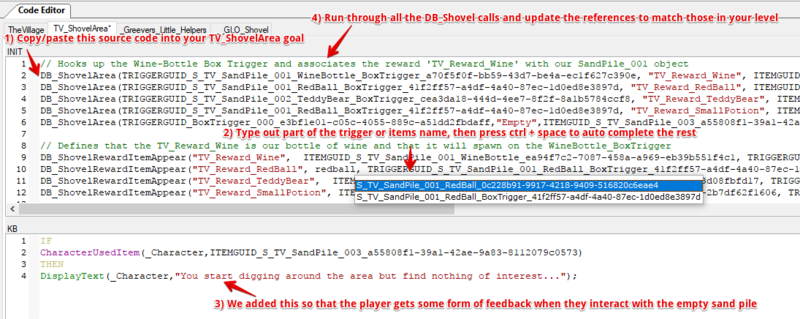
Please copy/paste the attached source code (1) into your TV_ShovelArea goal and update each of the references to your own triggers, objects and sand piles – using the ctrl + space code completion feature (2) to assist.
The example below shows the word redball being typed, and then ctrl + space being pressed to allow the user to see a drop-down of all related references, which in this case include both the red-ball object and the red-ball trigger.
// ----- Place in the INIT section ------

// Hooks up the Wine-Bottle Box Trigger and associates the reward 'TV_Reward_Wine' with our SandPile_001 object
DB_ShovelArea(TRIGGERGUID_S_TV_SandPile_001_WineBottle_BoxTrigger_a70f5f0f-bb59-43d7-be4a-ec1f627c390e, "TV_Reward_Wine", ITEMGUID_S_TV_SandPile_001_8f8f7e03-22a1-484d-8f7e-8bc05b92f14d);
DB_ShovelArea(TRIGGERGUID_S_TV_SandPile_001_RedBall_BoxTrigger_41f2ff57-a4df-4a40-87ec-1d0ed8e3897d, "TV_Reward_RedBall", ITEMGUID_S_TV_SandPile_001_8f8f7e03-22a1-484d-8f7e-8bc05b92f14d);
DB_ShovelArea(TRIGGERGUID_S_TV_SandPile_002_TeddyBear_BoxTrigger_cea3da18-444d-4ee7-8f2f-8a1b5784ccf8, "TV_Reward_TeddyBear", ITEMGUID_S_TV_SandPile_002_d6b1139e-41dd-4d17-b88f-9a3cf9b1c2cd);
DB_ShovelArea(TRIGGERGUID_S_TV_SandPile_001_RedBall_BoxTrigger_41f2ff57-a4df-4a40-87ec-1d0ed8e3897d, "TV_Reward_SmallPotion", ITEMGUID_S_TV_SandPile_002_d6b1139e-41dd-4d17-b88f-9a3cf9b1c2cd);
DB_ShovelArea(TRIGGERGUID_BoxTrigger_000_e3bf1e01-c05c-4055-889c-a51dd2fbdaff,"Empty",ITEMGUID_S_TV_SandPile_003_a55808f1-39a1-42ae-9a83-8112079c0573);

// Defines that the TV_Reward_Wine is our bottle of wine and that it will spawn on the WineBottle_BoxTrigger
DB_ShovelRewardItemAppear("TV_Reward_Wine",  ITEMGUID_S_TV_SandPile_001_WineBottle_ea94f7c2-7087-458a-a969-eb39b551f4c1, TRIGGERGUID_S_TV_SandPile_001_WineBottle_BoxTrigger_a70f5f0f-bb59-43d7-be4a-ec1f627c390e);
DB_ShovelRewardItemAppear("TV_Reward_RedBall", redball, TRIGGERGUID_S_TV_SandPile_001_RedBall_BoxTrigger_41f2ff57-a4df-4a40-87ec-1d0ed8e3897d);
DB_ShovelRewardItemAppear("TV_Reward_TeddyBear",  ITEMGUID_S_TV_SandPile_002_TeddyBear_e6cb08ec-d52f-4cac-b6b3-c23d08fbfd17, TRIGGERGUID_S_TV_SandPile_002_TeddyBear_BoxTrigger_cea3da18-444d-4ee7-8f2f-8a1b5784ccf8);
DB_ShovelRewardItemAppear("TV_Reward_SmallPotion", ITEMGUID_S_TV_SandPile_002_SmallPotion_42b65a2e-4b4f-4cbd-a639-2b7df62f1606, TRIGGERGUID_S_TV_SandPile_002_SmallPotion_BoxTrigger_30eb13ab-652d-444e-9ce4-3137fbb5ea0b);

// ----- END INIT section ------
// ----- Place in the KB section -----

// Displays the entered text if the character uses our SandPile_003 object
IF
CharacterUsedItem(_Character,ITEMGUID_S_TV_SandPile_003_a55808f1-39a1-42ae-9a83-8112079c0573)
THEN
DisplayText(_Character,"You start digging around the area but find nothing of interest...");

// ----- END KB section ------
10. NPC Patrols and moving NPC characters
11. Animations and gestures
== 12. Quest states and rewards ==
