How to create a basic adventure with quests, dialog and scripts
1. Create your new project and basic level
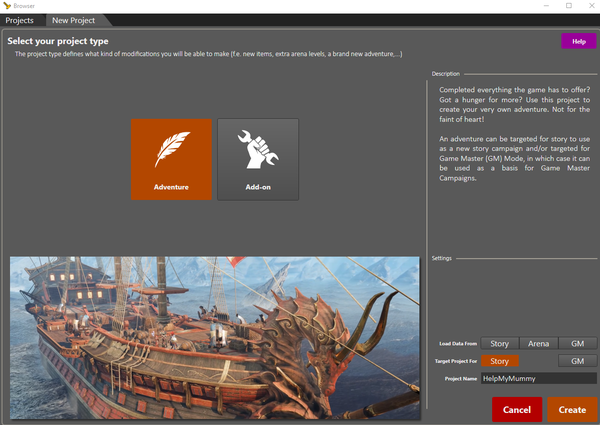
We will be creating a Story mode Adventure, with the main focus being assisting a little girl to find her mummy's medicine. To that end, please create a new Adventure, targeted for story mode with the name HelpMyMummy.
1.1. Create a new adventure type project, targeted at Story mode
Create a new project by pressing the green create project button on the top left. Select the Adventure project type, and target the project for Story mode. Use whatever name you like for the project name – for our tutorial adventure I have called the project HelpMyMummy.
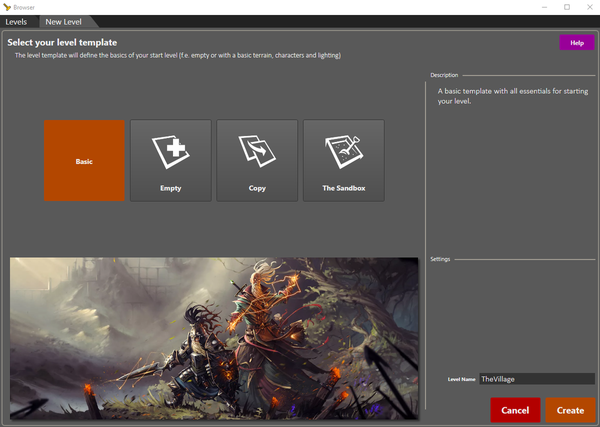
1.2. Create a new basic level template, called 'TheVillage'
Select the Basic level template, and call your level TheVillage – or whatever other name you prefer.
2. Add a character
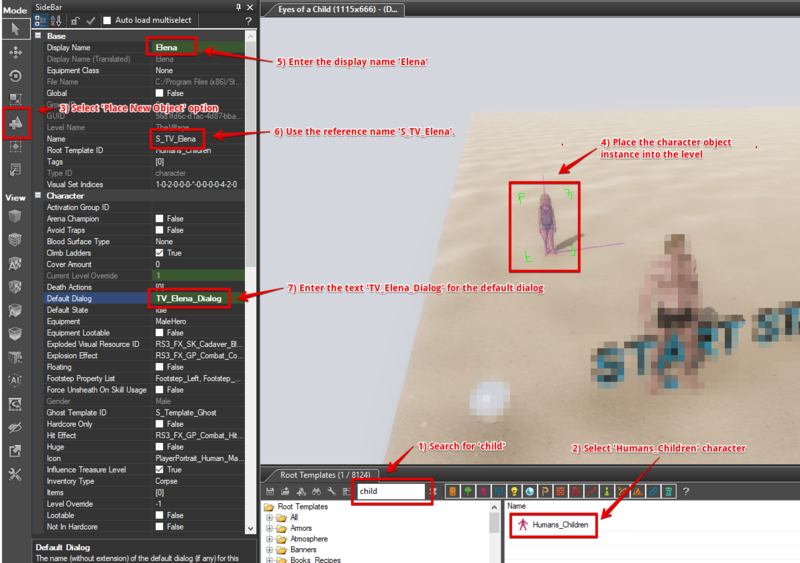
We'll keep this bare-boned and simple, placing a character into the level and updating the bits and pieces we will require for the next steps. We named her Elena (5) and used Larian coding standards to give her a reference name of S_TV_Elena (6). For this stage, feel free to use any character and name.
| Highly recommended we follow Larian's coding standards for consistency and because they make our job easier long term, both in understanding each-other's scripting and in reducing future 'lookup' time finding more info about items we wish to refer to. |
2.1. Create a new NPC character model and place it into the level
Find the Humans_Children (1,2) model and place it into the level (3,4), naming her Elena (5). To keep in line with standards, for her reference, use the name S_TV_Elena (6). The S is to let the engine know that we want to reference this local object in the story and the TV is the prefix for our TheVillage level.
We're adding this early so we don't have to come back, but for now please enter the text TV_Elena_Dialog (7) for the default dialog that will start when speaking with her.
3. Create a simple dialog and save it
In this section we are going to create a simple quest dialog so we can talk with our NPC character and begin a quest.
3.1. Create the start of a simple dialog
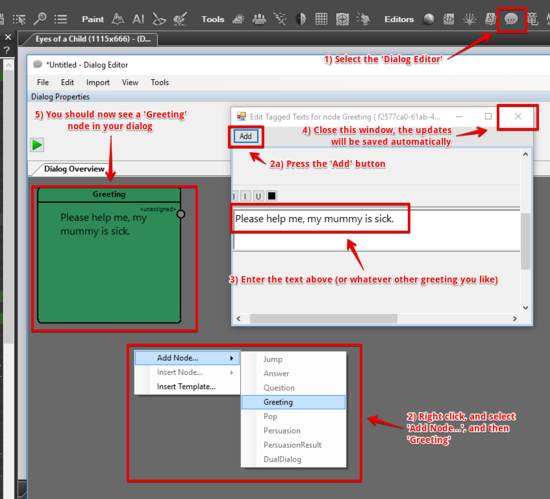
Open up the Dialog Editor (1) and create a simple dialog between players and your NPC character. Create a new Greeting dialog (1) and enter the initial greeting (3). Once done press the 'x' button (4) to save your changes and close the Edit Tagged Texts window.
3.2.Save the dialog as 'TV_Elena_Dialog'
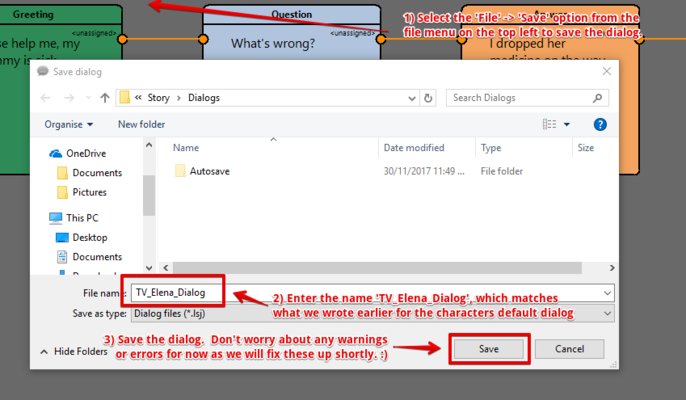
Take this moment to save the dialog. We know the prefix for this level is TV, that our character is called Elena and we are referencing a Dialog - thus: TV_Elena_Dialog (2), which we entered earlier.
3.3. Create the rest of the dialog
Follow the steps below to create the rest of the dialog nodes (1-4), along with the final node (5).
3.4. Setup and assign speakers for your dialog
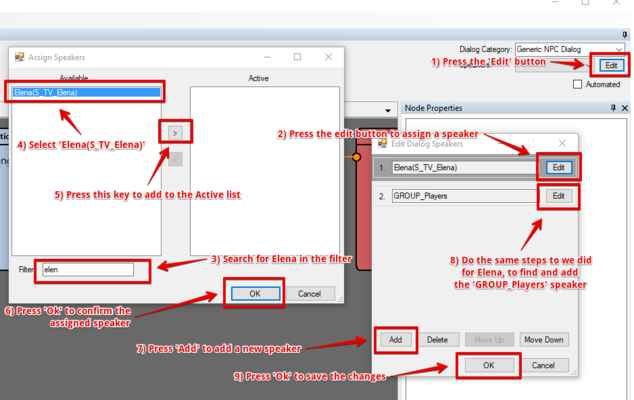
Final step for our dialog is to setup and assign our speakers. Press the edit (1) button to add new speakers, searching for our S_TV_Elena (3,4) speaker. Select Elena(S_TV_Elena) (4) and add it to the active list of speakers (5), pressing Ok once done (6).
Add a new speaker and then follow the same setup steps (3-6) for the GROUP_Players speaker (8), which covers any player talking to our NPC character. Press the Ok button to save your changes (9) once both speakers have been assigned.
| Don't add both speakers under one node. For example, having Elena(S_TV_Elena) and GROUP_Players both grouped together as speaker one (2). Doing so is only used when we have more than one speaker saying something, such as from a group of 2 or more NPC characters speaking together. |
3.5. Assign the correct speaker to each node
The correct speakers should automatically be assigned to their nodes now. However, if anything isn't correct, you can manually select a node (1) and update the speaker as need be.
4. Create our Quest Journal entries
Ah :-), some more of the fun parts. I'll show you what standards the DOS:2 team use and how we can best setup our quests for our adventure.
4.1. Create our quest categories
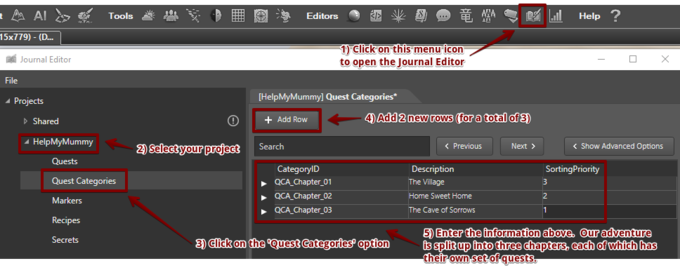
Open up the Journal Editor (1), select your project (2), click on the Quest Categories option (3) and add two new rows (4), for a total of three quest categories. Once done, update our quest categories to match our screenshot (5).
   a) CategoryID: QCA_Chapter_01 | Description: The Village | SortingPriority: 3
   b) CategoryID: QCA_Chapter_02 | Description: Home Sweet Home | SortingPriority: 2
   c) CategoryID: QCA_Chapter_03 | Description: The Cave of Sorrows | SortingPriority: 1
| Our little adventure has been broken up into categories (which would normally only occur in a larger adventure) to demonstrate how the DOS:2 team structure their adventures and to give you a template to build out your own larger scale adventure. |
4.2. Save and reload all
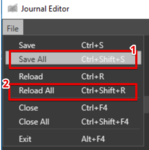
Take a quick second to click on the file menu and Save All (1). Then Reload All (2) to update everything.
4.3. Add a new quest under our 'QCA_Chapter_01' category
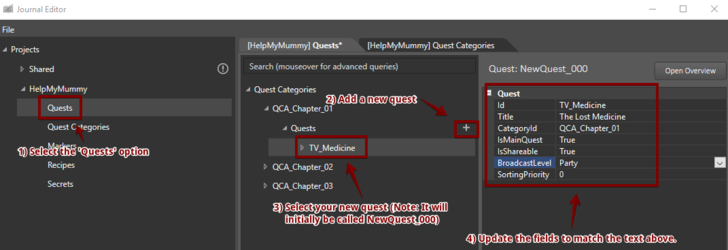
Select the Quests (1) option, add a new quest (2), select it (3) and then update its details (4). Please note the prefixes used, with TV representing TheVillage and QCA indicating that this is a quest category. We will go into more detail about the IsMainQuest, IsShareable and BroadcastLevel settings in future.
