Difference between revisions of "Dialog editor"
(More dialog editor) |
(More dialog editor) |
||
| Line 78: | Line 78: | ||
== Collapsing Nodes == | == Collapsing Nodes == | ||
| − | You can collapse dialog Nodes in the editor by double clicking their title bar. That is the top part of a Node where the Logical Name is shown: | + | You can collapse dialog Nodes in the editor by double-clicking their title bar. That is the top part of a Node where the Logical Name is shown: |
<br/> | <br/> | ||
[[File:Dialog_TitleBar.png]] | [[File:Dialog_TitleBar.png]] | ||
| Line 138: | Line 138: | ||
To assign a Speaker to the current slot you have to move Speakers from the Available list to the Active List. You can do this in two ways: | To assign a Speaker to the current slot you have to move Speakers from the Available list to the Active List. You can do this in two ways: | ||
| − | * Double click a Speaker from the Available Speakers list | + | * Double-click a Speaker from the Available Speakers list |
* Select one or more Speakers from the Available Speakers list and click the ''>'' button. Use the ''CTRL'' key on your keyboard to add or remove Speakers to your selection. | * Select one or more Speakers from the Available Speakers list and click the ''>'' button. Use the ''CTRL'' key on your keyboard to add or remove Speakers to your selection. | ||
To remove Speakers from the current slot, you have to move them from the Active list to the Available Speakers list. You can do this in two ways: | To remove Speakers from the current slot, you have to move them from the Active list to the Available Speakers list. You can do this in two ways: | ||
| − | * Double click a Speaker from the Active Speakers list | + | * Double-click a Speaker from the Active Speakers list |
* Select one or more Speakers from the Active Speakers list and hit the ''<'' button. Use the ''CTRL'' key on your keyboard to add or remove Speakers to your selection. | * Select one or more Speakers from the Active Speakers list and hit the ''<'' button. Use the ''CTRL'' key on your keyboard to add or remove Speakers to your selection. | ||
| Line 236: | Line 236: | ||
{{warning|The editor only looks through the Speakers it has found so far. This means that he might not return all Speakers if the Refreshing icon is still animating!}} | {{warning|The editor only looks through the Speakers it has found so far. This means that he might not return all Speakers if the Refreshing icon is still animating!}} | ||
| + | |||
| + | === Assigning Speakers to Speaker Groups === | ||
| + | Speaker Groups are assigned on the individual characters and items themselves. They can belong to more than 1 Speaker Group. To assign a Speaker Group to a character or item, select it in the editor and open up the proeprties panel ('''CTRL-B''' by default). | ||
| + | |||
| + | Look for the ''Speaker Group'' property in the properties pane of the object: | ||
| + | <br/> | ||
| + | [[File:Dialog_CharacterProperties.png]] | ||
| + | |||
| + | Select the property and click the button to open up the Speaker Group Assignment Editor: | ||
| + | <br/> | ||
| + | [[File:Dialog_SpeakerGroupAssign.png]] | ||
| + | |||
| + | The available Speaker Groups are in the ''Available groups'' list. The currently assigned Speaker Groups are in the ''Assigned Speaker Groups'' list. | ||
| + | |||
| + | The Speaker Group Assignment Editor also lists the Speaker Groups that were set on the Root Template for this object. | ||
| + | |||
| + | To assign this object to certain Speaker Groups, you have to select groups and put them in the '''Assigned Speaker Groups'' list. There are two ways to do this: | ||
| + | * Double-click a Group from the ''Available groups'' list | ||
| + | * Select a Group from the ''Available groups'' list and click the ''Assign'' button. | ||
| + | |||
| + | To remove this Object from a certain Speaker Group, you have to remove the Group from the Assigned Speaker Groups list. There's 2 ways to do this: | ||
| + | * Double-click a Group in the ''Assigned Speaker Groups'' list | ||
| + | * Select a Group in the ''Assigned Speaker Groups'' list and click the ''Remove'' button. | ||
| + | |||
| + | Click the ''OK'' button to apply your changes and close the Speaker Group Assignment Editor. Click the ''Cancel'' button to close the Speaker Group Assignment Editor without applying your changes. | ||
| + | |||
| + | = Adding Text to Nodes = | ||
| + | To add text to a node or edit the existing text, double click on the node. This will open the 'Edit Tagged Texts' window. | ||
| + | <br/> | ||
| + | [[File:EditText.png]] | ||
| + | |||
| + | To add a tagged text, click the add button. This will add a new Tagged text form. The text for the node can be entered in the textbox. | ||
| + | <br/> | ||
| + | [[File:EditText2.PNG]] | ||
| + | |||
| + | A tagged text can have multiple text blocks. To add a new text block, click the ''Add'' button. This will add an extra textbox. To remove one, click the ''X'' button. One of the text blocks will be randomly chosen when the dialog plays. | ||
| + | <br/> | ||
| + | [[File:EditText3.PNG]] | ||
| + | To personalize the text, you can add multiple Tagged Text forms and define rules on which one to choose while playing the dialog. This way, you can show a different text depending on whether the players are dwarves or elves. | ||
| + | <br/> | ||
| + | [[File:Edit_Text4.png]] | ||
| + | |||
| + | The tagged texts are checked in the given order (see numbers on top, left to right, top to bottom). The first one that meets the conditions, is chosen. | ||
| + | The first text block will be shown in the dialog node in the editor. | ||
| + | |||
| + | == Defining Rules == | ||
| + | A rule will check if all/any/none... members of the speakergroup or a single speaker have/has the given tag(s). To add a rule, click the ''+'' button, to remove one, click the ''-'' button. | ||
| + | |||
| + | === Show this when All/Any of the following rules are valid === | ||
| + | When choosing ''All'', all of the conditions needs to be met before that tagged text is chosen. When choosing ''Any'', only one condition needs to be met. It doesn't matter which one. | ||
| + | |||
| + | === Conditions === | ||
| + | There are 5 options: | ||
| + | ; Has all : will check if all members of the specified group have the given tag. | ||
| + | ; Has any : will check if there is at least one member in the group who has the given tag. | ||
| + | ; Has none : will check if there are no members in the group with the given tag. | ||
| + | ; And all : will make a subgroup of rules. All rules in the subgroup should be met. | ||
| + | ; And any : will make a subgroup of rules. Only one of the rules in the subgroup has to be met. | ||
| + | |||
| + | === Speaker === | ||
| + | Choose a speaker or speaker group on which the rule should be checked. | ||
| + | |||
| + | === Tags === | ||
| + | By clicking on the '...' button, the ''Add Tags'' window can be opened in which you can choose multiple tags. | ||
| + | <br/> | ||
| + | [[File:AddTags.png]] | ||
| + | |||
| + | On the ''Available Tags'' tab, you can see all the possible tags that can be chosen. The ''Current Tags'' tab shows all the tags that are used in the current node's tagged text block checks. The filter can be used to search for specific tags. | ||
| + | |||
| + | == Example == | ||
| + | [[File:RulesComplicated.png]] | ||
| + | |||
| + | In the above example, we have two subgroups: 2 and 2c. 2c is a subgroup in subgroup 2. | ||
| + | |||
| + | The tagged text for this set of rules will be selected when: | ||
| + | * 1 and 2 are met (because of ''Show this when ALL of the following rules are valid''. | ||
| + | * 2 is met when any rule in 2 is met (because of the ''And Any of the following rules''). So when 2a, 2b OR 2c is met. | ||
| + | * 2c is met when all of the rules in 2c are met (because of the ''And All of the following rules''). So when 2c' AND 2c<nowiki>''</nowiki> are met. | ||
| + | |||
| + | = Node Properties and Node Types = | ||
| + | In this section we'll cover the Node properties in detail. Not all Node Types will have the same properties, but all Text Nodes (nodes that display text in the dialogue) shared a set of common properties. We'll look at those first. | ||
| + | |||
| + | == Base Text Node Properties == | ||
| + | Greeting, Answer and Question nodes are all Text Nodes. As such they all share a number of properties: | ||
| + | <br/> | ||
| + | [[File:NodeProperties2.png]] | ||
| + | |||
| + | === Addressed To === | ||
| + | In some languages, a sentence being said to a man is different than the same sentence being said to a woman. | ||
| + | |||
| + | English: You are beautiful | ||
| + | |||
| + | French: Tu es beau (to a man) vs Tu es belle (to a woman) | ||
| + | |||
| + | To be able to choose the right version, we need to know to whom the sentence is addressed. This information is stored in the ''Addressed To'' property. | ||
| + | |||
| + | If no ''Addressed To'' speaker is specified, it will be addressed to the first speaker (that is not the ''Speaker'' of the node). If a ''Look At'' value is set for this node, the speaker of that property is taken. | ||
| + | |||
| + | === EndNode === | ||
| + | Checking this checkbox (and thus setting it to True), means that the dialogue will stop executing after this node has been shown. You'll see that the Node turns red to indicate it is an End Node now. You also can't connect nodes to an End Node. | ||
| + | <br/> | ||
| + | [[File:Dialog_EndNode.png]] | ||
| + | |||
| + | === Exclusive === | ||
| + | Normally a dialog selects a node to display out of the list of valid nodes at the point of execution. Out of all those valid nodes it selects a random node. When the dialog encounters one or more valid Exclusive nodes in that list, it stops considering all non-exclusive nodes. This means that the dialog will select a random node from the group of valid Exclusive nodes. This can be used to alter the flow of a dialog in case a certain condition is set and the dialog shouldn't take the normal path. For more info check [[#Controlling Dialogue Flow|]]. | ||
| + | |||
| + | === Logical Name === | ||
| + | This is a human-readable name that's useful to provide context for a dialog node. Can be useful for making the use of a node clear and for voice recordings. The logical name is displayed at the top of a node in the dialog overview. | ||
| + | |||
| + | === Optional === | ||
| + | Optional nodes function as normal nodes unless the dialog doesn't encounter any valid nodes when looking for a node to show. If the dialog doesn't encounter any valid nodes, but it has a list of optional nodes, it'll select a random node out of the optional nodes and skip it. The selected optional Node will not be shown then, but the dialog will progress as if that Node was shown. Note that the nodes are '''skipped''', that means '''none''' of the actions of the nodes are performed (so no flags are set). For more info see [[#Controlling Dialogue Flow]]. | ||
| + | |||
| + | === Shown Once === | ||
| + | When ''Shown Once'' is checked the node will only be shown once during a dialog instance. The node will be shown again when the dialog starts again. | ||
| + | |||
| + | === Speaker === | ||
| + | Who says the text in this Node? For Question Nodes this also decides who has to click the question. Clicking this property allows you to chose a value from a dropdown list containing all the Speaker Slots defined in this dialogue. | ||
| + | |||
| + | === Stub === | ||
| + | Indicates that this node is a work in progress (not used in practice). | ||
| + | |||
| + | === Tags === | ||
| + | The ''tags'' property can be used to assign multiple tags to a dialog node. The '''SFX_ONLY''' tag can be used on dialog nodes that don't need to be voiced. | ||
| + | |||
| + | === Texts in this Node === | ||
| + | List of all the texts contained in this node. More about the texts and how to create them in [[#Adding Text to Nodes]]. | ||
| + | |||
| + | === UUID === | ||
| + | Unique identifier of this node. This is generated for you and can't be changed. | ||
| + | |||
| + | === Transition Mode === | ||
| + | Indicates how the dialog progresses when it encounters this Node. It has 2 possible settings. | ||
| + | |||
| + | ==== Wait for input ==== | ||
| + | This is the default setting. The dialog will display the node and then wait for a user to click ''continue'' (or ''end'' in the case of an End Node) | ||
| + | |||
| + | ==== Wait X seconds ==== | ||
| + | The dialog will show the node and then wait X seconds before it shows the next node in the dialogue tree. X is a number that you can fill in when you select this transition mode: | ||
| + | <br/> | ||
| + | [[File:Dialog_TransitionMode.png]] | ||
| + | |||
| + | === Flags to Check === | ||
| + | Which flags is this Node checking? More about flags in [[#Controlling Dialogue Flow]]. | ||
| + | |||
| + | === Flags to Set === | ||
| + | Which flags is this Node setting? More about Flags in [[#Controlling Dialogue Flow]] and [[#Flags to Set property]]. | ||
| + | |||
| + | === Node Context === | ||
| + | What's the context for this Node? Use this to clarify a Node or for voice recording purposes, or as comments for yourself or others about this node (never shown to players). | ||
| + | |||
| + | == Text Nodes == | ||
| + | |||
| + | === Greeting === | ||
| + | [[File:Dialog_Greeting.png]] | ||
| + | |||
| + | These nodes indicate where a dialogue starts executing. They form the roots of the dialogue tree. | ||
| + | |||
| + | === Question === | ||
| + | [[File:Question.png]] | ||
| + | |||
| + | These Nodes are used to ask questions to other Speakers in the dialogue. When a dialogue encounters these nodes it'll present a list with all valid Question nodes to the Speaker that owns the Nodes. | ||
| + | |||
| + | {{warning|You cannot have a mix of valid ''Answer Nodes'' and ''Question Nodes'' as children of a single Node. When that happens the game will warn you and ignore the ''Answer Nodes''.}} | ||
| + | |||
| + | === Answer === | ||
| + | [[File:Dialog_Answer.png]] | ||
| + | |||
| + | These nodes are simple text entries. Most commonly used as replies to player Questions. | ||
| + | |||
| + | === Logic Nodes === | ||
| + | The Nodes in this section do not contain any text themselves and only exist to change the flow or to simplify the structure of a dialogue. As a result these Nodes do '''not''' have the base Text Node properties, but have their own (small) set of properties. | ||
| + | |||
| + | ==== Jump Nodes ==== | ||
| + | Jump Nodes are Nodes that reference other Nodes. They are a way to re-use nodes or as a means to keep dialogue structure cleaner by cutting down on the number of child connections needed. A Jump Node is constructed by pointing it to another node in the dialogue. | ||
| + | |||
| + | ===== Properties ===== | ||
| + | ; Jump To : This indicates which Node(s) a Jump node references. This Property can have 2 values: | ||
| + | :; Start of Node : This Jump node references the pointed to Node. This is as if the pointed to Node and its children are inserted at the point of the Jump Node. | ||
| + | :: {{warning|The pointed-to Node still needs to be valid before it can be shown (flag checks need to pass).}} | ||
| + | :; End of Node : This Jump Node references the children of the pointed-to Node. This is as if the parent Node of this Jump Node has all children of the pointed-to Node connected to it. | ||
| + | :: {{warning|The pointed-to Node does '''not''' need to be valid. The children of the pointed-to Node are still validated though.}} | ||
| + | ; Target Node UUID : The UUID of the Node this Jump Node is pointing to. You can not change this. To see which Node this is, double click the Jump Node and the editor will center the view and select the pointed-to Node. | ||
| + | ; UUID: The unique identifier of this Node. You can not change this. | ||
| + | |||
| + | ===== Creating Jump Nodes ===== | ||
| + | # Select a Node that accepts children and select Jump Node from the Node Context menu. | ||
| + | #:[[File:Dialog_JumpNode.png]] | ||
| + | # Your cursor will now change into a targetting cross. | ||
| + | # Select a node in the dialog to create a reference to that Node. | ||
| + | #:[[File:Dialog_JumpCreated.png]] | ||
| + | |||
| + | If you want to cancel the creation of a ''Jump Node'', you can press the '''ESCAPE''' key. | ||
| + | |||
| + | Once your Node has been created you can set the ''Jump To''-property to change which node(s) it references. | ||
| + | |||
| + | == DOS specific Nodes == | ||
| + | The Nodes in this section are not part of the Dialogue framework. they are Nodes that were created specifically for Divinity: Original Sin. These may or may not be available in other games. | ||
| + | |||
| + | === Pop Nodes === | ||
| + | [[File:Dialog_Pop.png]] | ||
| + | |||
| + | Pop Nodes are Nodes that were introduced to support the old Keyword dialogues. They function much like a ''Jump Node'' that always points to the End of a Node. | ||
| + | |||
| + | ==== Properties ==== | ||
| + | ; Exclusive : Functions the same as the ''Exclusive'' property of Text Nodes. See [[#Exclusive Property]]. | ||
| + | ; Pop Count : How many levels the Node should go back. This a number that starts from 0. See [[#Pop Levels]] for more information. | ||
| + | ; UUID : The unique identifier of this Node. | ||
| + | |||
| + | ==== Pop Levels ==== | ||
| + | Every time a list of Quesiton Nodes is presented, a ''pop level'' is created. This is a point in the dialogue that Pop Nodes can refer to, to present a list of Questions to the player. | ||
| + | |||
| + | The Pop Node then functions as a Jump Node that jumps back to the end of the Parent Node of the specified level of Question Nodes. To see how many levels to jump back to, you have to go back X+1 Question Nodes in the dialogue tree, starting from the Pop Node. X is the value you filled in for the Pop Count property. You can see which node a Pop Node it's targetting by double clicking the Pop Node. If the Pop Node can't Jump back to the specified pop level you'll get an error message in the editor when double clicking the Pop Node. | ||
| + | |||
| + | === Dual Dialog Node === | ||
| + | [[File:Dialog_DualDialog.png]] | ||
| + | |||
| + | Dual Dialog Nodes are Nodes that pause the current dialogue and ask the Game Scripting to start a certain sub-dialog. These sub-dialogs are typically decission dialogues between 1 or more players. When the sub dialogue ends, the current dialogue resumes again. | ||
| + | |||
| + | ==== Properties ==== | ||
| + | ; Dual Dialog Name : This is the name (without file extension) of the sub dialog to start. Double clicking the Dual Dialog content, tries to open or switch to a dialog editor for the pointed-to sub dialog. | ||
| + | ; Exclusive : Functions the same as the Exclusive property of Text Nodes. See [[#Exclusive Property]]. | ||
| + | ; Logical Name : Functions the same as the Logical Name property of Text Nodes. See [[#Logical Name Property]]. | ||
| + | ; Optional : Functions the same as the Optional property of Text Nodes. See [[#Optional Property]]. | ||
| + | ; Shown Once : Functions the same as the Shown Once property of Text Nodes. See [[#Shown Once Property]]. | ||
| + | ; UUID : The unique identifier of this Node. | ||
| + | |||
| + | === Persuasion Nodes === | ||
| + | |||
| + | == Game specific Node Properties == | ||
| + | In addition to the built-in Node Properties, a game can also add custom properties to Nodes. These Properties are on the Advanced tab of the properties sidebar: | ||
| + | <br/> | ||
| + | [[File:Dialog_GameProperties.png]] | ||
| + | |||
| + | === DOS Node Properties === | ||
| + | Divinity Original Sin has a couple of Node options that are unique to this game. These are all applied to the Text Nodes (Greeting, Question, Answer). | ||
| + | <br/> | ||
| + | [[File:GameNodeProperties.PNG]] | ||
| + | |||
| + | ==== Sound ==== | ||
| + | ; Sound Event : This is the id of an additional sound that is started when the node is started (eg. evil music when an evil answer is chosen). | ||
| + | ; Instruments : This is the id of a sound for a specific instrument. Depending on the instrument the player choose, the sound for the given instrument will be played. If there is a sound event set, the instrument sound will not be played. | ||
| + | |||
| + | ==== Animation ==== | ||
| + | ; Emotional Expression : This determines which animation the Speaker of this Node will play. Can also be used as a hint to the voice actors. '''If an animation for the Speaker of this Node is set as well, the emotional expression will not be played'''. | ||
| + | ; Look At : You can define per dialog Node what Speaker a certain Speaker needs to face when the Node starts. This is done by defining Look-At entries. You can add an entry by clicking the Add button. This will add an empty Look-At entry: | ||
| + | :[[File:GameNodePropertiesAddLookat.png]] | ||
| + | : | ||
| + | :Pressing the Add button again will add more empty Look-At entries to this node. | ||
| + | :The two dropdown boxes control which Speaker looks at which Speaker. The first one is the NPC that's going to face a certain Speaker. The second one is the target Speaker. '''You can only select Speakers that :were assigned to this dialog!''' | ||
| + | : | ||
| + | :You can delete a Look-At entry again by clicking the Delete button: | ||
| + | :[[File:GameNodePropertiesDeleteLookat.png]] | ||
| + | :To copy paste the look at property to another node in the dialog, click the 'Copy' button, select another node and click the 'Paste' buttons. | ||
| + | ; Animations : For each speaker, an animation can be set that will be performed during that dialognode. To add an animation, click the add button. | ||
| + | :[[File:GameNodePropertiesAddAnimation.png]] | ||
| + | :Choose one of the speakers and fill in the name of an animation. | ||
| + | :Copy-pasting and deleting an animation can be done the same way as for 'Look at'. | ||
| + | : | ||
| + | :If an animation for the speaker of the selected node AND an 'Emotional expression' (which is also for the speaker of the selected node) is set, only the animation will be played. | ||
| + | |||
| + | ==== Game ==== | ||
| + | ; Camera Target : The camera is, by default, following the speaker in a dialog. Choose another speaker from the list to target the camera on another player during the dialog node. | ||
| + | ; Extra node time : If a node needs to be shown longer than normal, that extra time can be set in the ''Extra node time'' property. This time will be added to the default node time (based on the amount of words), the length of the voice data or the ''Wait time'' set for nodes with the ''Wait for x seconds'' node transition mode. | ||
| + | |||
| + | = Controlling Dialogue Flow = | ||
| + | All the Nodes in a dialogue form a tree by connecting with their parents and children. The game then walks through the dialogue tree to figure out which Nodes to show to players and when. It does this by starting at the roots of the tree, selecting a root to show and from that root working itself through the branches towards the leaves that are connected to it. The [[#Greeting Nodes]] form the roots of the tree, so this is where all dialogues will start. The leaves are the End Nodes in a dialogue, and this is where execution of a dialogue stops. | ||
| + | |||
| + | == Node validation == | ||
| + | When a dialogue starts, the game looks through all of the roots of that dialogue and validates them. Validating a node means checking all the conditions that are put on the Node. Only Nodes that pass this test are considered for display. The game performs a similar test for the non-root Nodes that are connected to a root: only the valid nodes are considered for display. | ||
| + | |||
| + | Validating a Node is a process that results in a boolean value. You can think of a boolean value as a truth value, something that is either '''true''' or '''false'''. So validating a node results in 2 possible truths: the node is either valid ('''true''') or invalid ('''false'''). | ||
| + | |||
| + | == Node Conditions == | ||
| + | While a game can have custom validation requirements on a Node, most of the conditions are put on Nodes through the [[#Flags to check]] property of Nodes. A Flag is also a boolean value. It can either be set ('''true''') or not set ('''false'''). By default, Flags start out as being not set and are thus considered to be '''false'''. | ||
| + | |||
| + | The ''Flags to Check'' property is a list of flags that need to have a certain value (set or not set) if a Node is to be considered valid. Each entry of this list compares the boolean value of the specified Flag with a desired boolean value. If the boolean value of the Flag matches the desired boolean value, the games considers that entry to be '''true'''. If the two boolean values don't match it considers that entry to be '''false'''. The games calculates if a Node is valid or not, by combining all of the boolean values of the entries of that list. We'll see how we can combine boolean values in the next section. | ||
| + | |||
| + | === Boolean Logic === | ||
| + | Boolean Logic describes how we can combine two boolean values to come up with a new boolean value that's the combination of the two input values. We call the way we combine the 2 input values an operator. It's something that operates on 2 input values to produce a new output value. There's several operators you can use to combine boolean values, but we'll stick to the ones used by the dialogue system in this section. | ||
| + | |||
| + | ==== The AND operator ==== | ||
| + | The AND operator is used to enforce that the two input values passed to it are '''true'''. '''If and only if''' the two input values are '''true''' will the AND-operator return '''true''' as well. As soon as one (or both) of the inputs are '''false''' it will return '''false''' as well. | ||
| + | |||
| + | To summarize: | ||
| + | * '''true''' AND '''true''' gives us '''true''' | ||
| + | * '''false''' AND '''true''' gives us '''false''' | ||
| + | * '''true''' AND '''false''' gives us '''false''' | ||
| + | * '''false''' AND '''false''' gives us '''false''' | ||
| + | |||
| + | ==== The OR operator ==== | ||
| + | The OR-operator is more lenient than the AND operator. It returns '''true''' as soon as any of the two input values is '''true'''. That means it will only return '''false''' if both input values are '''false''' too. | ||
| + | |||
| + | To summarize: | ||
| + | * '''true''' OR '''true''' gives us '''true''' | ||
| + | * '''false''' OR '''true''' gives us '''true''' | ||
| + | * '''true''' OR '''false''' gives us '''true''' | ||
| + | * '''false''' OR '''false''' gives us '''false''' | ||
| + | |||
| + | ==== The NOT operator ==== | ||
| + | The NOT operator simply returns the inverse of whatever you put into it. That means that NOT '''true''' will result in '''false'''. Similarly NOT false will result in true. | ||
| + | |||
| + | To summarize: | ||
| + | * NOT '''true''' gives us '''false''' | ||
| + | * NOT '''false''' gives us '''true''' | ||
| + | |||
| + | === Validating a Node === | ||
| + | Now that we know how to combine boolean values, we can look at how the game checks the [[#Flags to Check]] property of Node. Like we already mentioned, this property is a list of Flags that need to be set ('''true''') or not set ('''false''') before this Node is considered valid (and thus, considered for display). It compares the boolean values of the flags with the desired boolean value and considers an entry true if they match. If they don't match it considers the entry '''false'''. The game then combines all of these boolean values using the AND operator. This means that a Node is only valid if that list only contains '''true''' values. As soon as that list of entries contains a '''false''', the node is considered invalid. | ||
| + | |||
| + | === Adding Flag Checks === | ||
| + | To add a Flag check to a Node, select the Flags to Check property of the Node in the properties sidebar and click the edit button: | ||
| + | <br/> | ||
| + | [[File:Dialog_AddNodeCheck.png]] | ||
| + | |||
| + | You'll get the Flag Editor screen: | ||
| + | <br/> | ||
| + | [[File:Dialog_FlagCategories.png]] | ||
| + | |||
| + | Select the Flag Category you want to add a Flag to from the Flag Categories list. You will then be presented with an overview of this Flag Category: | ||
| + | <br/> | ||
| + | [[File:Dialog_AddingFlags.png]] | ||
| + | |||
| + | The top list box shows all available Flags of the selected type. This is a list of all the Flags used in the whole dialogue or a list of all defined Tags (see [[#Tag Editor]] to define Tags) in the case of the Tags Flag type. | ||
| + | |||
| + | The bottom list box, the ''Active flags'' list box, shows the Flags that are active on the currently selected Node. | ||
| + | |||
| + | Type the name of the Flag you want to add in the ''Custom flag'' text field and click the Add button to add a new Flag. The new Flag will be automatically added to the Active flags list. | ||
| + | |||
| + | To remove a Flag from the currently selected Node, move the Flag from the ''Active flags'' list to the top list box. You can do this by double clicking the Flag in the ''Active flags'' list box or by selecting it in the ''Active flags'' list and clicking the up arrow button. | ||
| + | |||
| + | To add an already defined Flag to the currently selected Node move it from the top list box to the ''Active flags'' list. You can do this by double clicking the Flag in the top list or by selecting it in the top list and clicking the down arrow button. | ||
| + | |||
| + | Hit the ''OK'' button when you're done adding flags and apply your changes. Or hit the ''Cancel'' button to discard your changes and close the Flag Editor. | ||
| + | |||
| + | === Practical Examples === | ||
| + | Let's say we have a node that we want to show if a certain local flag (called localFlag) hasn't been set and if a certain global flag (called globalFlag) is set. More concrete this means that this node is valid if: | ||
| + | * localFlag's value has to be false. | ||
| + | *: AND | ||
| + | * globalFlag's value has to be true. | ||
| + | This translates into the following Flags to Check property: | ||
Revision as of 21:24, 15 October 2017
Contents
- 1 Introduction
- 2 Creating Dialogues
- 3 Nodes
- 4 Navigating the Dialogue Tree
- 5 Speakers
- 6 Adding Text to Nodes
- 7 Node Properties and Node Types
- 7.1 Base Text Node Properties
- 7.2 Text Nodes
- 7.3 DOS specific Nodes
- 7.4 Game specific Node Properties
- 8 Controlling Dialogue Flow
Introduction
The Dialogue Designer is a visual tool for creating dialogues in our Divinity games. The tool is easy to use for writers and scripters alike and it is independent of the game we're working on.
Creating Dialogues
The Dialogue Designer can be found in the toolbar of our game editor. Look for the speech bubble.
Click that icon to open an instance of the Dialogue Designer. Every time you click on that icon, you will open a new dialogue editor instance. You will be presented with an empty dialogue when the editor starts:

New Dialogues
From the File menu you can create a new empty dialogue (replaces the currently open dialogue, if any, with an empty one) or a dialogue from a template. For more about Templates see #Templates.
Copying Dialogues
If you want to create a new dialogue based on an existing dialogue, don't just copy the files! This will cause problems with voice recording. If you want to copy an existing dialogue you can either:
- Open up the existing dialogue and use the "save as" function in the File menu to save a new dialogue with the name of your choice. You will then be working in the copied version of the dialogue.
- OR
- Open up two instances of the Dialogue Editor. Open your source dialogue in the first instance and Copy the nodes. Then go to the second Dialogue Editor Instance and paste the nodes. For more about copying nodes see #Copying_Nodes.
Nodes
The Dialogue Designer represents the logical structure of a dialogue with a node tree. A node is a logical block of text said by an actor in the dialogue. Everything an NPC or a player can say (or ask), is represented by such a node. Nodes form a tree by connecting to other nodes. These connections denote the flow of the dialogue. For example, if you want an NPC A to say something and another NPC B to reply to that, you have to make a node for NPC A and connect another node for NPC B to that. Nodes can be connected to multiple other nodes, but more about that later.
Adding Nodes
In your dialogue window, right click the grey area to get the node popup menu:

From this menu you can select which type of node you want to add to your dialogue. You'll notice that some of them are greyed out in this pictures. That's because not all node types can be added independently. Some node types require a parent node, before they can be added.
Connecting Nodes
In the previous section we saw that some nodes need a parent node before they can be added to your dialogue. That's the case for most node types found in a dialogue. The Greeting node is an example of a node that doesn't need a parent, since it's the node where the dialogue will start execution. They form the roots of the dialogue tree and the rest of the dialogue flows from them.
Let's create a greeting node, by selecting “Greeting” from the node popup menu:

You'll see a green box appear in the main panel of your dialogue designer. Every node is represented as a little box like that, each with a unique colour, Notice the little circle at the top right of the greeting node? That's a connector. This is where other nodes will connect to this greeting node. The greeting node only has a single connector (to the right), because it does not accept parent nodes. You can only attach nodes to it, you can't attach a greeting node to another node since it has no connector on the left.
Now lets add an Answer node to this greeting node. Answer nodes are plain text nodes, usually put in dialogues as answers to questions made by a player (hence the name). You can't have an answer without a preceding question or another text node of some kind, That just wouldn't make sense. That's why Answers require a parent node and that explains why they were greyed out when we first opened up the node popup menu.
To add an answer node, we first select the greeting node, by left clicking on it. You'll notice the colour will change to a lighter shade of green. Now you right click to open the node popup menu:

You'll notice the previously greyed out options are now available to click. All those greyed out node types require a parent node before they can be used in a dialogue. Now select “Answer” from the menu. You'll see an Answer node appear next to your Greeting node:

Notice the line between the two nodes. That's a node connection. It extends from one node connector to another node connector. The Answer node has a node connector on its right side, That means you can attach other nodes to it. It also has a node connector on the left, which means it accepts incoming connections from other nodes.
There is no limit on the number of node connections you can have. A single Greeting node can have multiple nodes attached to it. Just as a single Answer node can have multiple nodes as parents.
Inserting Nodes
Some times you want to add a node in between a parent and its children. Instead of adding a new node to the parent and then manually connecting (and disconnecting) the parent's child nodes, you can use the node popup menu's “Insert Node” function.
To insert a node, select the parent node and right click it. Then from the node popup menu open the “Insert Node” sub menu and select your desired node type from the list. This list only contains nodes that can be inserted in between 2 nodes. That is, it only contains nodes that accept parents and children. Selecting Nodes
If you want to move a node, remove it or change its properties you have to first select it. You can select more than one node, though you can't change node properties if you have more than 1 node selected. The dialogue editor offers several ways to select nodes:
- Select a single node by left-clicking it with the mouse.
- Add or remove from your node selection by holding the CTRL key and left-clicking another node. If the new node was not selected it gets added to the current node selection. If the new node was already selected it will be removed from the current selection.
- You can marquee select a (group of) nodes by left-clicking in empty space and dragging over the node(s) you want to select. You'll see a rectangular region extend from where you clicked and following the mouse cursor. When you let go of the left mouse button, any nodes contained in the selection rectangle will be selected.
- Select a node and all of its children by holding the ALT key and left-clicking a node.
Copying Nodes
You can copy and paste nodes into your dialogues.
To copy dialog nodes, select the nodes you want to copy and press the CTRL + C key combination on your keyboard. The dialog nodes are now put on the clipboard and can be pasted in either the current dialogue or another instance of the dialogue editor.
To paste your copied dialog nodes, simply go to the destination dialogue editor window and press the CTRL + V key combination on your keyboard. If the pasted nodes had parent and/or child nodes and those nodes are present in the destination dialogue editor, the newly pasted nodes will be connected to those too.
Removing Nodes
Remove nodes from the dialogue by selecting them and pressing the DELETE key.
Moving Nodes
To move nodes to a new location in the dialogue tree, select them first. Then left click and drag one of the selected nodes. The group of selected nodes will now follow the mouse cursor as you drag it around. Let go of the left mouse button to place the nodes on the new location. When you drop the nodes, they will snap to a location. You can show the grid by checking the 'Show grid' option in the 'View' menu.
Collapsing Nodes
You can collapse dialog Nodes in the editor by double-clicking their title bar. That is the top part of a Node where the Logical Name is shown:

A collapsed Node only displays the Logical Name and not its contents:
![]()
Changing Node Properties
Every node type has a number of properties that can be changed from the node properties side bar:

You can only edit the properties of one node at a time. So if you have multiple nodes selected you can not change their properties. Not every node type offers the same node properties. A more in-depth discussion is provided in #Node Properties and Node Types.
To copy and paste properties from one node to another, you can right click the property and choose for 'Copy'. If you want a textual representation of a property (eg. for documentation), you can choose 'Copy display string to clipboard'.
You can drag the Node Properties window to dock it somewhere else or move it to a second screen for easier editing.
As your dialogue grows not all nodes will fit on the screen anymore. When your view doesn't contain all the nodes in the dialogue tree anymore, the dialogue editor will show scrollbars to indicate where there's more nodes outside of the current view. Drag the scrollbars to pan the view. You can also right-click or middle-click the mouse and drag to move the dialogue view in a desired direction.
If you want an overview of the dialogue tree, you can zoom the dialogue view by scrolling the mouse-wheel.
If you want to center the view on a node, select the node and hit the HOME key on your keyboard.
Speakers
Every dialogue is written for a certain set of characters. These characters are the actors of the dialogue. Every dialogue keeps these actors in a list, called the Speakers. They indicate who says what in the dialogue. This Speaker list has a certain order. For example, say we have a dialogue between Bill and Ted. Bill would be speaker 1 (and be in the first slot) and Ted would be speaker 2 (and be in the second slot). Nodes refers to these slot to see who's saying the text contained in.
In our dialogues players will always be the last Speakers in the list. That's because we can have dialogues where depending on the situation more than 1 player can be active in a dialogue. Since we don't want to disrupt the order of the other Speakers, we add players in the back.\
For Question nodes, the Speaker of the node also determines who has to select the question.
Editing Speakers
At the top right of the Dialogue Designer window you can find the Speaker Editor:

Click the Edit button to open up the Speaker Editor. The Speaker Editor will open and show the current Speakers assigned to the slots (if any):

Click the Add button to add a Speaker Slot to the current dialogue:

The slot with the grey background is the currently selected item. This is important if you want to change the order of the slots with the Move Up and Move Down buttons.
To select a Speaker Slot, just click it with the left mouse button.
The Delete button removes the currently selected slot from the list. When the removed slot is still used in the dialog, a messagebox will pop up asking you if you want to replace the speaker by another speaker. All occurrences of the removed speaker (in flags, speaker, animations...) will then be replaced by the selected speaker.
Click the Edit button next to a slot to start assigning Speakers to that slot:

You'll see 2 lists. All the available Speakers in the game and the active Speakers in the selected slot. A slot can have more than 1 speaker assigned to it. This is because some dialogues can be said by several NPCs (think flavour automated dialogues).
To assign a Speaker to the current slot you have to move Speakers from the Available list to the Active List. You can do this in two ways:
- Double-click a Speaker from the Available Speakers list
- Select one or more Speakers from the Available Speakers list and click the > button. Use the CTRL key on your keyboard to add or remove Speakers to your selection.
To remove Speakers from the current slot, you have to move them from the Active list to the Available Speakers list. You can do this in two ways:
- Double-click a Speaker from the Active Speakers list
- Select one or more Speakers from the Active Speakers list and hit the < button. Use the CTRL key on your keyboard to add or remove Speakers to your selection.
You can use the Filter textbox to search for speakers in the list of Available Speakers.
Once you're done, click the OK button and you'll see your Speakers show up in your selected slot.

Click the OK button in the Speaker Editor to close it and keep your changes. The Cancel button will close the Speaker Editor without saving your changes.
Once you're done assigning Speakers to your slots, they'll show up in the drop down list in the upper right:

The Narrator Speaker
Sometimes you want a node to be spoken by a narrator instead of any of the Speakers inside the dialogue. To handle that case there's a special Narrator Speaker provided. This Speaker can not be found in the Speaker List of the Dialogue and needs to be assigned manually to the Nodes you want to be said by the Narrator:

For more info on Assigning Speakers see #Assigning Speakers to Nodes.
NOTE: this Speaker is not available for every node type. This is because it simply doesn't make sense for all nodes to have support for this. At the moment only Greeting and Answer nodes support the Narrator Speaker.
The Narrator Speaker is there for voice recording reasons and as such can not be used to set or check Flags and/or Tags on!
Assigning Speakers to Nodes
Not all nodes have a Speaker, only nodes that have text inside of them need one. In our case these are the Greeting, Answer and Question nodes. To assign a Speaker to them, select the node and in the properties panel look for the Speaker property:

Selecting the Speaker property in the grid will show a button that opens up a dropdown list with the current Speakers. Select the speaker from the dropdown list to assign it to that Node.

By default, Answer and Greeting nodes will select the first Speaker slot as their Speaker. Questions default to the last Speaker Slot. This is in keeping with the fact that players will be added to the back of the Speaker list.
Addressed To Property
This property indicates who the Speaker of the node is talking to. This is an optional property. If nothing is filled in, the game will select a default value. At the moment this property is only used for localization purposes.
Speaker Groups
We've already mentioned that a Speaker Slot can contain more than 1 speaker. This is to support generic dialogues that can be said by more than 1 character. For example a generic "Hello" dialogue that's assigned to several citizens in a town. You would then have to assign every citizen as a Speaker in that "Hello" dialogue. Some times you don't know beforehand who's going to be able to say something or the list of speakers is just too long to manually assign them all. That's why the dialogue editor also supports Speaker Groups. Speaker Groups simply group a number of Speakers together so that you can assigned the group to a Speaker Slot instead of each speaker individually.
Creating Speaker Groups
Creation and editing of Speaker Groups is done through the Speaker group Editor. This is a tool that's found in the Tools menu of the dialogue editor:

Click it and the Speaker Group Editor will open.

The Speaker Group Editor will scan the game for all characters and items to see in which groups they are. That way you can see exactly which characters are in which groups or in no groups at all. While it's looking through the characters, you'll see the icon animate in the top right:

While it's refreshing the Speaker list you are free to edit Speaker Groups.
- To add a Speaker Group click the Add button. This will create a new Group with a default name. You can change the name in the Speaker Group properties.
- To remove a Speaker Group, select a Group from the list and click the Remove button.
- Filtering is possible for a part of the name or the full uuid.
Speaker Group Properties
When you select a Speaker Group from the list the right part of the editor will display an overview of that Speaker Group:

This overview shows which Speakers are assigned to the Group, along with a number of properties of the group.
- UUID
- Each Speaker Group has a unique identifier. This is used by the game so you don't have to update the Speaker Groups for your characters or items if you decide to rename a group. This is automatically generated for oyu and can not be modified.
- Name
- This is a logical name for your Speaker Group. This is the name that will be shown in the Speaker list in the dialogue editor. As a convention we start Speaker Groups with the "GROUP_" prefix.
- Description
- This is a text field that contains a description for this Speaker Group. Can be useful for voice recording purposes.
- Mod
- This property shows in which game module this Group was defined. Groups that are unique to a certain game should be created in that game's module. Groups that are shared between games should be created in the Shared module.
- Overwrite speaker
- If an override speaker is defined for a group, the speaker of that character will be used for the voice data. The uuid of the character should be filled in here. An override speaker is a speaker that will be used to voice all characters in this group when this group is assigned as speaker in a dialogue node (e.g. the God King voices most voidwoken in the main campaign).
Looking for a specific Speaker
The Speaker Group Editor also provides you with an option to look for a certain Speaker. You can do this by pressing the CTRL-F key combination on your keyboard or by selecting the find option from the Edit menu:
 The Find Speaker window will pop up:
 Enter text to search for in the Search For text box. The checkboxes in Search Locations determines where the editor will look for the text:
- Name
- The editor looks in the name of the Speaker for a match
- UUID
- The editor looks in the unique identifier of the Speaker for a match
You can select both locations to search in both the UUID and the Name of Speakers. If you tick the Match Case check box, only Speakers are returned if they contain the text with a matching case.
The results are displayed at the bottom of the screen. It contains 3 columns:
- Name
- Name of the Speaker
- UUID
- Unique identifier of the Speaker
- Groups
- All the Speaker Groups this Speaker is assigned to
Assigning Speakers to Speaker Groups
Speaker Groups are assigned on the individual characters and items themselves. They can belong to more than 1 Speaker Group. To assign a Speaker Group to a character or item, select it in the editor and open up the proeprties panel (CTRL-B by default).
Look for the Speaker Group property in the properties pane of the object:

Select the property and click the button to open up the Speaker Group Assignment Editor:

The available Speaker Groups are in the Available groups list. The currently assigned Speaker Groups are in the Assigned Speaker Groups list.
The Speaker Group Assignment Editor also lists the Speaker Groups that were set on the Root Template for this object.
To assign this object to certain Speaker Groups, you have to select groups and put them in the 'Assigned Speaker Groups list. There are two ways to do this:
- Double-click a Group from the Available groups list
- Select a Group from the Available groups list and click the Assign button.
To remove this Object from a certain Speaker Group, you have to remove the Group from the Assigned Speaker Groups list. There's 2 ways to do this:
- Double-click a Group in the Assigned Speaker Groups list
- Select a Group in the Assigned Speaker Groups list and click the Remove button.
Click the OK button to apply your changes and close the Speaker Group Assignment Editor. Click the Cancel button to close the Speaker Group Assignment Editor without applying your changes.
Adding Text to Nodes
To add text to a node or edit the existing text, double click on the node. This will open the 'Edit Tagged Texts' window.

To add a tagged text, click the add button. This will add a new Tagged text form. The text for the node can be entered in the textbox.

A tagged text can have multiple text blocks. To add a new text block, click the Add button. This will add an extra textbox. To remove one, click the X button. One of the text blocks will be randomly chosen when the dialog plays.
 To personalize the text, you can add multiple Tagged Text forms and define rules on which one to choose while playing the dialog. This way, you can show a different text depending on whether the players are dwarves or elves.

The tagged texts are checked in the given order (see numbers on top, left to right, top to bottom). The first one that meets the conditions, is chosen. The first text block will be shown in the dialog node in the editor.
Defining Rules
A rule will check if all/any/none... members of the speakergroup or a single speaker have/has the given tag(s). To add a rule, click the + button, to remove one, click the - button.
Show this when All/Any of the following rules are valid
When choosing All, all of the conditions needs to be met before that tagged text is chosen. When choosing Any, only one condition needs to be met. It doesn't matter which one.
Conditions
There are 5 options:
- Has all
- will check if all members of the specified group have the given tag.
- Has any
- will check if there is at least one member in the group who has the given tag.
- Has none
- will check if there are no members in the group with the given tag.
- And all
- will make a subgroup of rules. All rules in the subgroup should be met.
- And any
- will make a subgroup of rules. Only one of the rules in the subgroup has to be met.
Speaker
Choose a speaker or speaker group on which the rule should be checked.
Tags
By clicking on the '...' button, the Add Tags window can be opened in which you can choose multiple tags.

On the Available Tags tab, you can see all the possible tags that can be chosen. The Current Tags tab shows all the tags that are used in the current node's tagged text block checks. The filter can be used to search for specific tags.
Example

In the above example, we have two subgroups: 2 and 2c. 2c is a subgroup in subgroup 2.
The tagged text for this set of rules will be selected when:
- 1 and 2 are met (because of Show this when ALL of the following rules are valid.
- 2 is met when any rule in 2 is met (because of the And Any of the following rules). So when 2a, 2b OR 2c is met.
- 2c is met when all of the rules in 2c are met (because of the And All of the following rules). So when 2c' AND 2c'' are met.
Node Properties and Node Types
In this section we'll cover the Node properties in detail. Not all Node Types will have the same properties, but all Text Nodes (nodes that display text in the dialogue) shared a set of common properties. We'll look at those first.
Base Text Node Properties
Greeting, Answer and Question nodes are all Text Nodes. As such they all share a number of properties:

Addressed To
In some languages, a sentence being said to a man is different than the same sentence being said to a woman.
English: You are beautiful
French: Tu es beau (to a man) vs Tu es belle (to a woman)
To be able to choose the right version, we need to know to whom the sentence is addressed. This information is stored in the Addressed To property.
If no Addressed To speaker is specified, it will be addressed to the first speaker (that is not the Speaker of the node). If a Look At value is set for this node, the speaker of that property is taken.
EndNode
Checking this checkbox (and thus setting it to True), means that the dialogue will stop executing after this node has been shown. You'll see that the Node turns red to indicate it is an End Node now. You also can't connect nodes to an End Node.

Exclusive
Normally a dialog selects a node to display out of the list of valid nodes at the point of execution. Out of all those valid nodes it selects a random node. When the dialog encounters one or more valid Exclusive nodes in that list, it stops considering all non-exclusive nodes. This means that the dialog will select a random node from the group of valid Exclusive nodes. This can be used to alter the flow of a dialog in case a certain condition is set and the dialog shouldn't take the normal path. For more info check [[#Controlling Dialogue Flow|]].
Logical Name
This is a human-readable name that's useful to provide context for a dialog node. Can be useful for making the use of a node clear and for voice recordings. The logical name is displayed at the top of a node in the dialog overview.
Optional
Optional nodes function as normal nodes unless the dialog doesn't encounter any valid nodes when looking for a node to show. If the dialog doesn't encounter any valid nodes, but it has a list of optional nodes, it'll select a random node out of the optional nodes and skip it. The selected optional Node will not be shown then, but the dialog will progress as if that Node was shown. Note that the nodes are skipped, that means none of the actions of the nodes are performed (so no flags are set). For more info see #Controlling Dialogue Flow.
Shown Once
When Shown Once is checked the node will only be shown once during a dialog instance. The node will be shown again when the dialog starts again.
Speaker
Who says the text in this Node? For Question Nodes this also decides who has to click the question. Clicking this property allows you to chose a value from a dropdown list containing all the Speaker Slots defined in this dialogue.
Stub
Indicates that this node is a work in progress (not used in practice).
Tags
The tags property can be used to assign multiple tags to a dialog node. The SFX_ONLY tag can be used on dialog nodes that don't need to be voiced.
Texts in this Node
List of all the texts contained in this node. More about the texts and how to create them in #Adding Text to Nodes.
UUID
Unique identifier of this node. This is generated for you and can't be changed.
Transition Mode
Indicates how the dialog progresses when it encounters this Node. It has 2 possible settings.
Wait for input
This is the default setting. The dialog will display the node and then wait for a user to click continue (or end in the case of an End Node)
Wait X seconds
The dialog will show the node and then wait X seconds before it shows the next node in the dialogue tree. X is a number that you can fill in when you select this transition mode:

Flags to Check
Which flags is this Node checking? More about flags in #Controlling Dialogue Flow.
Flags to Set
Which flags is this Node setting? More about Flags in #Controlling Dialogue Flow and #Flags to Set property.
Node Context
What's the context for this Node? Use this to clarify a Node or for voice recording purposes, or as comments for yourself or others about this node (never shown to players).
Text Nodes
Greeting
These nodes indicate where a dialogue starts executing. They form the roots of the dialogue tree.
Question

These Nodes are used to ask questions to other Speakers in the dialogue. When a dialogue encounters these nodes it'll present a list with all valid Question nodes to the Speaker that owns the Nodes.
Answer

These nodes are simple text entries. Most commonly used as replies to player Questions.
Logic Nodes
The Nodes in this section do not contain any text themselves and only exist to change the flow or to simplify the structure of a dialogue. As a result these Nodes do not have the base Text Node properties, but have their own (small) set of properties.
Jump Nodes
Jump Nodes are Nodes that reference other Nodes. They are a way to re-use nodes or as a means to keep dialogue structure cleaner by cutting down on the number of child connections needed. A Jump Node is constructed by pointing it to another node in the dialogue.
Properties
- Jump To
- This indicates which Node(s) a Jump node references. This Property can have 2 values:
- Start of Node
- This Jump node references the pointed to Node. This is as if the pointed to Node and its children are inserted at the point of the Jump Node.
- End of Node
- This Jump Node references the children of the pointed-to Node. This is as if the parent Node of this Jump Node has all children of the pointed-to Node connected to it.
- Target Node UUID
- The UUID of the Node this Jump Node is pointing to. You can not change this. To see which Node this is, double click the Jump Node and the editor will center the view and select the pointed-to Node.
- UUID
- The unique identifier of this Node. You can not change this.
Creating Jump Nodes
- Select a Node that accepts children and select Jump Node from the Node Context menu.
- Your cursor will now change into a targetting cross.
- Select a node in the dialog to create a reference to that Node.


If you want to cancel the creation of a Jump Node, you can press the ESCAPE key.
Once your Node has been created you can set the Jump To-property to change which node(s) it references.
DOS specific Nodes
The Nodes in this section are not part of the Dialogue framework. they are Nodes that were created specifically for Divinity: Original Sin. These may or may not be available in other games.
Pop Nodes

Pop Nodes are Nodes that were introduced to support the old Keyword dialogues. They function much like a Jump Node that always points to the End of a Node.
Properties
- Exclusive
- Functions the same as the Exclusive property of Text Nodes. See #Exclusive Property.
- Pop Count
- How many levels the Node should go back. This a number that starts from 0. See #Pop Levels for more information.
- UUID
- The unique identifier of this Node.
Pop Levels
Every time a list of Quesiton Nodes is presented, a pop level is created. This is a point in the dialogue that Pop Nodes can refer to, to present a list of Questions to the player.
The Pop Node then functions as a Jump Node that jumps back to the end of the Parent Node of the specified level of Question Nodes. To see how many levels to jump back to, you have to go back X+1 Question Nodes in the dialogue tree, starting from the Pop Node. X is the value you filled in for the Pop Count property. You can see which node a Pop Node it's targetting by double clicking the Pop Node. If the Pop Node can't Jump back to the specified pop level you'll get an error message in the editor when double clicking the Pop Node.
Dual Dialog Node

Dual Dialog Nodes are Nodes that pause the current dialogue and ask the Game Scripting to start a certain sub-dialog. These sub-dialogs are typically decission dialogues between 1 or more players. When the sub dialogue ends, the current dialogue resumes again.
Properties
- Dual Dialog Name
- This is the name (without file extension) of the sub dialog to start. Double clicking the Dual Dialog content, tries to open or switch to a dialog editor for the pointed-to sub dialog.
- Exclusive
- Functions the same as the Exclusive property of Text Nodes. See #Exclusive Property.
- Logical Name
- Functions the same as the Logical Name property of Text Nodes. See #Logical Name Property.
- Optional
- Functions the same as the Optional property of Text Nodes. See #Optional Property.
- Shown Once
- Functions the same as the Shown Once property of Text Nodes. See #Shown Once Property.
- UUID
- The unique identifier of this Node.
Persuasion Nodes
Game specific Node Properties
In addition to the built-in Node Properties, a game can also add custom properties to Nodes. These Properties are on the Advanced tab of the properties sidebar:

DOS Node Properties
Divinity Original Sin has a couple of Node options that are unique to this game. These are all applied to the Text Nodes (Greeting, Question, Answer).

Sound
- Sound Event
- This is the id of an additional sound that is started when the node is started (eg. evil music when an evil answer is chosen).
- Instruments
- This is the id of a sound for a specific instrument. Depending on the instrument the player choose, the sound for the given instrument will be played. If there is a sound event set, the instrument sound will not be played.
Animation
- Emotional Expression
- This determines which animation the Speaker of this Node will play. Can also be used as a hint to the voice actors. If an animation for the Speaker of this Node is set as well, the emotional expression will not be played.
- Look At
- You can define per dialog Node what Speaker a certain Speaker needs to face when the Node starts. This is done by defining Look-At entries. You can add an entry by clicking the Add button. This will add an empty Look-At entry:
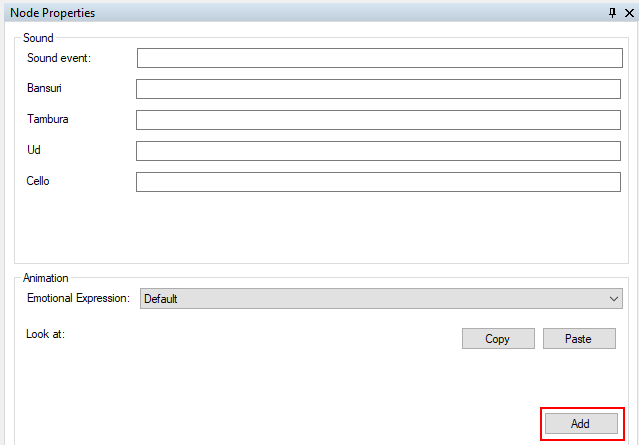
- Pressing the Add button again will add more empty Look-At entries to this node.
- The two dropdown boxes control which Speaker looks at which Speaker. The first one is the NPC that's going to face a certain Speaker. The second one is the target Speaker. You can only select Speakers that :were assigned to this dialog!
- You can delete a Look-At entry again by clicking the Delete button:
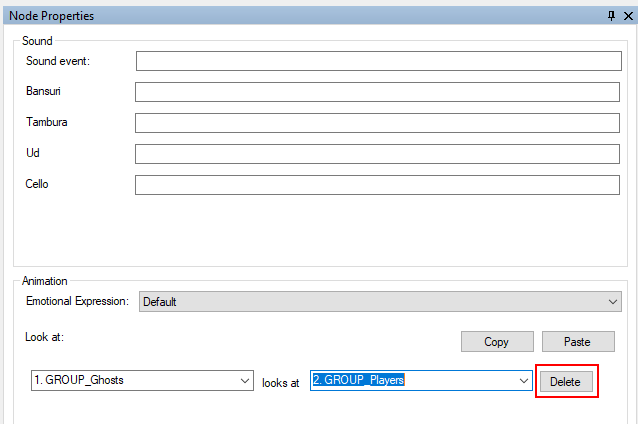
- To copy paste the look at property to another node in the dialog, click the 'Copy' button, select another node and click the 'Paste' buttons.
- Animations
- For each speaker, an animation can be set that will be performed during that dialognode. To add an animation, click the add button.
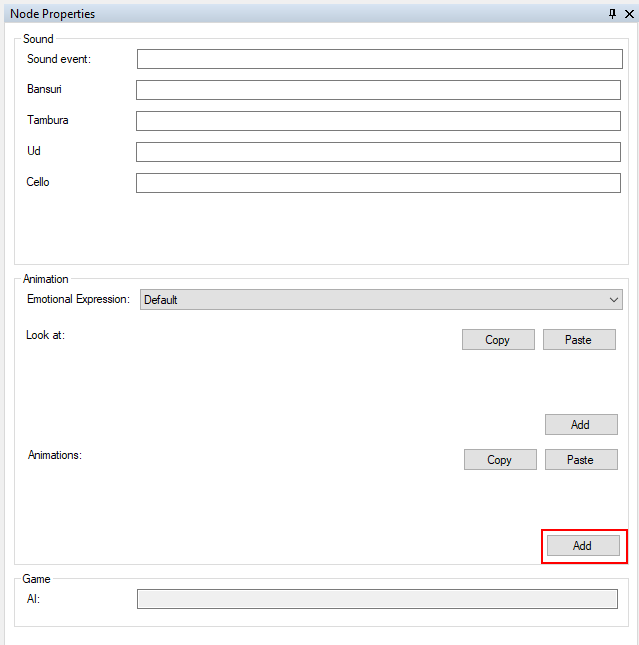
- Choose one of the speakers and fill in the name of an animation.
- Copy-pasting and deleting an animation can be done the same way as for 'Look at'.
- If an animation for the speaker of the selected node AND an 'Emotional expression' (which is also for the speaker of the selected node) is set, only the animation will be played.


Game
- Camera Target
- The camera is, by default, following the speaker in a dialog. Choose another speaker from the list to target the camera on another player during the dialog node.
- Extra node time
- If a node needs to be shown longer than normal, that extra time can be set in the Extra node time property. This time will be added to the default node time (based on the amount of words), the length of the voice data or the Wait time set for nodes with the Wait for x seconds node transition mode.
Controlling Dialogue Flow
All the Nodes in a dialogue form a tree by connecting with their parents and children. The game then walks through the dialogue tree to figure out which Nodes to show to players and when. It does this by starting at the roots of the tree, selecting a root to show and from that root working itself through the branches towards the leaves that are connected to it. The #Greeting Nodes form the roots of the tree, so this is where all dialogues will start. The leaves are the End Nodes in a dialogue, and this is where execution of a dialogue stops.
Node validation
When a dialogue starts, the game looks through all of the roots of that dialogue and validates them. Validating a node means checking all the conditions that are put on the Node. Only Nodes that pass this test are considered for display. The game performs a similar test for the non-root Nodes that are connected to a root: only the valid nodes are considered for display.
Validating a Node is a process that results in a boolean value. You can think of a boolean value as a truth value, something that is either true or false. So validating a node results in 2 possible truths: the node is either valid (true) or invalid (false).
Node Conditions
While a game can have custom validation requirements on a Node, most of the conditions are put on Nodes through the #Flags to check property of Nodes. A Flag is also a boolean value. It can either be set (true) or not set (false). By default, Flags start out as being not set and are thus considered to be false.
The Flags to Check property is a list of flags that need to have a certain value (set or not set) if a Node is to be considered valid. Each entry of this list compares the boolean value of the specified Flag with a desired boolean value. If the boolean value of the Flag matches the desired boolean value, the games considers that entry to be true. If the two boolean values don't match it considers that entry to be false. The games calculates if a Node is valid or not, by combining all of the boolean values of the entries of that list. We'll see how we can combine boolean values in the next section.
Boolean Logic
Boolean Logic describes how we can combine two boolean values to come up with a new boolean value that's the combination of the two input values. We call the way we combine the 2 input values an operator. It's something that operates on 2 input values to produce a new output value. There's several operators you can use to combine boolean values, but we'll stick to the ones used by the dialogue system in this section.
The AND operator
The AND operator is used to enforce that the two input values passed to it are true. If and only if the two input values are true will the AND-operator return true as well. As soon as one (or both) of the inputs are false it will return false as well.
To summarize:
- true AND true gives us true
- false AND true gives us false
- true AND false gives us false
- false AND false gives us false
The OR operator
The OR-operator is more lenient than the AND operator. It returns true as soon as any of the two input values is true. That means it will only return false if both input values are false too.
To summarize:
- true OR true gives us true
- false OR true gives us true
- true OR false gives us true
- false OR false gives us false
The NOT operator
The NOT operator simply returns the inverse of whatever you put into it. That means that NOT true will result in false. Similarly NOT false will result in true.
To summarize:
- NOT true gives us false
- NOT false gives us true
Validating a Node
Now that we know how to combine boolean values, we can look at how the game checks the #Flags to Check property of Node. Like we already mentioned, this property is a list of Flags that need to be set (true) or not set (false) before this Node is considered valid (and thus, considered for display). It compares the boolean values of the flags with the desired boolean value and considers an entry true if they match. If they don't match it considers the entry false. The game then combines all of these boolean values using the AND operator. This means that a Node is only valid if that list only contains true values. As soon as that list of entries contains a false, the node is considered invalid.
Adding Flag Checks
To add a Flag check to a Node, select the Flags to Check property of the Node in the properties sidebar and click the edit button:

You'll get the Flag Editor screen:

Select the Flag Category you want to add a Flag to from the Flag Categories list. You will then be presented with an overview of this Flag Category:

The top list box shows all available Flags of the selected type. This is a list of all the Flags used in the whole dialogue or a list of all defined Tags (see #Tag Editor to define Tags) in the case of the Tags Flag type.
The bottom list box, the Active flags list box, shows the Flags that are active on the currently selected Node.
Type the name of the Flag you want to add in the Custom flag text field and click the Add button to add a new Flag. The new Flag will be automatically added to the Active flags list.
To remove a Flag from the currently selected Node, move the Flag from the Active flags list to the top list box. You can do this by double clicking the Flag in the Active flags list box or by selecting it in the Active flags list and clicking the up arrow button.
To add an already defined Flag to the currently selected Node move it from the top list box to the Active flags list. You can do this by double clicking the Flag in the top list or by selecting it in the top list and clicking the down arrow button.
Hit the OK button when you're done adding flags and apply your changes. Or hit the Cancel button to discard your changes and close the Flag Editor.
Practical Examples
Let's say we have a node that we want to show if a certain local flag (called localFlag) hasn't been set and if a certain global flag (called globalFlag) is set. More concrete this means that this node is valid if:
- localFlag's value has to be false.
- AND
- globalFlag's value has to be true.
This translates into the following Flags to Check property: