Custom Menu Screens
Preparing the Level
Custom Menu Screens are created by designing a level with a Spectator Camera Trigger and then linking it to the project settings for your mod. There are some special rules to observe when designing your level, however. When the menu screen is displayed from the game menu, there is no server running, which means that spawned creatures and interactive items will not display. For this reason, most artists prefer to create levels specifically tailored for start menus rather than employing the ones used in game.
Placing Your Menu Camera
- Select the SpectatorCameraTrigger from your Root Templates and add it somewhere in your level.
- Give it the name 'Start_Camera'.


- Once your Spectator Camera is placed in your level, you can move it around and rotate it with the translation controls like any other object.
- You can get a live preview of how the Start Menu will look by selecting the Spectator Camera->right mouse click->"Activate in FX Preview".

Activating Fx Preview to Evaluate Camera Placement
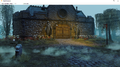
Live Preview of Spectator Camera Field of View


Assigning the Menu Level to your Mod
Once you are happy with the placement and field of view of the Start Camera in your menu level, you simply assign it to the project through the "Project->Project Settings..." menu under the 'General' tab.

When you start up the game, you will see your menu anytime you return to playing your mod!