Basic Character Creation
Contents
Character Creation for Standalone Adventures
Larian is working on a character creation template, but in the meantime this guide will show you how to get something working for now. Unfortunately it does not work for multiplayer.
Requirements
[Create an adventure mod]. [Make a basic level] [Download the scripts]
This tutorial is only for standalone adventure mods and will not work with mods that have "Origins" as a dependency
Setting up the Story Scripts
- Unzip the File:Basic Character Creation.zip file to the folder:
\Divinity Original Sin 2\Data\mods\YOUR MOD HERE\Story\RawFiles\Goals These scripts are pulled from D:OS 2 Origins and modified.
- Launch the editor, open your adventure mod, and open the level you intend to be the first one after character creation finishes. If your level does not have an [AI grid], you need to generate one.
- Open the [Story Editor], the goals you copied should now be on the left pane.
- Expand the goal _BasicCC_Creation_Start. Open the goal file _BasicCC_CharacterCreation

- Change the strings in the following entries seen above as the name of your first level.
DB_CharacterCreationTransitionInfo("Level1"
DB_GLO_FirstLevelAfterCharacterCreation("Level1");
- Save your work.
Setting up the Trigger
- Go to the Root Templates pane, find the point trigger, and place one on the level you need players to be transported to when character creation is finished.
- Name your trigger something logical then check the global box on the side bar.
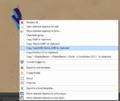
- Right click your trigger and copy the TypeGUID_Name_GUID to clipboard.
- Paste the TypeGUID_Name_GUID into the goal _BasicCC_Creation_Start in the DB:
DB_CharacterCreationTransitionInfo("Level1"
- *NOTE* Do not delete the blue prefix (TRIGGERGUID), paste your information after that.
Copy the GUID
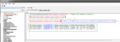
Paste it into the story editor in the blue box.

Verify the Generic Origins
- The Generic Origin characters are inherited from the SHARED datapack.
- You need to double check that they have the same GUID in your mod as they do in the scripts. They most likely are the same.
- Open the World Outliner,
- Click the orange button on the top right corner to show all global objects.
- Find the character S_Player_GenericOrigin and copy the TypeGUID_Name_GUID to clipboard.
- Back in the story editor, compare the TypeGUID_Name_GUID you copied to the one in the DB:
DB_GenericOrigins((CHARACTERGUID)S_Player_GenericOrigin_7b6c1f26-fe4e-40bd-a5d0-e6ff58cef4fe);
- the GUIDs are most likely the same, if not replace it.
- Still in the story editor, press CONTROL+F7 to generate definitions, build, and reload.
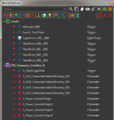
World Outliner

Configure the Project Settings
- On the top menu go to Project > Project Settings
- Click the "General" tab.
- Change both the Startup Level and CharacterCreation Level to "SYS_Character_Creation_A".
- SYS_Character_Creation_A is located in the SYS folder. You will have to click on the top right corner "Show Inherited Levels"

Change both of the levels marked by the green arrow.
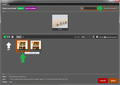
Show the inherited levels.


- Save your work
Finished
- Now your character should be usable both in the editor and in the game proper. Test it out!
- You will need to close out and reopen your project to see the changes in the editor.