Modding: Maya Exporter

The exporter tool window in Maya 2015
Description
The Maya exporter tool lets you export visuals, physics and animations from Maya to the editor (in the required file format). It is a set of scripts to add an extra tab to your Maya window.
| For more information on how to install the exporter tool, look here: Maya Setup Guide |
Components
This article references the image at the top of the page
The Maya exporter tool consists of the following components:
- Animation Manager
- Multi Layer Exporter
- Modify Path
- Export Variables Setup
Animation Manager
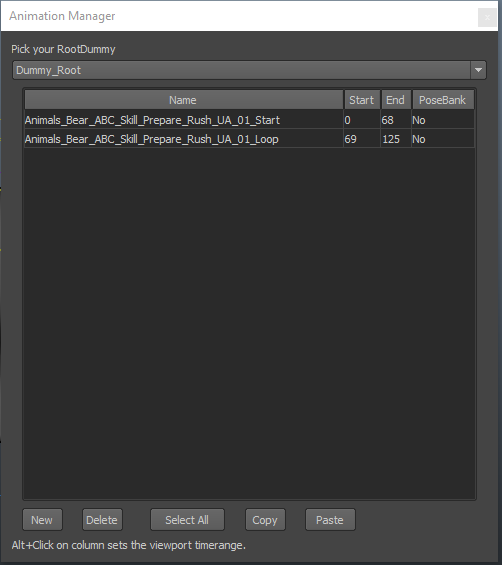
The animation manager
This script works together with the export tool Multi Layer Exporter to help organize and name your animations for export.
By default the exporter will export the frame range an animation file is saved with and name it the same as the source file,
but with the Animation manager script it’s possible to add data to your file for the Multi Layer Exporter to read.
This is particularly useful for animations that need to be played out in a start, loop, stop sequence such as Knockdown Status or Various skill activation animations.
The animation Manager expects a rig with Dummy_Root as the first bone in the hierarchy. There is support for Root bones named Dummy_*LayerName*
Already present entries are found when selecting the root dummy with the data present.
New entries can be made with the new button on the bottom.
Obsolete entries can be removed with the delete button while the entry is selected.
Double clicking any of the fields of an entry allows to edit the data within the field.
The posebank value is used to differentiate between animations that should be played out and animations that are a set a of set of sequential poses.
This is mostly used for death banks which are used to provide a set of death poses. Character animation sets have an animation slot for death banks
Multi Layer Exporter
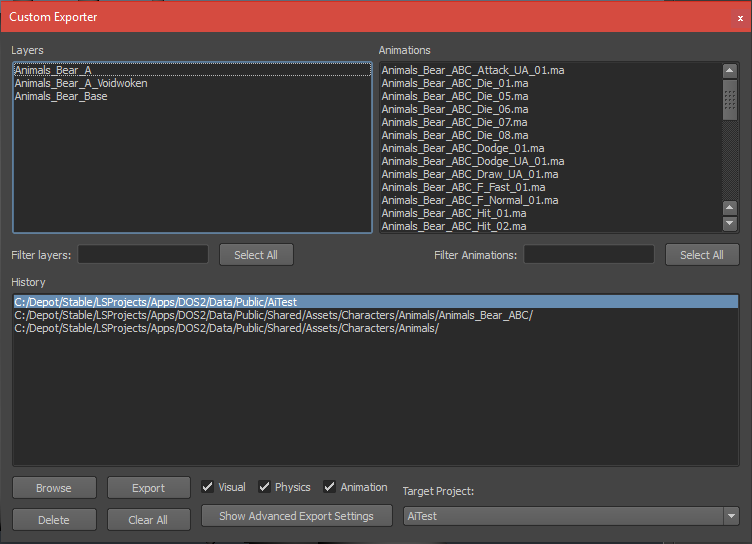
The multi layer exporter
The Multi Layer Exporter is the workhorse of this script package.
It is responsible for exporting models, physics and animations to their correct formats.
Most cases will only show the top left hand panel with the layers currently available in the scene.
Layers that shouldn’t be exported can be hidden from this list with the Exclude_ prefix.
A Layer should contain the relevant model and its matching physics.
Physics are expected to have the _Phys suffix
Rig Bones are expected to have _Bone or Bone_ in their name
The layer name determines the exported file name:
- {LayerName}.lsm (lsm is a custom extension we use to recognize your custom granny files. If you have a .gr2 file, you can simply rename it to .lsm)
- {LayerName}_Phys.bullet
The _Base suffix tells the MLE that the layer contains a character rig.
This is particularly useful for exporting models that are supposed to be used in a visual set and need their rig exported separately in one piece.
The Right Hand panel becomes available when the animation checkbox is checked.
When this is checked the MLE will look for a folder in the same location as your currently open maya file with the same name as your currently open maya file.
If it finds such a folder it will list all the maya files available in the folder.
When exporting, animations are put within a folder with the name of the base file.
Alternatively when opening the MLE in a file within a folder with a name similar to one of the maya files neighbouring it MLE will recognize the file as an animation file and show Animation Manager data instead.
These files won’t allow model or physics exports.
The bottom History Panel keeps track of where you have exported already.
The paths created are dependent on the provided data path.
Found mods within the data path and whether or not you have browsed for new paths with the browse button on the botton left.
On start up the MLE searches through the data path for available mods and lists them in the target project dropdown list.
If your currently open maya file is in a path containing the currently selected mod’s name it will copy the structure of your assets in the export path.
If the source doesn’t match up exports are done within the base folder of the mod.
The actual export button is on the bottom left.
The delete and clear all button are for the path history panel.
The visual checkbox enables model export doesn’t include objects with a _Phys suffix in their name.
The Physics checkbox enables physics export when checked alone only objects with a _Phys suffix in their name are exported.
The Animation Checkbox enables animation exporting if you’re working from a base file. Is on by default if the file you are in is recognized as an animation file.
Make sure to have all model pivots centered on 0,0,0 the exporter does not do this for you.
Advanced Export Settings

The advanced export settings
Edit Export Settings
Allows you to change the granny preset during export.
Most likely you’ll never need this in a mod export.
Single Character Export
Tells the MLE to select the entire rig hierarchy rather than just what is skinned to a model.
This checkbox can be overridden to be always active in a file with the Export Variables Setup Make Single Object button.
This is active by default for a Base Layer export.
Export Vertex Colour
Tells the MLE to include vertex colour in the export of the selected layers.
This overridden with the Export Variable Setup Make Cloth Simmed since cloth simulation requires vertex colours to be present.
This is also overriden by the Export Variable Setup Make vertex Coloured
Create Debug Log
This checkbox is for when the Express Export variable is off.
It tries to catch any export errors occurring and write them in a debug log which is shows after export.
Express Export
This checkbox is off by default it tells the MLE the export the files in the current maya instance.
Turn this off if you have a large amount of models to export. With this variable off the MLE will use maya standalone batch mode to export models more quickly.
Maya standalone is used by default for exporting Animations from a base file.
Animation Quality
This dropdown list lets you define different compression setting for animation export.
The following settings are available:
- Default Quality: The default setting used for most animation exports.
- Medium Quality: Increases how often the animation is analysed before creating final export data. Should bring general jitter down, but increases export time allot.
- High Quality: Increases how often the animation is analysed before creating final export data. Should bring general jitter down to a minimum, but increases export time allot.
- Low Rotation Tolerance: A setting that reduces the amount of rotation jitter. Good for Character Creation poses that are looked at in greater detail.
- Snappy Tolerance: A setting that allows an animator export an animation with pose to pose jumps with no limb jitter. Applies to for example the blitz attack.
Modify Path

Data path editor
The Multi Layer Exporter has been specifically modified to use a file hidden within your default maya script path to find the Divinity Engine data path.
The Modify Path script allows you to set up and modify the path saved.
The MLE will throw a warning when this isn’t done before its first launch.
Export Variables Setup
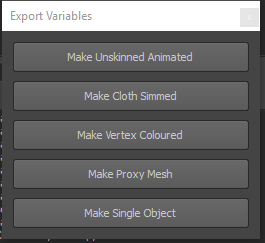
Variable setup window
The Divinity Engine has a few extra functions that can be activated via variables attached to the model data.
The Multi Layer Exporter also reads these variables to ensure everything that needs to be present in the export file is present.
Make Unskinned Animated is to allow objects which are rigidly animated or include dummies that need to be interacted with be fully recognized as such.
Apply this Variable if the object needs effects attached needs to function like a bed or chair or is an object with dummy driven animations like a door.
Works on current selection.
Make Cloth Simmed is specifically for character Models with elements that need cloth sim applied.
The object needs to have vertex colour applied and the variable this button adds to indicate it needs to be treated as a simulated object.
Works on current selection.
Make Vertex Coloured is specifically for meshes that have vertex colours, but won't be cloth simmed.
Only used by MLE to determine inclusion of vertex colours during export.
Works on current selection.
Make Proxy Mesh is specifically for meshes that are going to be used as emitter proxies in effect. The MLE automatically changes the export settings for these objects if this setting is found.
Works on current selection.
Make Single Object is specifically for the MLE to override the Single Character Export checkbox and include every bone within a detected rig in the export with every single export.
Works on every dummy root and Dummy_*LayerName* objects it finds within the scene.
Setting up Physics in Maya for the MLE
To set up physics we use the bullet.mll plugin. This plugin should come shipped with every install of maya.
If the plugin is active you should have a bullet shelf tab. If it isn't active go to Top Menu -> Window -> Settings/Preferences -> Plug-in Manager
Look for bullet.mll in the list and set it to loaded and auto load.
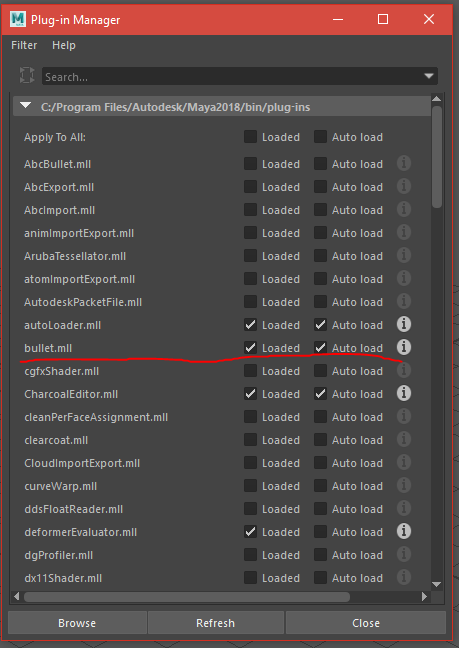

The bullet shelf works on the current selection. To turn a mesh in a physics mesh click the third button in the shelf Create a passive Rigid Body Object.
This will attach a BulletRigidBodyShape to your object. This is what we will edit via the attribute editor.
The important settings are Body type and Collider Shape Type.
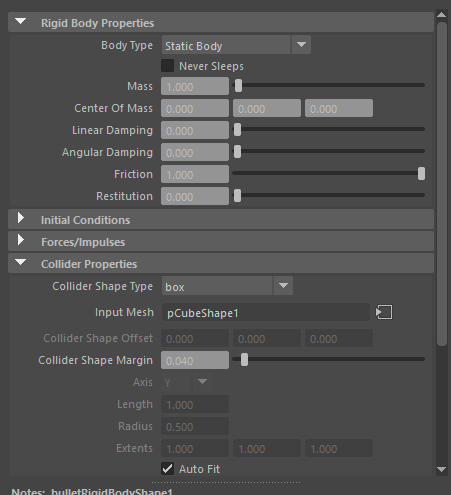
For a physics object that can not move the Body type should be set to Static body

For a physics object that can move the Body type should be set to Kinematic RigidBody
!!!Important: Don't ever use Dynamic Rigid Body as a body type. This is reserved for rigid bodies only!!!
Currently supported shape types are:
- Box/Box2D (Plane)
- Sphere
- Capsule
- Convex Hull
- Mesh (Static Only)
- Cylinder
The best supported shape type is hull, but feel free to experiment with the other shape types to see how they work.
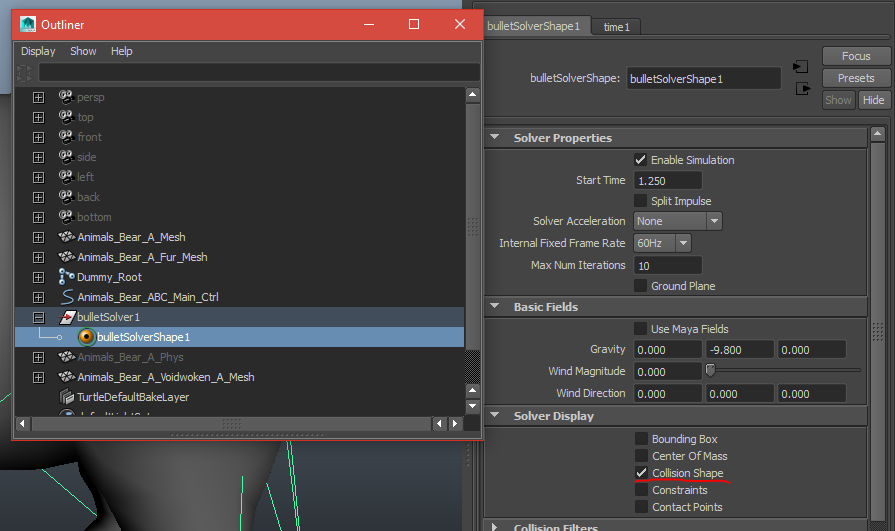
To visualize the rigid body shapes look for the bullet solver shape in the outline and check it's Solver Display -> Collision Shape
this will draw a wireframe representation of what the bullet plugin thinks your physics mesh looks like.
Note: Physics are an approximation of reality you can't have the worlds most comples shape and expect calculations to go well. Keep it simple first and foremost.