Animation resource panel: Difference between revisions
No edit summary |
No edit summary |
||
| Line 67: | Line 67: | ||
Animation Time line:<br /> | Animation Time line:<br /> | ||
This is the track that displays the length of the animation. The most important function of this element is to place text keys timed on your animation. To add a textkey simply right click on the track and pick a textkey from one of the presets. You can always start with the closest preset of what you need and customize it, by no means is this list a complete list of the possibilities, but merely a selection of what we perceive as most frequently used. | This is the track that displays the length of the animation. The most important function of this element is to place text keys timed on your animation. To add a textkey simply right click on the track and pick a textkey from one of the presets. You can always start with the closest preset of what you need and customize it, by no means is this list a complete list of the possibilities, but merely a selection of what we perceive as most frequently used. | ||
*Blendout | *Blendout | ||
*cast | *<span style="color:#a85252">cast</span> | ||
*combat_comment | *combat_comment | ||
*dissolve | *dissolve | ||
| Line 95: | Line 95: | ||
*cast_shadows | *cast_shadows | ||
*receive_decals | *receive_decals | ||
There are different types of textkeys and each of them have their own function. Their properties will also change depending on which type you select. The color coded you see for each is how you will see them in the engine as well. | |||
<span style="color:#a85252">Regular text driven keys:</span> | |||
<span style="color:#71a852">Footstep keys keys:</span> | |||
<span style="color:#a87f52">Sound keys:</span> | |||
<span style="color:#7052a8">Hit keys:</span> | |||
<span style="color:#9f52a8">Ragdoll keys:</span> | |||
<span style="color:#a1a852">Effects keys:</span> | |||
__________________<br /> | __________________<br /> | ||
Back to [[Panels]] | Back to [[Panels]] | ||
Revision as of 08:32, 23 October 2017
The Animation Resource Panel aka Animation Previewer (Page in Progress!)
An Animation Resource is recognized by the blue running man in the Content Browser. To open the animation and access its meta data there are 2 ways you can do this. Both have the same outcome and technically it should not matter how you open it, but for each way has it's own advantage and disadvantage. This is illustrated in bullet A) and B) on this page.
Note that the previewer always forces itself to be highest on top. This might have the unwanted side effect that if you open another panel or any sort that this will be ordered behind the animation resource panel. This could unfortunately lead to the confusing situation where it might look that a certain panel didn't open, but simply is located BEHIND your animation resource panel.
A) Shortcut to mushrooms.
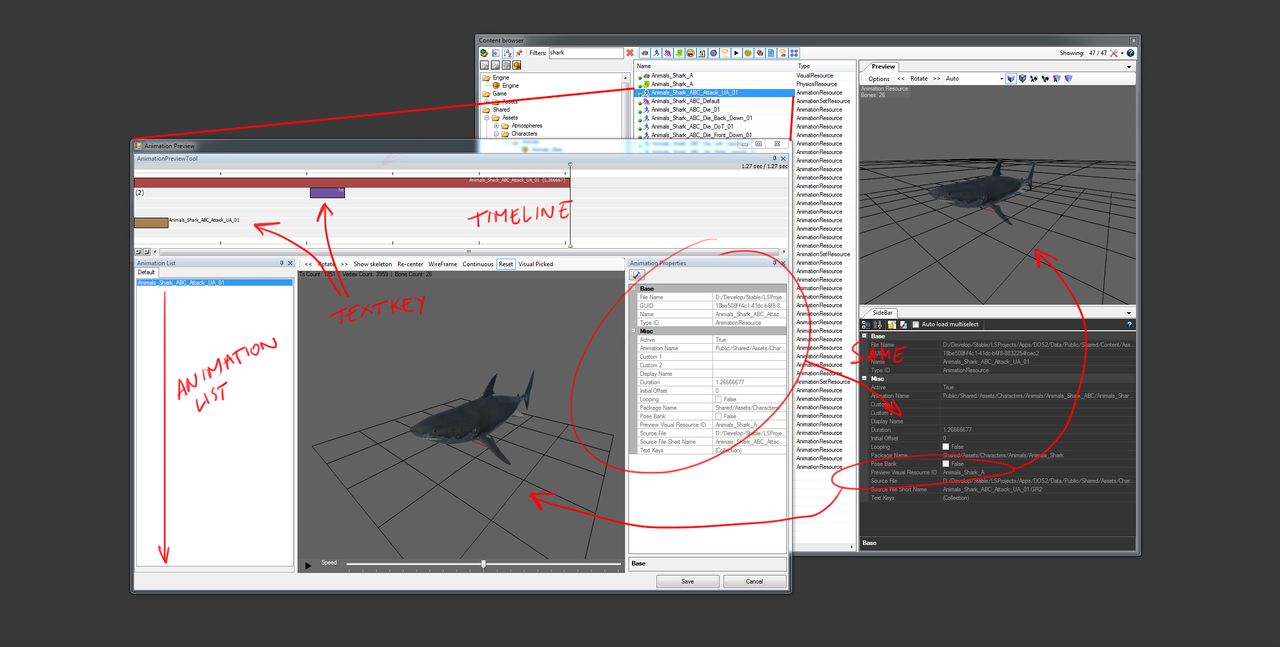
Double click the blue running man in your Content Browser and the animation resource panel will open in front of you. The animation previewer will now show that single animation file and all it's properties and Metadata. However the animation preview will ONLY be able to preview your animation on top of your visual if you have set a visual resource in the Preview Visual Resource ID property of your animation file. If you haven't set this, your time line will empty and your preview window will be blank. If that is the case, close the previewer, set the correct visual resource in the Sidebar and reopen the animation.
B) I’d say we were taking the long way around...
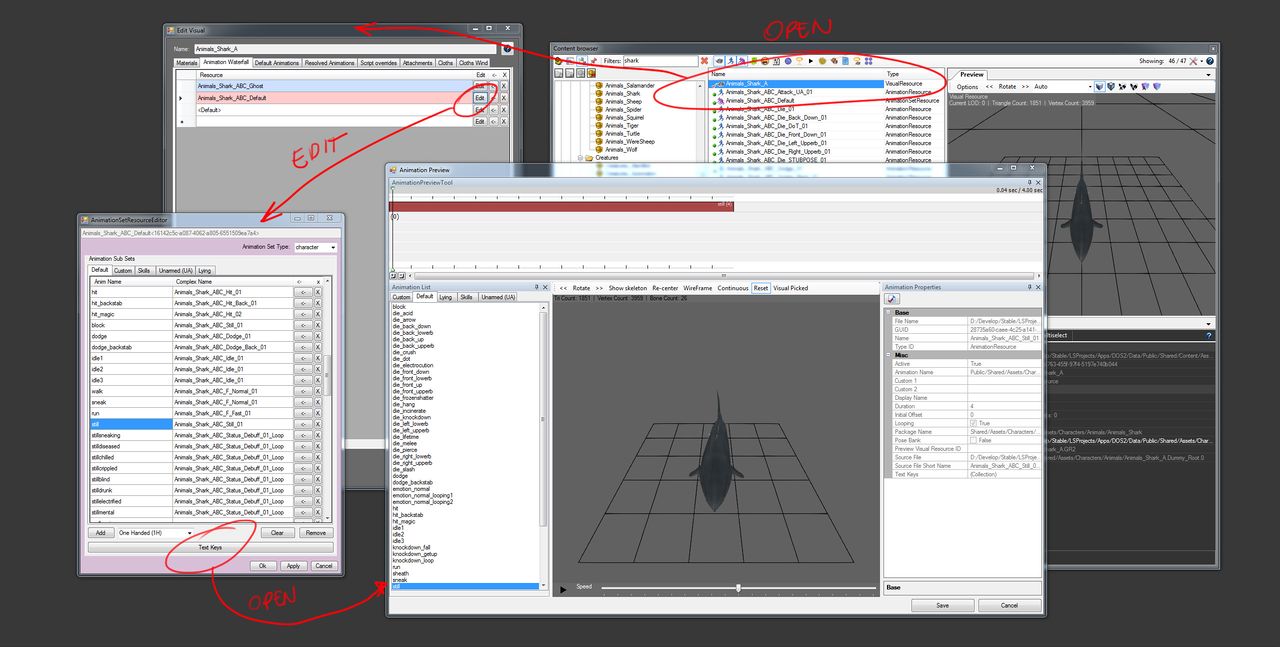
You can also access your animation previewer by going through the Visual Resource that contains either the animation itself or the Animation Set Resource. To do this,
1 - double click your Visual Resource
2 - press Edit in the animation waterfall / or open the Default Animation tab
3 - press Text Keys button of the animation set
The Animation Previewer is now open and will show the entire list of all animations plugged into the animation set of your selected Visual Resource. This has the advantage you can cycle through them more quicky and that you don't need to have each animation with a predefined Preview Visual Resource ID in its properties.
Now lets go over the vital components of the Animation Previewer.
The Preview window:
In this window your model will show and playback the selected animation. At the top shelve of the window you'll find an assort of buttons that manipulates the playback.
- <<Rotate>> : Lets you rotate your model. Alternatively your mouse buttons let you do similar navigation. Mouse click plus drag rotates the model, mouse wheel zooms in on it.
- Show Skeleton: Shows a stickfigure representation of your bone structure.
- Re-Center: Puts your model back in the center.
- WireFrame: renders your model in the wireframe of its mesh.
- Continuous: Playsback your animation continuously and indefinitally, regardless from the fact your animation is looping or not.
- Reset: Resets your preview window.
- Visual Picked: Lets your pick a different visual for your model representation, on the condition that the mesh is skinned to the same rig!
The Animation List:
This is a list of all the animation you can preview, this list either shows a single animation or multiple animations depending on how you accessed the Animation Previewer. More on this on button A) and B) below.
The Animation Properties:
These are the same properties as listed in the Sidebar information when you select the animation resource in the Resource Browser. A quick run through:
- Filename:
- GUID: It's unique identifier in the engine. Each time you add a resource a new GUID is assigned to the resource, and it is never the same.
- Name: The name you gave it when you imported your resource. This can be modified at any time.
- Type ID: the type you selected when you imported your resource.
- Active:
- Animation Name:
- Custom 1:
- Custom 2:
- Display Name:
- Duration: the total length of your animation in seconds.
- Initial Offset
- Looping: whether or not the engine needs to loop your animation.
- Package Name: the package you selected when you imported your resource
- Pose Bank: whether your animation data is an actual animation or a collection of poses. Poses banks are currently used to put corpses in various predefined poses. An animation flagged as pose bank never animates!
- Preview Visual Resource ID: predefine which visual should be use to preview this animation.
- Source File: the file and path you've selected when you imported your resource. TIP: you can change the source file if you want to update/replace your animation to a different source so you may keep the GUID set to the original resource. This is important if your GUID is already used at places and want to maintain this link.
- Source File Short Name:
- Text Keys:
Animation Time line:
This is the track that displays the length of the animation. The most important function of this element is to place text keys timed on your animation. To add a textkey simply right click on the track and pick a textkey from one of the presets. You can always start with the closest preset of what you need and customize it, by no means is this list a complete list of the possibilities, but merely a selection of what we perceive as most frequently used.
- Blendout
- cast
- combat_comment
- dissolve
- hit
- hit_off
- hold
- loot
- move_start
- move_stop
- prepare
- pull
- relax
- shoot
- switch
- switch_off
- teleport
- vampirism
- attach
- effect
- footstep_left
- footstep_right
- sound
- swoosh
- ragdoll
- cast_shadows
- receive_decals
There are different types of textkeys and each of them have their own function. Their properties will also change depending on which type you select. The color coded you see for each is how you will see them in the engine as well.
Regular text driven keys:
Footstep keys keys:
Sound keys:
Hit keys:
Ragdoll keys:
Effects keys:
__________________
Back to Panels

