Project browser: Difference between revisions
(Created page with "File:Projectbrowser-existing.png == Description == <p>The root template panel provides an overview of all the root templates in the loaded active mod and it's loaded depe...") |
m (Protected "Project browser" ([Edit=⧼protect-level-larianeditonly⧽] (indefinite) [Move=⧼protect-level-larianeditonly⧽] (indefinite))) |
||
| (27 intermediate revisions by the same user not shown) | |||
| Line 1: | Line 1: | ||
[[File:Projectbrowser- | [[File:Projectbrowser-overview.png|center]] | ||
<br /> | |||
== Description == | == Description == | ||
<p>The | <p>The project browser is used for loading and creating projects. <br /> | ||
Here you can see all existing projects, as well as the different types of new projects you can create.</p> | |||
{| class="wikitable" | {| class="wikitable" | ||
|- | |- | ||
| | |A similar browser exists for opening and creating levels: [[Level browser]] | ||
|- | |- | ||
|} | |} | ||
<br /> | |||
== Existing Projects == | |||
<div> | |||
[[File:Projectbrowser-existing-annotated.png]] | |||
</div> | |||
<sub> The existing projects browser with annotated elements </sub> | |||
#Go to the "New Project" tab to create a new project | |||
#Filters (text and type) [CTRL + F] | |||
#Recently opened projects (right-click to remove from list) | |||
#Size slider [CTRL + scroll] | |||
#All projects | |||
#Info on the currently selected project | |||
#Editor preferences | |||
== | <br /> | ||
[[File: | === Editor Preferences === | ||
{| class="wikitable" | |||
|- | |||
|The editor preferences button (7) open the preferences window also available via the editor's Options tab. An explanation of the available settings can be found here: [[Editor preferences]] | |||
|- | |||
|} | |||
<br /> | |||
== New Project == | |||
<div> | |||
[[File:Projectbrowser-new-annotated.png]] | |||
</div> | |||
<sub> The new project browser with annotated elements </sub> | |||
#Project type (Adventure or Add-on) | |||
#Project Settings | |||
<br /> | |||
=== Project Type and Settings === | |||
<p>When creating a new project, there are two types to choose from: Adventure and Add-on. <br /> | |||
Adventures are full campaigns, like the main story. When creating your own adventure, you are expected to create your own story, or edit an existing one, and do the necessary scripting. <br /> | |||
Add-ons are (smaller) projects that can be toggled on/off while playing an Adventure. An example would be an add-on that adds 2 new swords to the game. <br /> | |||
Story (scripting) is not available in add-ons and an add-on is not required to be able to play an adventure.</p> | |||
<p>Next to the project name, there are two more possible project settings. Both can later be altered in the Project Settings window ([[Project settings window]]). <br /> | |||
Story, Arena and GM (Game Master) define our three game modes that are shipped with the game. Each of them is a project we created internally. <br /> | |||
Selecting any of them in "Load Data From" means that the new project will be dependent on the selection: it will load data, story,... from this project. <br /> | |||
In a similar fashion, selecting any in "Target Project For" means that, when someone downloads your published project, it will only be available for use in the game modes you selected.</p> | |||
{| class="wikitable" | |||
|- | |||
|We refer to the available guides for more info on creating, publishing and downloading custom content: [[Larian guides]] | |||
|- | |||
|} | |||
{| class="wikitable" | |||
|- | |||
|A more thorough, internal explanation on our system of different project types and custom content ("mods") can be found here: [[Modding internals]] | |||
|- | |||
|} | |||
Latest revision as of 11:48, 2 October 2017

Description
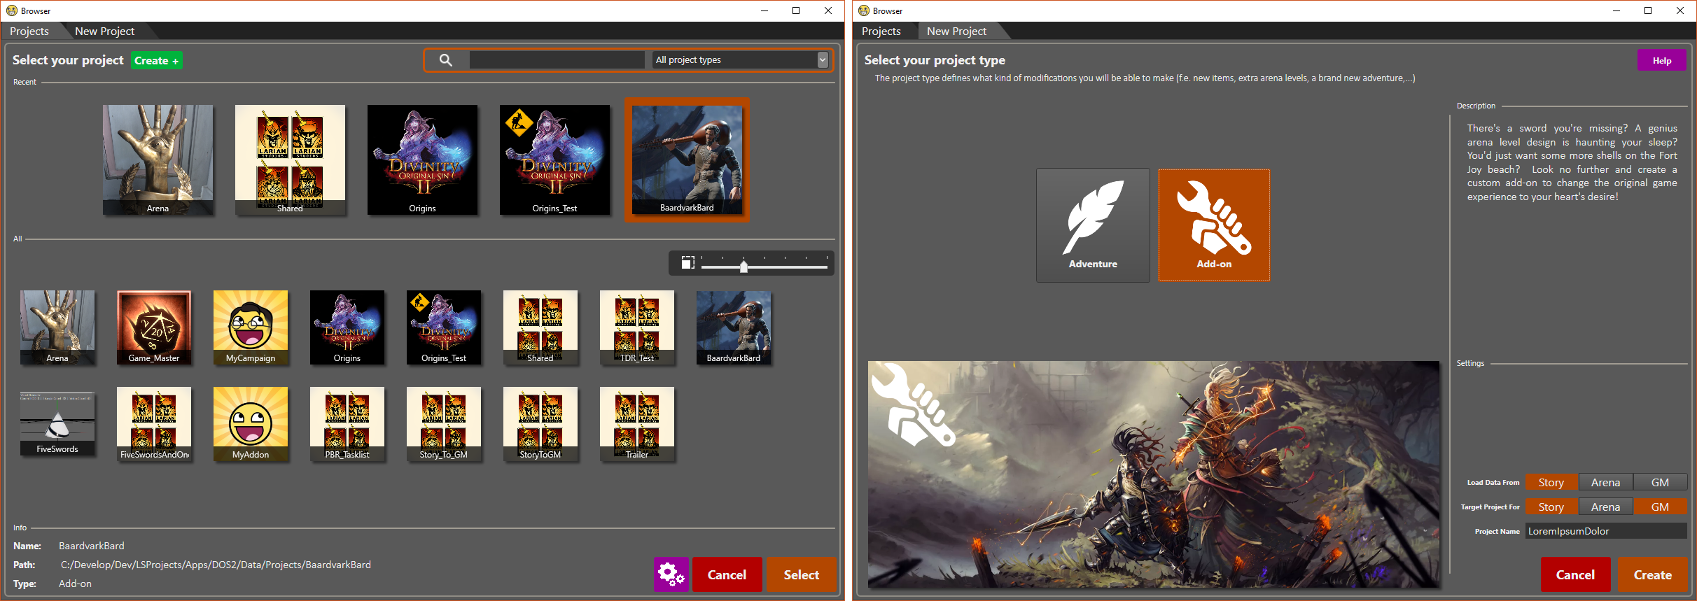
The project browser is used for loading and creating projects.
Here you can see all existing projects, as well as the different types of new projects you can create.
| A similar browser exists for opening and creating levels: Level browser |
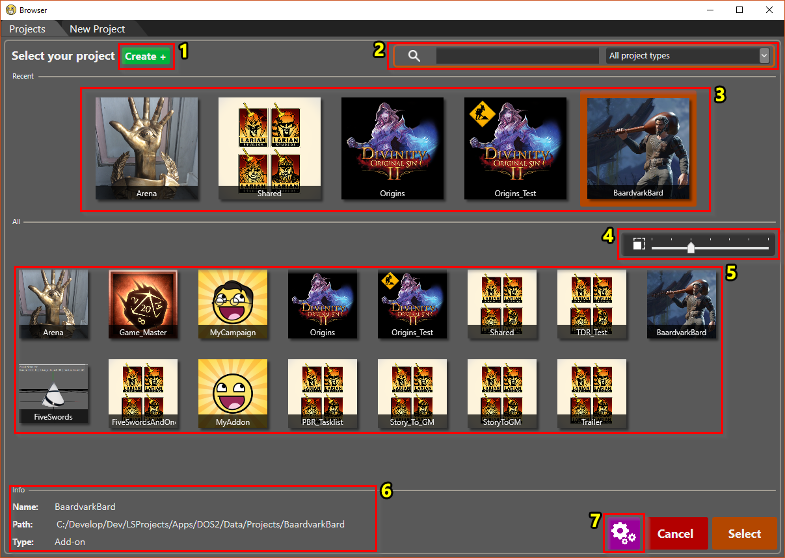
Existing Projects
The existing projects browser with annotated elements
- Go to the "New Project" tab to create a new project
- Filters (text and type) [CTRL + F]
- Recently opened projects (right-click to remove from list)
- Size slider [CTRL + scroll]
- All projects
- Info on the currently selected project
- Editor preferences
Editor Preferences
| The editor preferences button (7) open the preferences window also available via the editor's Options tab. An explanation of the available settings can be found here: Editor preferences |
New Project
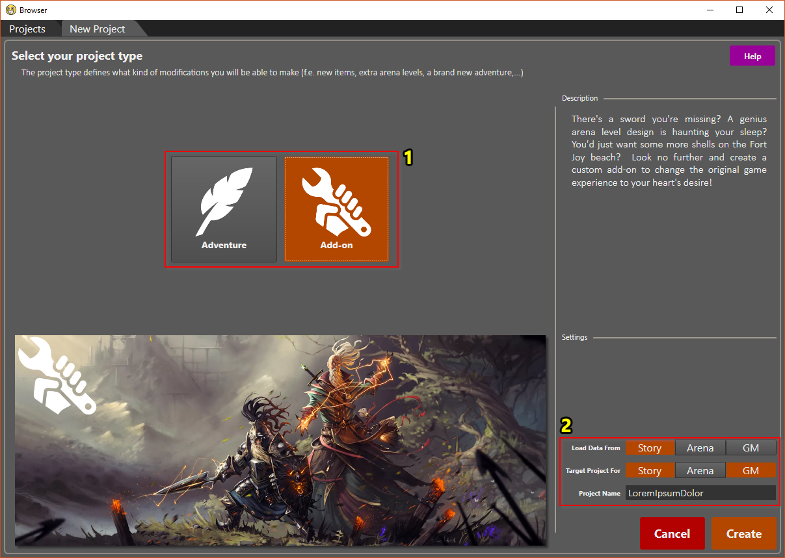
The new project browser with annotated elements
- Project type (Adventure or Add-on)
- Project Settings
Project Type and Settings
When creating a new project, there are two types to choose from: Adventure and Add-on.
Adventures are full campaigns, like the main story. When creating your own adventure, you are expected to create your own story, or edit an existing one, and do the necessary scripting.
Add-ons are (smaller) projects that can be toggled on/off while playing an Adventure. An example would be an add-on that adds 2 new swords to the game.
Story (scripting) is not available in add-ons and an add-on is not required to be able to play an adventure.
Next to the project name, there are two more possible project settings. Both can later be altered in the Project Settings window (Project settings window).
Story, Arena and GM (Game Master) define our three game modes that are shipped with the game. Each of them is a project we created internally.
Selecting any of them in "Load Data From" means that the new project will be dependent on the selection: it will load data, story,... from this project.
In a similar fashion, selecting any in "Target Project For" means that, when someone downloads your published project, it will only be available for use in the game modes you selected.
| We refer to the available guides for more info on creating, publishing and downloading custom content: Larian guides |
| A more thorough, internal explanation on our system of different project types and custom content ("mods") can be found here: Modding internals |

