Vignettes: Difference between revisions
No edit summary |
No edit summary |
||
| Line 6: | Line 6: | ||
== <font color="#ff9c00">Vignettes</font> == | == <font color="#ff9c00">Vignettes</font> == | ||
To create a vignette, simply click on the Vignette Window. This will bring up a blank vignette, which is completely customisable. | |||
It will look like this: | It will look like this: | ||
| Line 15: | Line 15: | ||
|- | |- | ||
| | | | ||
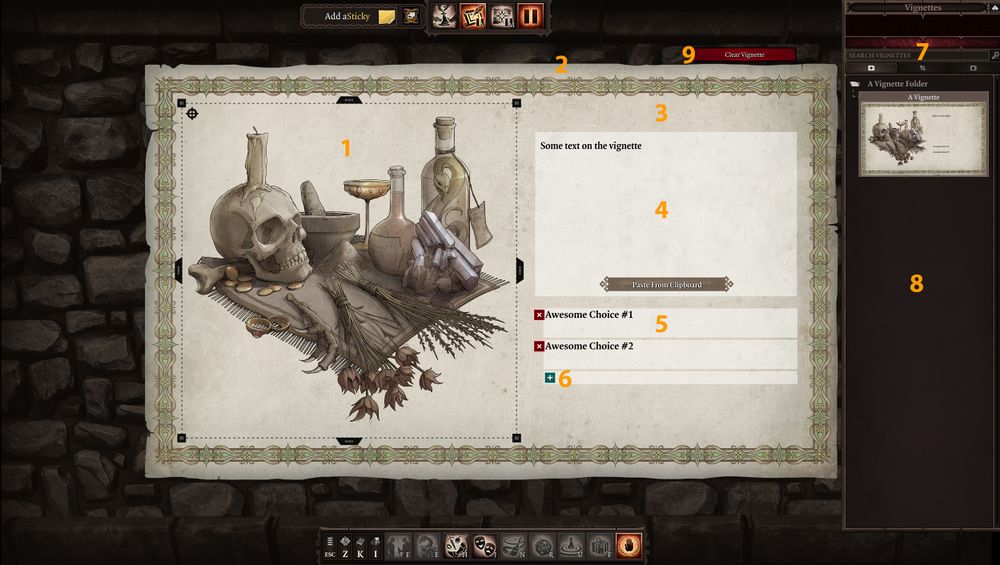
# [[#Vignette Image|'''Vignette Image''']] | # [[#Vignette Image|'''Vignette Image''']] is the image of your current '''Vignette'''. You can change this image by right-clicking on it and selecting "Change Image". You can also crop the image. | ||
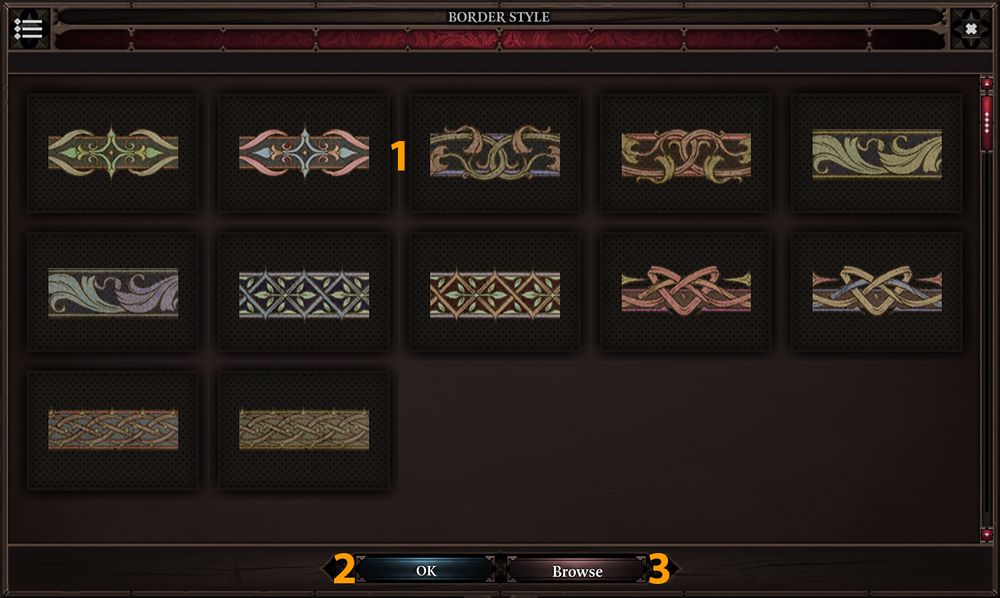
# [[#Vignette Borders|'''Vignette Borders''']] | # [[#Vignette Borders|'''Vignette Borders''']] are the borders of your current '''Vignette'''. You can change the border of the vignette by selecting "Change Border". | ||
# [[#Vignette Canvas|'''Vignette Canvas''']] | # [[#Vignette Canvas|'''Vignette Canvas''']] references the background colour of your current vignette. You can change the colour of the background by selecting "Change Canvas". | ||
# '''Vignette Text''' | # '''Vignette Text''' is where you write the text that will be seen by the players. You can type or paste the prompt for this vignette's encounter into the text box on the upper right. | ||
# '''Vignette Choices''' | # '''Vignette Choices''' allows you to add multiple choices the party can take. These options can be indirect reactions to situations (eg. "Punch him") or direct dialogue options (eg. "I'll have you know I'm not that kind of shepherd!") or anything your mind can dream up. | ||
# '''Adding Choices''' | # '''Adding Choices''' can be done by clicking on the Plus symbol to add an option, and typing your text directly into the textbox. | ||
# '''Search & Folders''', | # '''Search & Folders''', allows you to search for words to find a specific '''Vignette'''. You can also '''Add Folders''', '''Rename Folders''', and '''Delete Folders'''. | ||
# '''Vignette Area''', this is where all your '''Vignettes''' and '''Folders''' | # '''Vignette Area''', this is where all your '''Vignettes''' and '''Folders''' are located. | ||
# '''Clear Vignette''', this will wipe all the text in the '''Vignette'''. | # '''Clear Vignette''', this will wipe all of the text in the '''Vignette'''. It is important to note that the text will be deleted forever. | ||
|- | |- | ||
|} | |} | ||
=== <font color="#ff9c00">Creating Vignettes</font> === | === <font color="#ff9c00">Creating Vignettes</font> === | ||
To create a vignette, simply click on the Vignette Window. This will bring up a blank vignette, which is completely customisable. | |||
From there you can also '''Delete''' a '''Vignette'''. | From there you can also '''Delete''' a '''Vignette'''. Note that if you select this option, your '''Vignette''' will be gone forever. Note also that you can't delete a '''Vignette''' if there is only one. | ||
=== <font color="#ff9c00">Changing Vignettes</font> === | === <font color="#ff9c00">Changing Vignettes</font> === | ||
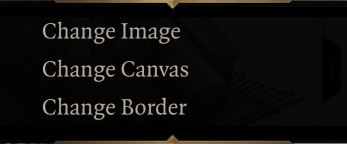
Right-clicking | Right-clicking on the '''Vignette''' will open up a menu with these options: | ||
[[File:GM_VignetteMenu.jpg]] | [[File:GM_VignetteMenu.jpg]] | ||
| Line 40: | Line 40: | ||
|- | |- | ||
| | | | ||
# [[#Vignette Image|'''Change Image''']] | # [[#Vignette Image|'''Change Image''']] will allow you to change the image of the vignette. | ||
# [[#Vignette Canvas|'''Change Canvas''']] | # [[#Vignette Canvas|'''Change Canvas''']] will allow you to change the background of the vignette. | ||
# [[#Vignette Borders|'''Change Border''']] | # [[#Vignette Borders|'''Change Border''']] will allow you to change the border of the vignette. | ||
|- | |- | ||
|} | |} | ||
| Line 53: | Line 53: | ||
|- | |- | ||
| | | | ||
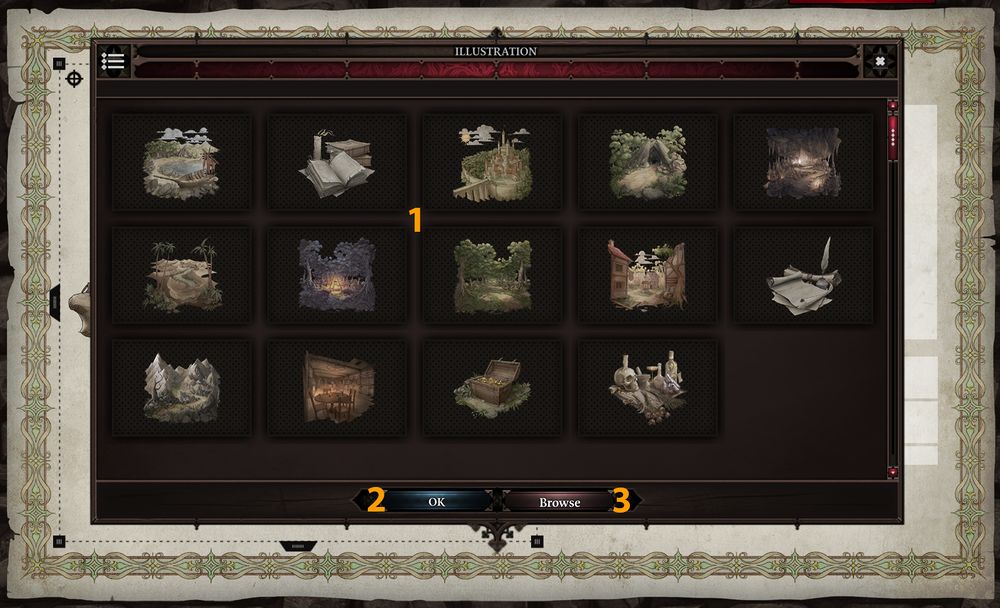
# '''Images Area''' | # '''Images Area''' is where all your available images are located. | ||
# '''OK''' | # '''OK''' - pressing this button after selecting an image will change the image of the '''Vignette''' | ||
# [[#Importing Assets|'''Browse''']] | # [[#Importing Assets|'''Browse''']] will allow you to import an image from your computer into your campaign. | ||
|- | |- | ||
|} | |} | ||
| Line 65: | Line 65: | ||
|- | |- | ||
| | | | ||
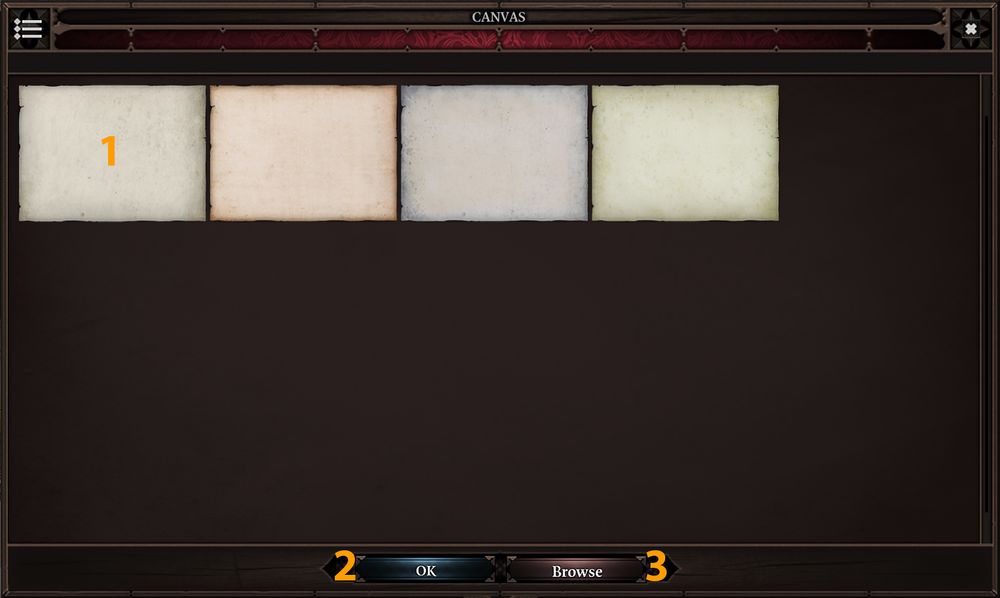
# '''Canvas Area''' | # '''Canvas Area''' is where all your available '''Canvas''' images are located. | ||
# '''OK''' | # '''OK''' - pressing this button after selecting an image will change the image of the '''Vignette'''. | ||
# [[#Importing Assets|'''Browse''']] | # [[#Importing Assets|'''Browse''']] will allow you to import an image from your computer into your campaign. | ||
|- | |- | ||
|} | |} | ||
| Line 77: | Line 77: | ||
|- | |- | ||
| | | | ||
# '''Borders Area''' | # '''Borders Area''' is where all your available '''Borders''' images are located. | ||
# '''OK''' | # '''OK''' - pressing this button after selecting an image will change the image of the '''Vignette'''. | ||
# [[#Importing Assets|'''Browse''']] | # [[#Importing Assets|'''Browse''']] will allow you to import an image from your computer into your campaign. | ||
|- | |- | ||
|} | |} | ||
== <font color="#ff9c00">Importing Assets</font> == | == <font color="#ff9c00">Importing Assets</font> == | ||
Importing data is | Importing data is not complicated. | ||
After pressing the Browse button you | After pressing the Browse button you can navigate the folders on your computer to find the image that you want. | ||
Supported format are PNG and JPG. | Supported format are PNG and JPG. Please note that renaming a PNG for a JPG or vice-versa is not supported. | ||
Keep in mind that if you want to have something transparent ( | Keep in mind that if you want to have something transparent (for example: to use as a border) you'll need to use image modification software. | ||
If you want to add custom images to | If you want to add custom images to your Game Master Mode campaign while it is not loaded, they should be placed here: | ||
{| class="wikitable" | {| class="wikitable" | ||
| Line 102: | Line 102: | ||
If you want to add new images when you are also working on your campaign in the game at the same time, | If you want to add new images when you are also working on your campaign in the game at the same time, place the images here: | ||
{| class="wikitable" | {| class="wikitable" | ||
|- | |- | ||
| Line 110: | Line 110: | ||
|} | |} | ||
Afterwards, to make sure your campaign "loads" the newly added image, open the [[Game Menu|'''Game Menu''']] (or '''Press Escape''') and click on '''Reload Assets'''. | |||
This will reload any newly added assets while the game | This will reload any newly-added assets while the game is running. | ||
Revision as of 17:19, 9 January 2018
General
Vignettes are used by the Game Master to tell part of the story with some visual and are also use to ask the party what they want to do after.
This part will cover every details related to Vignettes.
Vignettes
To create a vignette, simply click on the Vignette Window. This will bring up a blank vignette, which is completely customisable.
It will look like this:
|
Creating Vignettes
To create a vignette, simply click on the Vignette Window. This will bring up a blank vignette, which is completely customisable.
From there you can also Delete a Vignette. Note that if you select this option, your Vignette will be gone forever. Note also that you can't delete a Vignette if there is only one.
Changing Vignettes
Right-clicking on the Vignette will open up a menu with these options:
|
Vignette Image
|
Vignette Canvas
|
Vignette Borders
|
Importing Assets
Importing data is not complicated.
After pressing the Browse button you can navigate the folders on your computer to find the image that you want.
Supported format are PNG and JPG. Please note that renaming a PNG for a JPG or vice-versa is not supported.
Keep in mind that if you want to have something transparent (for example: to use as a border) you'll need to use image modification software.
If you want to add custom images to your Game Master Mode campaign while it is not loaded, they should be placed here:
|
%(DocumentsFolder)\Larian Studios\Divinity Original Sin 2\GMCampaigns\%(CampaignName)\ |
If you want to add new images when you are also working on your campaign in the game at the same time, place the images here:
|
%(DocumentsFolder)\Larian Studios\Divinity Original Sin 2\PlayerProfiles\%(ProfileName)\GMActiveCampaignSession\ |
Afterwards, to make sure your campaign "loads" the newly added image, open the Game Menu (or Press Escape) and click on Reload Assets.
This will reload any newly-added assets while the game is running.
