My first: Character: Difference between revisions
No edit summary |
No edit summary |
||
| Line 107: | Line 107: | ||
We have a couple of Larian materials(shaders) you can use:<br /> | We have a couple of Larian materials(shaders) you can use:<br /> | ||
[[File:Materials.jpeg|none]] character folder: [[File:CharacterMaterials.jpeg|none]] <br /> | [[File:Materials.jpeg|none]] character folder: [[File:CharacterMaterials.jpeg|none]] <br /> | ||
Character materials have fresnel effect on them so you can see your character better in different environment and it also has an MSK system, | Character materials have fresnel effect on them so you can see your character better in different environment and it also has an MSK system, which helps you change colors on certain things like skin and cloths (more on MSK below). <br /> | ||
If you don't need this functionality you can use any material from the "Base_PBR" folder.<br /> | If you don't need this functionality you can use any material from the "Base_PBR" folder.<br /> | ||
After you created your material assign your textures in it and assign material to your mesh. (double click on material in content browser; double click on the mesh in content browser)<br /> | After you created your material assign your textures in it and assign material to your mesh. (double click on material in content browser; double click on the mesh in content browser)<br /> | ||
Revision as of 09:04, 12 October 2017
Creating a character can be roughly divided into three parts:
- Creating a creature (monster or animal)
- Creating body parts and hairstyles (heads, hairstyles, beards)
- Creating Armor
Creating custom characters is a very technical and complicated process. It will require artistic skills and profound knowledge of 3d modelling, texturing, rigging, skinning, animation and Larian editor.
If you do not possess all the skills mentioned above and still want to make custom characters we strongly recommend reusing existing rigs and animations.
To make a creature you can either:
- Make your own custom creature, rig, animations
- Make your own custom creature that will use already existing rig and animations (recommended)
Larian pipeline of creature creation in a nutshell:
- Concept
- Creation a high poly asset in zbrush
- Retopo, unwrap
- Texturing
- Testing your mesh in the editor
- Rigging
- Skinning
- Animating
Note: if you're reusing existing rig you can skip #6 and #8
File formats
In the editor 3d models are saved as granny files (.GR2).
The textures are saved as DirectDraw Surface (.dds).
| More info on Granny 3D can be found here |
| More info on DirectDraw Surface can be found here |
Creature editor set-up
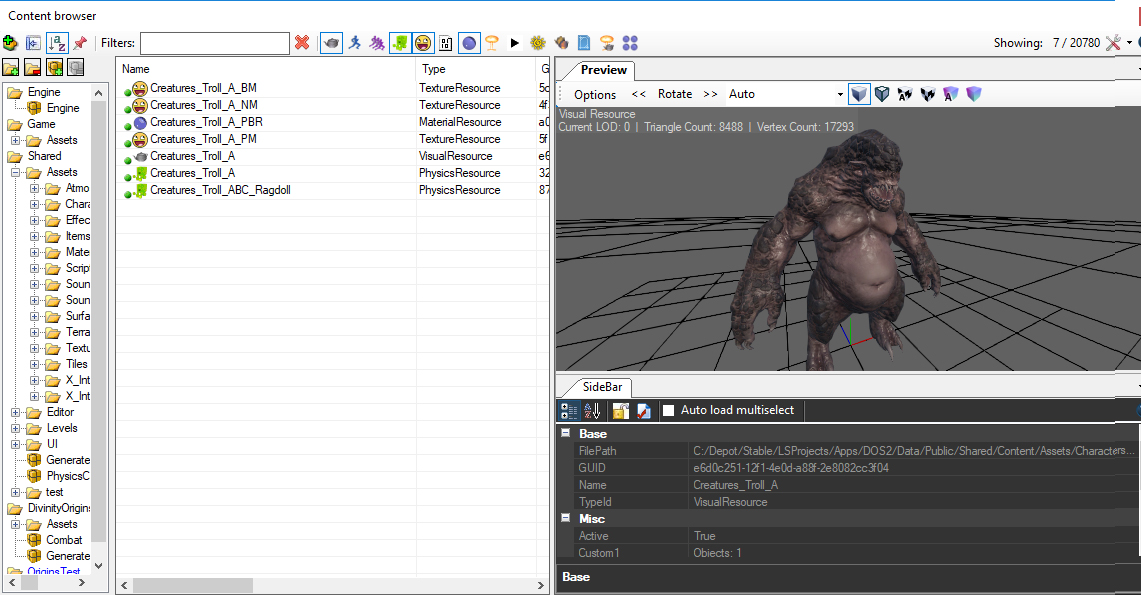
Lets take an example of the troll creature.
To be able to implement a troll creature in the game you need:
Resources:
- 3d model
- Textures: Base Map(BM) Normal map (NM) and Physical map(PM)
- Material
- Physics mesh
- Ragdoll mesh
- Animation files (won't be covered in this guide)
Special editor files (more on them below):
- Visual Set
- Root Template
Example file of the troll creature: Troll example
Example of all the resource files in content browser:
Modelling
General modelling tips:
- All the joints areas should have the proper cuts (bending cuts- see below), aligned accordingly along with the respective naked model of the race you’re modeling.
- The armors are using the same rig as the naked model, joints need to be placed correctly, with as similar cuts as possible.
- No Scaling applied to the meshes: reset X-form.
- No N-gons. Only 3 (triangles) and 4-gons (quads) are allowed.
- Delete any unused vertices and floating triangles.
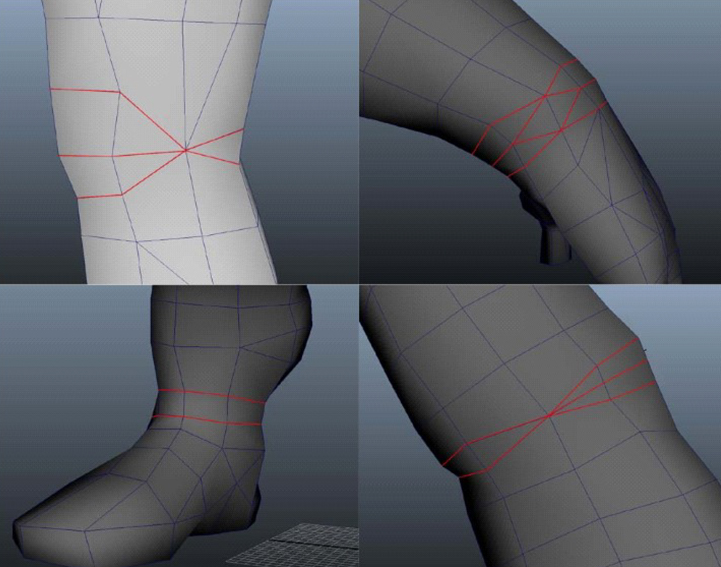
Reasons for the Cuts:
The cuts that are made will be used to squash and stretch at joint areas.
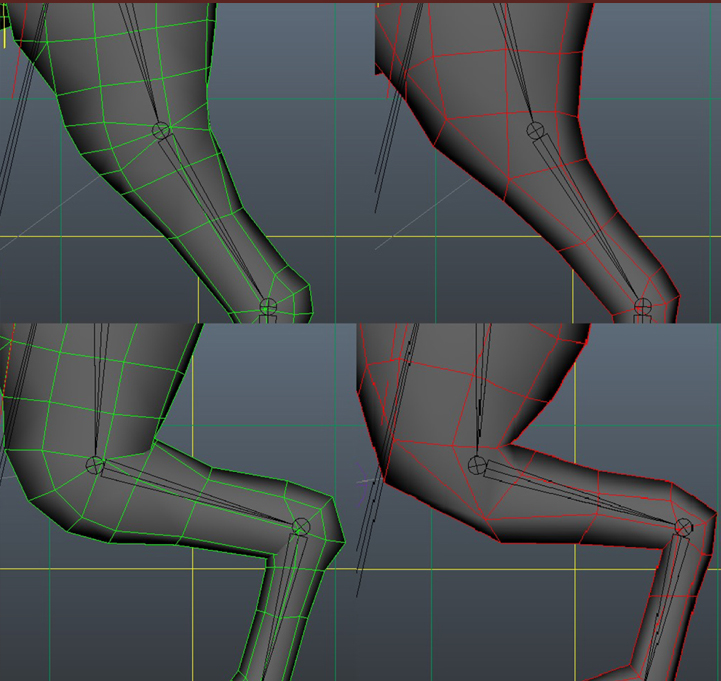
The green and red meshes are skinned to the same rig and posed in the same way.
The green mesh has the correct shapes to create a nice rolling bend of the knee.
whilst the red mesh is missing the shapes and cannot be bend in the same way.
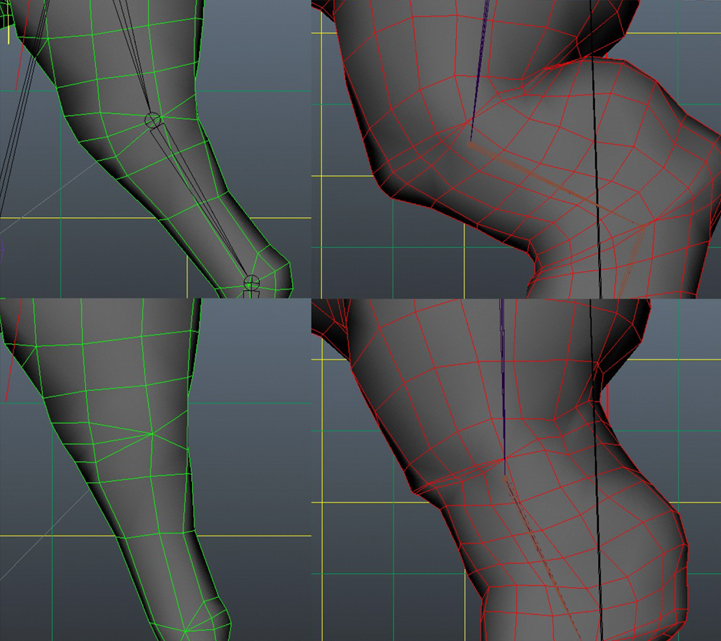
When creating the shapes there must be enough space to straiten the leg.
The red mesh on the image is too small to straighten the leg without it collapsing on itself
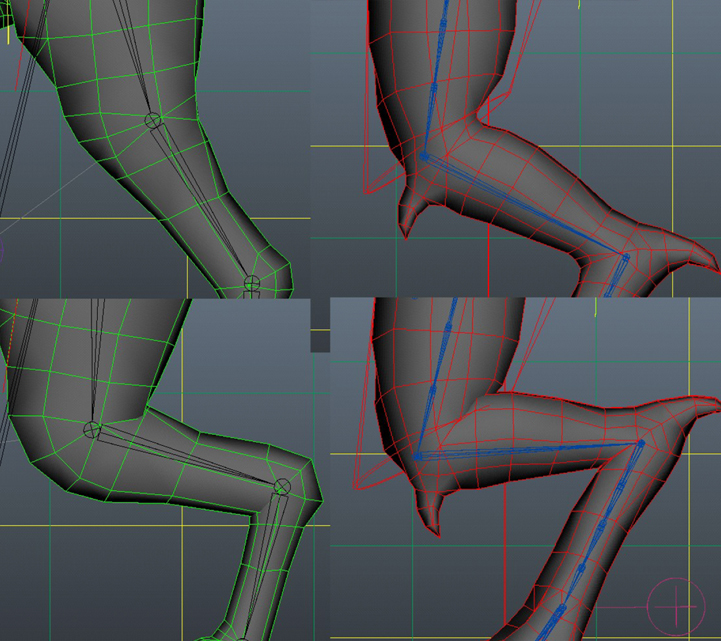
In this example the shapes do not match the location of the knee-joint.
There for are not used in the skinning.
Make sure when creating the mesh to look at the size of the shape and location of the joints.
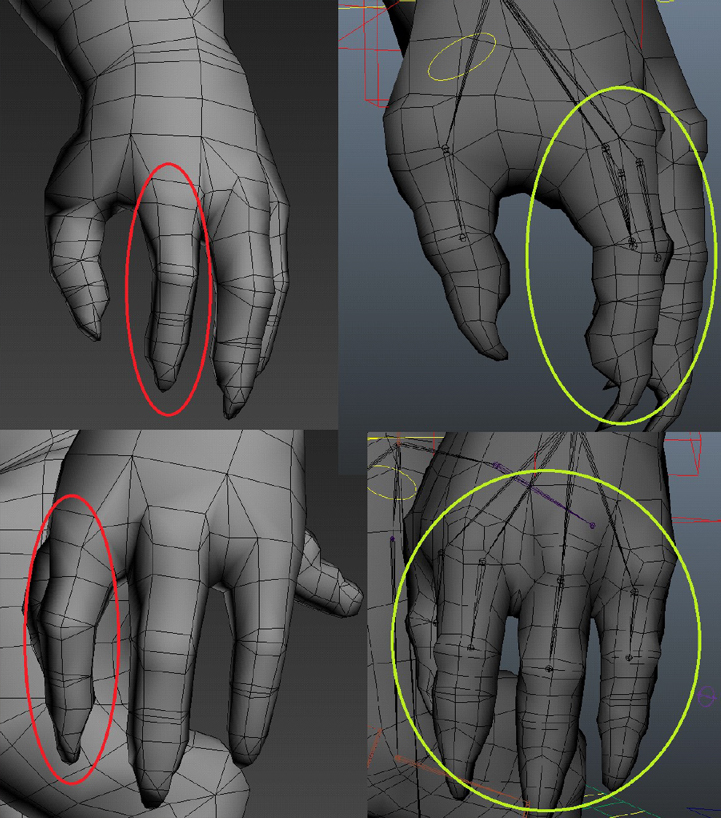
When making the Fingers make sure they all rotate the same way in their base position
- Bottom of feet should be as flat as possible.
- Use smoothing groups sparingly: don’t use 32 smoothing groups when 4 is enough.
- Make sure the armor/clothing pieces are not clipping through one another.
- The vertices along the center world line (symmetry line) should be obviously aligned correctly in the center.
- Close your armor pieces: the player starts with a naked model and can dress up his character with any armor piece you’re going to make. It is therefore important there are no holes. Also, make sure your Lowerbody and Upperbody pieces hide the cut at the waistline level.
- About objects that can bend (e.g. tails), don't put concave (=bending inwards) curves in it. They should be as straight as possible in neutral pose.
- Final character should be centered on origin (x0,y0,z0).
Don't forget to make a physics mesh for your character, it needs it to collide with the environment, so the player can click and select your character on the screen.
Textures
In DOS2 we use Physically-Based Rendering (PBR).
To learn more about PBR you can read PBR Guide by Allegorithmic here.
A creature, like troll, usually needs basemap (BM), normal map(NM) and physical map(PM) textures.
Texture examples:
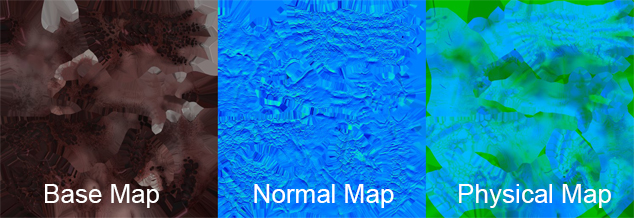
We pack Metallness in the Red channel, Roughness in the Green channel and Ambient Occlusion in the Blue channel of Physical map.
Why our NM and PM textures look different from the ones used in other game engines ?
-In image files (including dds) the red channel gets the least bytes assigned to it this causes some detail loss which you don't want.
To improve quality of our in-game normal maps, we swap our red channel into the alpha channel. Instead of outputting RGB, we output xGBR maps.
Larian primarily uses Substance Painter for texturing our characters and assets. You can get/try it here.
Materials
After you import your mesh and textures in the editor you need to create a material.
We have a couple of Larian materials(shaders) you can use:
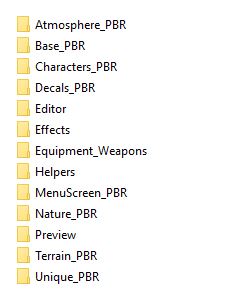
character folder:
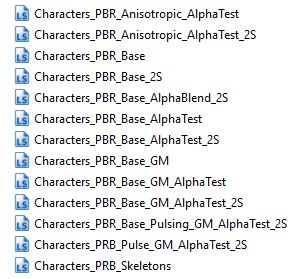
Character materials have fresnel effect on them so you can see your character better in different environment and it also has an MSK system, which helps you change colors on certain things like skin and cloths (more on MSK below).
If you don't need this functionality you can use any material from the "Base_PBR" folder.
After you created your material assign your textures in it and assign material to your mesh. (double click on material in content browser; double click on the mesh in content browser)
If your are not using MSK but still want to use character material, just leave it empty (don't enable it in the box) or assign a black texture to it.
You can edit the functionality of the material by right clicking it in content browser and selecting "Open in editor".
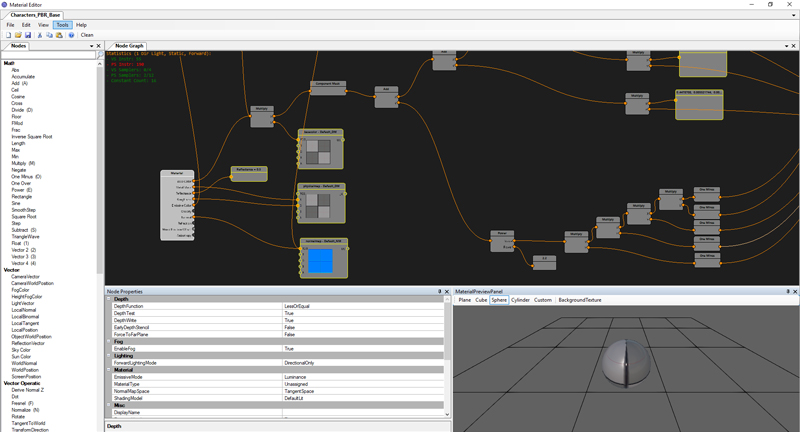
Beware if you make changes and save the material all the assets that are using the material will change accordingly.
You can always make edits and "save as" a separate copy for testing purposes.
Material source file can be easily changed if you select your material in the content browser and go to the side bar.
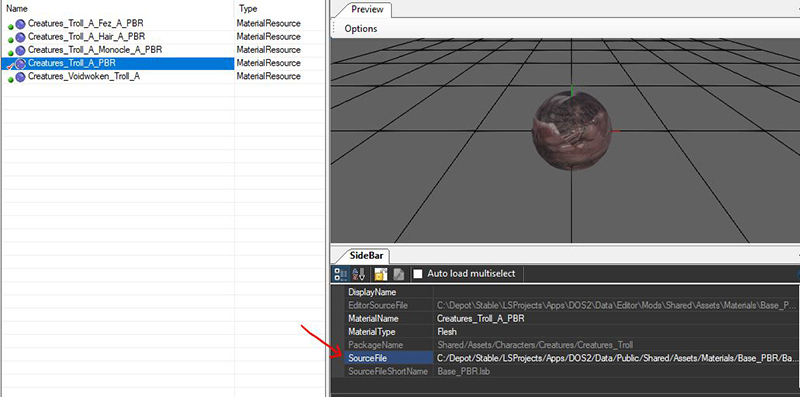
If you change the sourcefile of the material you need to reassign textures.
You can also see a "Material Type" parameter in the side bar of the material. the parameter will trigger different sound effects in the game depending in the type of your material, so don't leave it unassigned.
Visual Sets
Visual sets are special editor files, which help us organizing characters, their armor, body parts and colors.
It also possible to a create without the visual set, in case you don't need any functionality mentioned above.
Visual Set consists of 9 visual lists, where you can put meshes and 3 color lists where you can store colors.
Visual set example:
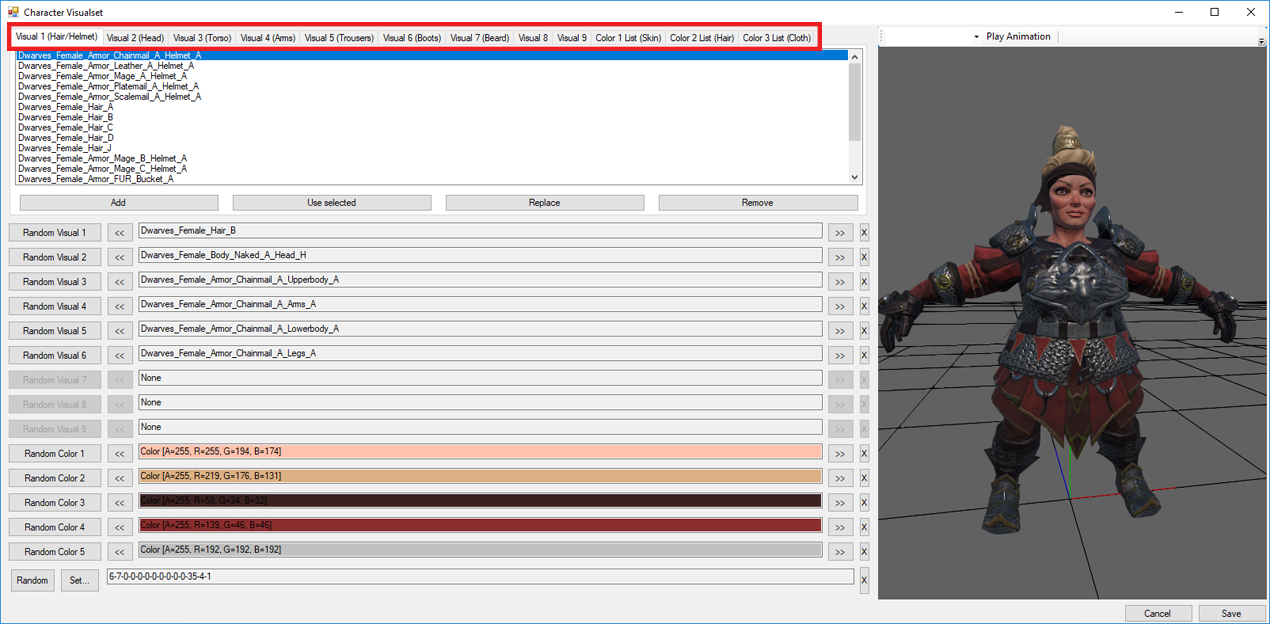
If you're working on a unique creature that doesn't need as many equipment pieces as our regular characters, you can put armor meshes in any visual list. (the names in brackets are for your convenience and consistency).
Although it is recommended to keep something in either list #3(Torso) or #2(Head) because of material sounds functionality.
Our troll example visual set:
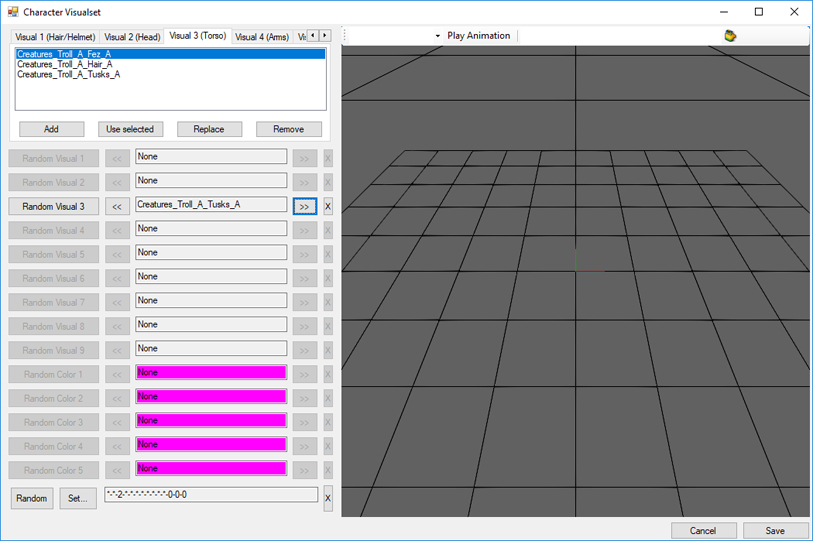
Troll creature doesn't need to equip armor so it has some unique meshes in visual 3 (torso) list.
!Important! You can also leave the meshes unassigned meshes by pressing "X" button.
Space in the visual set is very limited, cause each visual set is stored in unit64. So you might have to create multiple visual sets for different armors.
Colors in the visual set
There are 3 color tabs in the Visual lists: Skin, Hair and Cloth colors. And 5 color rows you can change on the bottom.
In the lists you can select and store colors. And in the rows on the bottom you can select colors from the list.
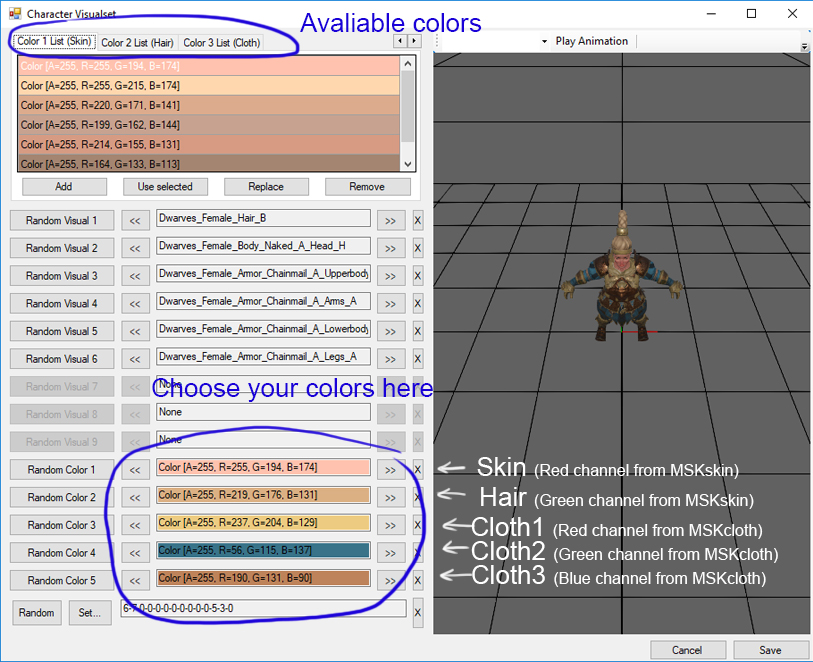
To be able to edit colors from the visual set you need your mesh to use character pbr material and have MSKskin and/or MSKcloth.
Our MSK pipeline will be described below.
Root Template
To be able to spawn a character in the editor you will need to create a root template for it.
More advanced guide about root templates here
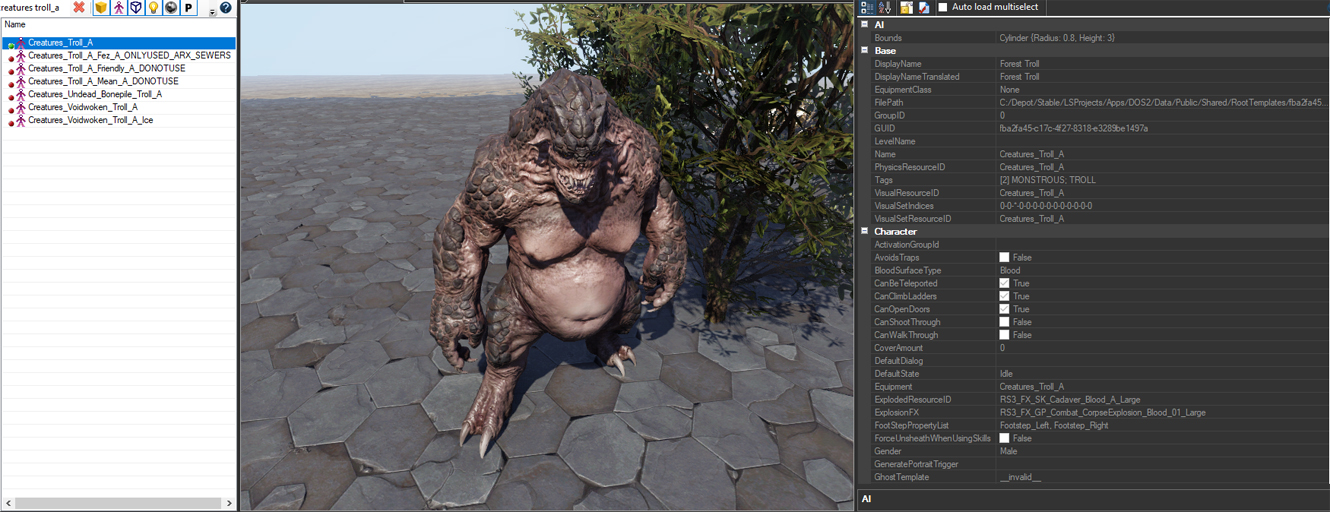
You will need to edit following parameters for your creature:
- Ai Bounds - preferably a cylinder for the creature.
- DisplayName
- Physical Resource (physical mesh of your character)
- VisualResourseID - your actual mesh with the rig (could also be just a file with the rig)
- VisualSetResourseID (if any)
Make sure it has:
- ExplodedResourseID
- ExplosionFX
- HitFX
- Icon
- RagdollResourseID
- Stats
Do not scale creatures unless you really need to. If scale a creature some animations, like climbing will not work properly.
Small scale like 1.1 -1.3 is generally ok.
Only use "IsPlayer" property for testing.
Beware if you make your character "IsPlayer" the equipment system will not work properly. (More about equipment below)
Root templates and Visual sets.
There are 3 ways of using visual sets for creatures in root templates:
- Not using visual set for creatures - you put character mesh with all boned in VisualResourseID
- Using visual set only for armor/equipment for your character - character mesh with all boned in VisualResourseID + visual set with armor meshes, skinned to the character.
- Using visual set for both body parts and armor - just the rig with all bones in VisualResourseID +visual set with naked body parts and armor.
Most of the animals use #1, most of the creatures with equipment use #2 and ALL of NPC of our playable races use #3 approach.
Character creation visuals
If you want to change Character Creation(CC) visuals you need to change "hero" root templates of our playable races:
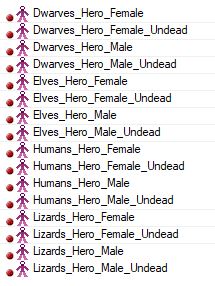
Hero root templates also have their own "hero" visual sets:
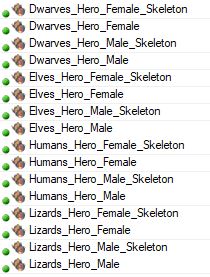
If you add/delete meshes from hero visual sets it will appear/disappear in Character Creation(CC). So to add/modify meshes in CC you just need to add them in those visual sets.
Hair, Heads and Facial Features come from hero visual sets. while colors and armors in CC come from stats.
To change the color selection available in character creation you need to change Race Presets files:
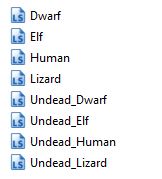
To change or add color of the hair/skin you will need to change the value of the colors.
Example of the value of the color:
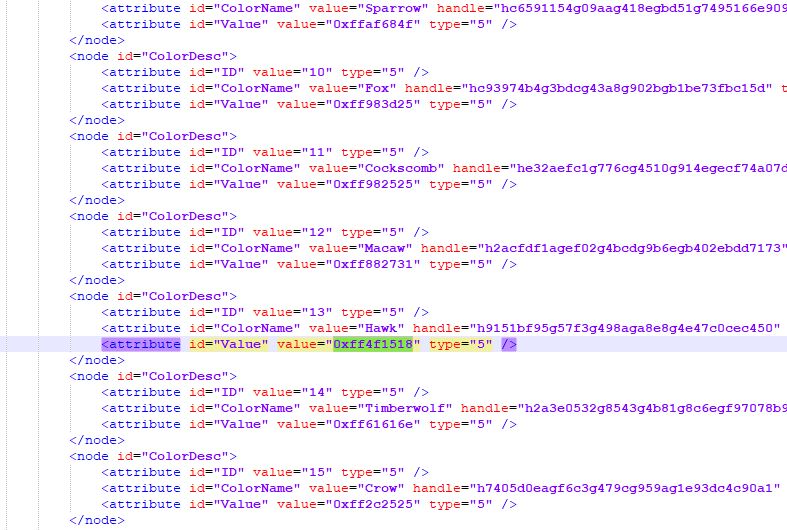
Color value is "0xff" + it's Hex Color Code. So completely while color will be 0xffffffff; completely black - 0xff000000
To change armor equipment and colors you will need to modify "ItemProgression", "Equipmet" and "Item Colors" stat files. Those will require more advanced knowledge. Guide on stats is still WIP here.
Armor and Equipment
There is a difference in code between playable and NPC characters. NPC characters, as mentioned above, use visual sets for armor, while player characters use equipment. NPC visuals is just a rig in it's root template with all the armor and body parts stored in visual sets, while player characters have their naked body parts in them, which can't be unequiped, and are hidden when player equips armor from eq root templates.
So when you make armor you need to ask yourself a question:
Do you want players to be able to equip your armor piece or is it going to be just a unique npc/creature armor?
If not:
You just need to create a mesh, import it to editor and add it it your NPC visual set.
If yes you will also need:
- Create meshes for each race and gender. So you need to have 8 meshes + 8 skeleton version variation.
- Your armor pieces needs to be made and cut the same way as already existing equipment, so they could fit with each other.
- Meshes need to be textured and masked the same way (read about MSK system below)
- Create separate eq root template and add your meshes to eq data.
- Create foldable mesh of your armor piece (Mesh that you see when you drop an armor piece on the ground)
- Crete an icon for your eq root template
- Give stats to your new equipment and make sure it can be generated for loot.
As an example you can check how Lizards female platemail armor is set up :
Lizard Female files
You will need to work in Lizards_Female_Armor_ABC, use other files as references.
Note: if you export armor only include bones that you need, don't include entire skeleton.
But! The character root should be always included.
If you're making a helmet or any other piece of armor that only skinned to 1 bone, make it rigid.
Go to "Extra Attributes" tab in maya and put "Rigid = true", otherwise it won't work in the editor.
Cloth Simulation
Cloth meshes shouldn't have any thickness.
To add cloth simulation you need add "Cloth=1" in "Extra Attributes" tab in maya and add vertex paint on your mesh.
Black for fixed vertices (0, 0, 0) Red for simulated vertices (255, 0 ,0)
You can preview how it looks in the example file:
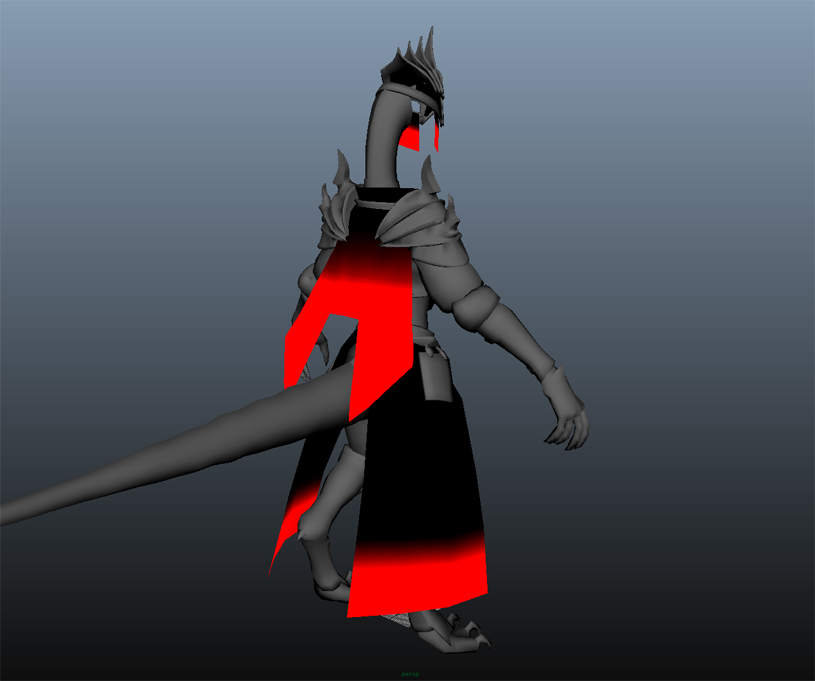
In Maya, select your mesh -> go to Polygons tab -> Color -> Paint Vertex Color
Make sure there are no elements with only red vertices. With no black vertices to fix the cloth in place it will fall apart to pieces. These pieces will fall through the level without being connected to anything.
Make sure your cloth simulated mesh has only 1 smoothing group. To be sure in Maya, select your mesh -> go to Polygons tab -> Normals -> Soften Edge
Try not to go too high poly with your cloth simulated meshes, as it will affect performance. Keep it <400 vertices per cloth mesh.
Don't put cloth simulated meshes in the areas where they will bend (elbows, shoulders, knees) it won't look good.
If you added cloth to a mesh when you double click on it in content browser you will be able to edit some cloth parameters:

Pose matching is one of the most important parameter you'll find there. Don't put it on 0 cause it will fly around too much. If you put it to high your cloth mesh will be too stiff or wouldn't simulate at all. Best results could be achieved when it's between 0.01 - 0.2
Equipment root templates
If you want to change existing equipment or add new one you'll have to work with eq roots. Each eq root has it's Equipment Data:
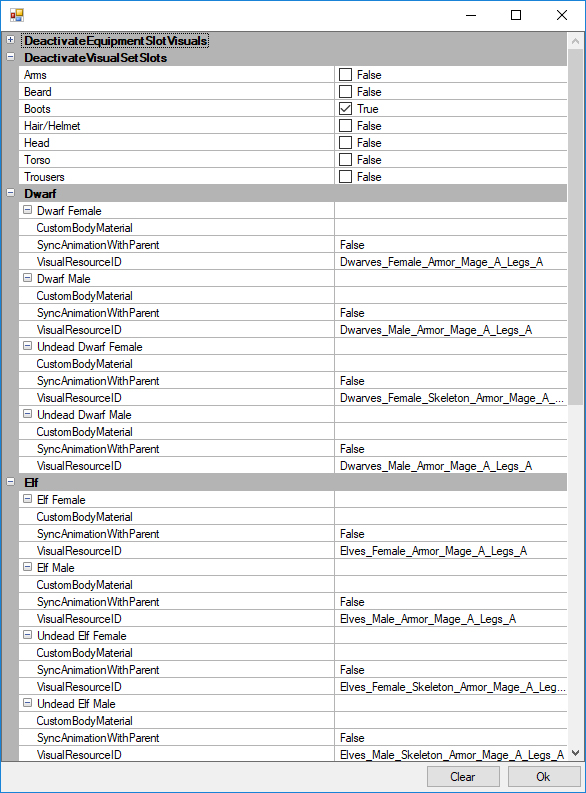
You need to assign meshes to each race gender and tick the box if you want to deactivate any visual of any body part (usually you should).
We have "Deactivate Equipment Slot Visuals" there as well, but it is used in very rare cases when we want to hide certain equipment slot whenever something is equipped. For example we have a very long robe that hides any trousers your character equips.
Skeleton/Undead equipment
Undeads are using the same rigs as alive characters versions so you can avoid remodeling entire mesh by just duplicating the existing mesh from the alive version and assigning Helper_Invisible_A material to the naked bodyparts in it. If the naked skin was baked in the texture you can use a different character material (replace the source file of the material to Characters_PRB_Skeletons from the CHaracters_PBR folder and reassign the textures)
Hair and Helmets
If you're are making an equip-able helmet you need to add a separate mesh with hair to it. It needs to be in the same granny but separate mesh with "_Hair_" in its name. In this case if a player is bald and equips your hair mesh from the helmet won't be rendered.
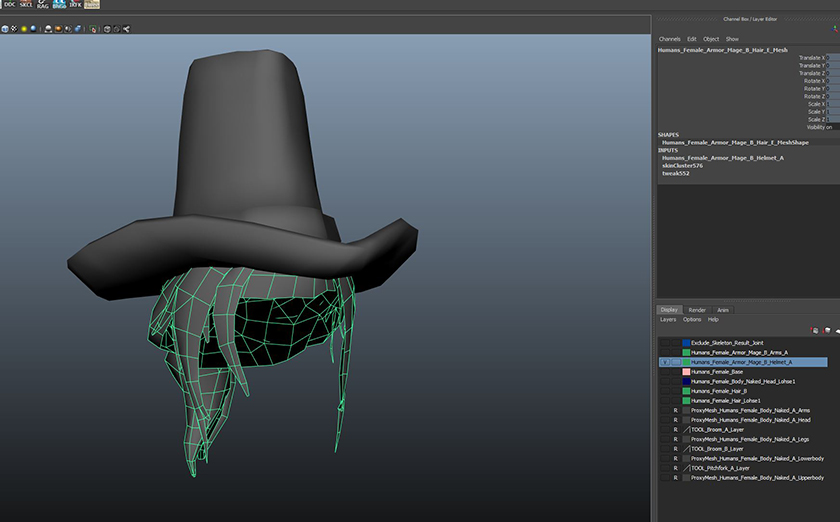
The hair and helmet is in one layer "Humans_Female_Armor_Mage_B_Helmet_A" hair is called Humans_Female_Armor_Mage_B_Hair_E_Mesh. If the player is bald and equips this helmet he'll only equip the hat.
Downloadable files
Example files of the creatures Animals:
Bear example
Boar example
Cattle example
Crocodile example
Deer example
Dog example
Frog example
Pig example
Rat example
Salamander example
Squirrel example
Tiger example
Turtle example
Wolf example
Example files of the creatures Creatures:
ElementalDevil example
Gheist example
Insect example
Merman example
Werewolf example
Automaton example
SourcePuppet example
Troll example
Playable Races Armor:
Dwarves Female files
Dwarves Male files
Elves Female files
Elves Male files
Human Female files
Human Male files
Lizard Female files
Lizard Male files