Difference between revisions of "AI Bound Editor"
m |
|||
| (8 intermediate revisions by 2 users not shown) | |||
| Line 1: | Line 1: | ||
| − | [[File:AIBoundEditor.png| | + | [[File:AIBoundEditor.png|center]] |
| − | < | + | <br /> |
== Opening the AI Bound Editor == | == Opening the AI Bound Editor == | ||
| Line 12: | Line 12: | ||
# Select the "Bounds" property in the PropertyGrid and click the [..] button to the right | # Select the "Bounds" property in the PropertyGrid and click the [..] button to the right | ||
| − | + | <br/> | |
== Using the AI Bound Editor == | == Using the AI Bound Editor == | ||
[[File:AIBoundEditorStepByStep.png|none|496px]] | [[File:AIBoundEditorStepByStep.png|none|496px]] | ||
| Line 24: | Line 24: | ||
# Renderview | # Renderview | ||
| − | + | <br/> | |
=== Save and Load === | === Save and Load === | ||
| − | The | + | The save button applies the AI bounds, the load button restores the AI bound properties back to original (how they were when you opened the panel) |
| − | |||
| + | <br/> | ||
=== AI Bound Properties === | === AI Bound Properties === | ||
The AI bound properties box shows the AI bounds of your template in meters, and consists of 2 components: | The AI bound properties box shows the AI bounds of your template in meters, and consists of 2 components: | ||
| − | # [[File: | + | # [[File:AIBoundEditor_Properties_Type.png|top]]<br />The AI bound type <sup>[1] [2]</sup> |
| − | # The AI bounds | + | # [[File:AIBoundEditor_Properties_Bounds.png|top]]<br />The AI bounds |
| Line 38: | Line 38: | ||
<sup>[2] For performance reasons, cylindrical AI bounds are turned off for items</sup> | <sup>[2] For performance reasons, cylindrical AI bounds are turned off for items</sup> | ||
| − | + | <br/> | |
=== AI Bound Editing Tools === | === AI Bound Editing Tools === | ||
The AI Bound Editor has 2 tools to make editing a root template's AI bounds easier: | The AI Bound Editor has 2 tools to make editing a root template's AI bounds easier: | ||
| Line 44: | Line 44: | ||
# The [[#Auto Size Tool|Auto Size Tool]] | # The [[#Auto Size Tool|Auto Size Tool]] | ||
| − | + | <br/> | |
==== Resize Interaction Mode ==== | ==== Resize Interaction Mode ==== | ||
[[File:AIBoundEditor_Tools_ResizeInteractionMode.png]] | [[File:AIBoundEditor_Tools_ResizeInteractionMode.png]] | ||
| Line 56: | Line 56: | ||
# Click the resize interaction mode toggle button | # Click the resize interaction mode toggle button | ||
# Mouse over the face you want to expand or contract | # Mouse over the face you want to expand or contract | ||
| − | ## For cylinders, this can be the side (radius) or top (height) | + | ## [[File:AIBoundEditor_Tools_ResizeExample_Cylinder.png|top|200px]]<br />For cylinders, this can be the side (radius) or top (height) |
| − | ## For boxes, this can be any individual face (x, z, y), an edge (moves 2 faces) or vertex (moves 3 faces) | + | ## [[File:AIBoundEditor_Tools_ResizeExample_Box.png|top|200px]]<br />For boxes, this can be any individual face (x, z, y), an edge (moves 2 faces) or vertex (moves 3 faces) |
For additional options, right-click the resize interaction mode button. | For additional options, right-click the resize interaction mode button. | ||
| − | + | <br/> | |
==== Auto Size Tool ==== | ==== Auto Size Tool ==== | ||
[[File:AIBoundEditor_Tools_AutoSize.png]] | [[File:AIBoundEditor_Tools_AutoSize.png]] | ||
Latest revision as of 19:14, 2 August 2017

Contents
Opening the AI Bound Editor

A dockpanel containing a Root Template Panel and a Sidebar Panel showing the location of the AI Bounds property
To open the AI Bound Editor to edit the bounds of a character or item:
- Open the Root Template Panel and select the root template of the character or item you want to edit
- Select and open the Sidebar Panel via View > SideBar or press <Ctrl + B>
- Select the "Bounds" property in the PropertyGrid and click the [..] button to the right
Using the AI Bound Editor

Each component of the AI Grid Panel numbered
The AI Bound Editor has the following components:
- Save/Load
- AI Bound Properties
- AI Bound Editing Tools
- Renderview
Save and Load
The save button applies the AI bounds, the load button restores the AI bound properties back to original (how they were when you opened the panel)
AI Bound Properties
The AI bound properties box shows the AI bounds of your template in meters, and consists of 2 components:
-
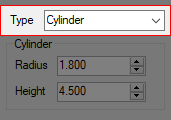
The AI bound type [1] [2] -
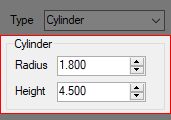
The AI bounds


[1] The AI bound type determines whether the template has no AI bound (None), a cylindrical AI bound (Cylinder) or a box AI bound (Box)
[2] For performance reasons, cylindrical AI bounds are turned off for items
AI Bound Editing Tools
The AI Bound Editor has 2 tools to make editing a root template's AI bounds easier:
Resize Interaction Mode
![]() The resize interaction mode toggle
The resize interaction mode toggle
The resize interaction mode works the same way as the Shape Edit Interaction Mode, providing a visual representation of the template's AI Bounds which you can click and drag.
To use the resize interaction mode:
- Make sure your template has the correct AI bounds shape (box or cylinder)
- Click the resize interaction mode toggle button
- Mouse over the face you want to expand or contract
-
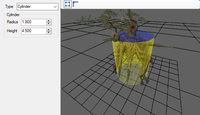
For cylinders, this can be the side (radius) or top (height) -
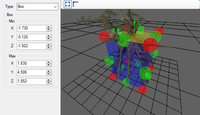
For boxes, this can be any individual face (x, z, y), an edge (moves 2 faces) or vertex (moves 3 faces)
-


For additional options, right-click the resize interaction mode button.
Auto Size Tool
![]() The auto size tool
The auto size tool
The auto size tool automatically resizes the AI bounds to fit the template's visual.
To use this tool, simply assign the correct visual to your template and click the auto size button.